ActiveDEMAND
The ActiveDEMAND modules allow you to watch, create, update, list, retrieve, and delete the contacts, and histories in your ActiveDEMAND account.
Getting Started with ActiveDEMAND
Prerequisites
An ActiveDEMAND account
In order to use ActiveDEMAND with Make, it is necessary to have an ActiveDEMAND account. If you do not have one, you can create an ActiveDEMAND account at activedemand.com.
Note
The module dialog fields that are displayed in bold (in the Make scenario, not in this documentation article) are mandatory!
Connecting ActiveDEMAND to Make
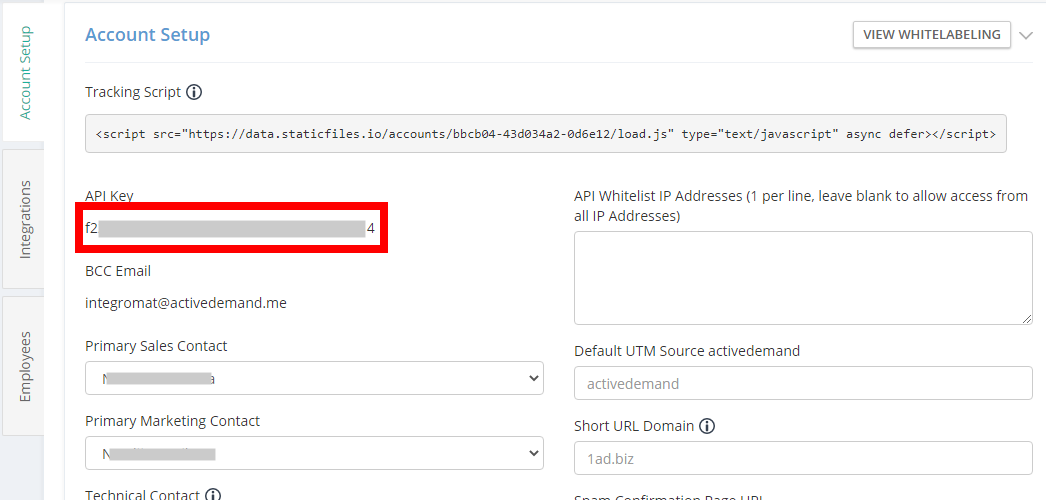
To connect your ActiveDEMAND account to Make you need to obtain the API Key from your ActiveDEMAND account and insert it in the Create a connection dialog in the Make module.
Log in to your ActiveDEMAND account.
From the Dashboard, click Your Profile Icon > Account Settings.
Copy the API Key to your clipboard.
Go to Make and open the Create a connection dialog.
In the Connection name field, enter a name for the connection.
In the API Key field, enter the API key copied in step 3, and click Continue.
The connection has been established.
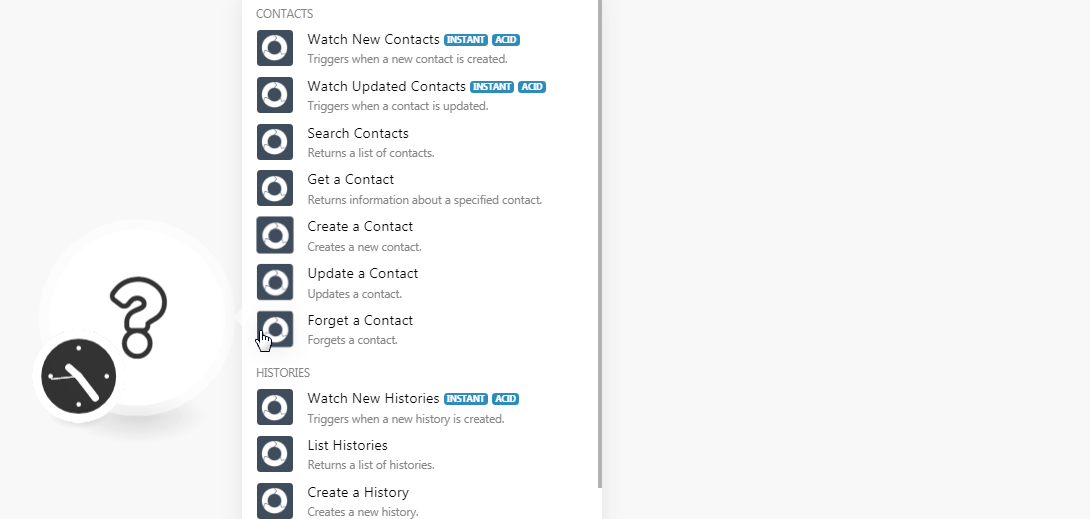
Contacts
You do not have to add the webhooks in the ActiveDEMAND as it is automatically done for you once you add and save an instant trigger module to your scenario.
Triggers when a new contact is created.
Webhook Name | Enter a name for the webhook. |
Connection |
Triggers when a contact is updated.
Webhook Name | Enter a name for the webhook. |
Connection |
Returns a list of contacts.
Connection | |
Search | Enter the text or phrase to search the contacts based on the specified query. |
List ID | Select the List ID whose contacts you want to search. |
Tag | Enter the tags to searches the contacts based on specified tags. |
Order | Select the order in which you want to list the contacts:
|
Order by | Select the option to list the contacts:
|
Created Not Later Than | Enter the date to list the contacts created on or before the specified date. |
Updated Not Later Than | Enter the date to list the contacts updated on or before the specified date. |
Include Timeline | Select whether to include the contact's timeline in the results. |
History Type | Select the history type to list contacts with the specified history. For example, |
Limit | Set the maximum number of contacts Make should return during one scenario execution cycle. |
Returns information about a specified contact.
Connection | |
Contact ID | Select the Contact ID whose details you want to retrieve. |
Creates a new contact.
Connection | |
Email Address | Enter the contact's email address. |
Contact Click To Call Link | Enter the contact's link to use it for calling the contact with a click. |
Contact Lead Score | Enter the contact's lead score. |
First Name | Enter the contact's first name. |
Last Name | Enter the contact's last name. |
Full Name | Enter the contact's full name. |
Title | Enter the contact's job position title. |
DOB | Enter the contact's date of birth. See the list of supported date and time formats. |
Contact Source | Select the source from where you got the contact's details. For example, |
Contact Source Description | Enter the details of the contact's source. |
Industries | Enter the industries that the contact or contact's organization associated with. For example, |
Tags | Add the tags for the contact. |
Opted In | Select whether the contacted opted-in for marketing emails. |
Cookie Accepted | Select whether the contact has accepted cookies with the ActiveDEMAND website. |
Unsubscribed | Select whether the contact has unsubscribed from the system to receive marketing emails or calls. |
Contact Manager Email | Enter the contact's contact manager's email address. |
DNI Replace For Contact | Select whether there is a DNI replacement for the contact. |
Gender | Enter the contact's gender details. For example, |
Seniority | Enter the contact's seniority details. |
Bio | Enter the contact's bio details. |
Avatar | Enter the URL address to the contact's avatar. |
Suite No | Enter the contact's suite number. |
Street Address | Enter the street address. |
City | Enter the city name. |
Province/State | Enter the state name. |
Postal/Zip Code | Enter the area postal code. |
Country | Enter the contact's country details. |
Latitude | Enter the contact's location's latitude details. |
Longitude | Enter the contact's location's longitude details. |
Phone Number | Enter the contact's phone number. |
Contact Edit Link | Enter the URL address to the contact's edit. |
Website | Enter the contact's website details. |
Twitter Handle | Enter the contact's Twitter details. |
LinkedIn Handle | Enter the contact's LinkedIn details. |
Facebook Handle | Enter the contact's Facebook details. |
Crunchbase Handle | Enter the contact's Crunchbase details. |
Github Handle | Enter the contact's GitHub details. |
Google+ Handle | Enter the contact's Google+ details. |
AboutMe Handle | Enter the details of the contact's AboutMe. |
Employer Organization | Enter the name of the organization with which the contact is associated with. |
Organization Blocked | Enter whether the organization is blocked. |
Organization Suite No | Enter the contact's organization's suite number. |
Organization Street Address | Enter the contact's organization's street address. |
Organization City | Enter the contact's organization's city name. |
Organization Province/State | Enter the contact's organization's state name. |
Organization Postal/Zip Code | Enter the contact's organization's area postal code. |
Organization Country | Enter the contact's organization country name. |
Organization Latitude | Enter the contact's organization's location latitude address. |
Organization Longitude | Enter the contact's organization's location longitude details. |
Organization Phone Number | Enter the contact's organization's phone number. |
Organization Email Address | Enter the contact's organization email address. |
Organization Website | Enter the contact's organization website URL address. |
Organization Logo (URL) | Enter the URL address for the contact's organization company logo. |
Organization Contact Manager Email | Enter the contact's organization's contact manager's email address. |
Organization Employee Count | Enter the number of employees in the contact's organization. For example, |
Organization Employee Range | Enter the number of employees range in the contact's organization. For example, |
Organization Annual Revenue | Enter the contact's organization's annual revenue income details. |
Organization Description | Enter the details of the contact's organization. |
Organization Industries | Enter the industries in which contact's organization does business. For example, |
Organization Tags | Enter the tags for the contact's organization. |
Organization Technologies | Enter the contact's organization's technology details they deal with. |
Organization Twitter Handle | Enter the contact's organization's Twitter details. |
Organization LinkedIn Handle | Enter the contact's organization's LinkedIn details. |
Organization Facebook Handle | Enter the contact's organization's Facebook details. |
Organization Crunchbase Handle | Enter the contact's organization's Crunchbase details. |
Organization Github Handle | Enter the contact's organization's GitHub details. |
Organization Google+ Handle | Enter the contact's organization's Google+ details. |
Updates contact.
Connection | |
Contact ID | Select the Contact ID whose details you want to update. |
Contact Edit Link | Enter the contact's edit link's URL address. |
Update the details as provided in the Create a contact module.
Forgets a contact.
Connection | |
Contact ID | Select the Contact ID you want to mark as forget. |
Histories
You do not have to add the webhooks in the ActiveDEMAND as it is automatically done for you once you add and save an instant trigger module to your scenario.
Triggers when a new history is created.
Webhook Name | Enter a name for the webhook. |
Connection |
Returns a list of histories.
Connection | |
Campaign ID | Select the Campaign ID whose histories you want to list. |
Contact ID | Select the Contact ID whose histories you want to list. |
History Type | Select the history type to list the histories with the specified history. For example, |
Start Date | Enter the start date of the histories you want to list. |
End Date | Enter the end date of the histories you want to list. |
Contact Group | Select the contact group whose histories you want to list. |
Search | Enter the text or phrase to search the histories based on the specified query. |
Order | Select the order in which you want to list the contacts:
|
Email GUID | Enter the email GUID whose histories you want to list. |
Limit | Set the maximum number of histories Make should return during one scenario execution cycle. |
Creates a new history
Connection | |
History Type | Select the history type you want to create:
|
Email Address | Enter the contact's email address for the deal, or sales notes, or customer event history you want to create. |
Description | Enter the deal or event, or sales note details. |
Comments | Enter the sales note text. |
Value | Enter the deal amount. |
Phone Number | Enter the contact's phone number. |
Name | Enter the custom event name. |
Custom Event Items | Add the custom event items name and details. |
Website | Enter the contact's or contact's company website URL address. |
Contact Date of Birth | Enter the contact's date of birth. See the list of supported date and time formats. |
City | Enter the contact's or contact's company's city name. |
State/Province | Enter the contact's or contact's company's state name. |
Address | Enter the contact's or contact's company's address. |
Zip/Postal Code | Enter the contact's or contact's company's area postal or ZIP code. |
Company Name | Enter the contact's company's name. |
Title | Enter the deal name. |
Country | Enter the contact's or contact's company's country name. |
Full Name | Enter the contact's full name. |
Contact Manager Email | Enter the contact's contact manager's email address. |
Contact ID | Select the Contact ID assigned to this deal, sales note, or event. |
Country Select | Select the country in which deal, sales, or event occurred. |
Last Name | Enter the contact's last name. |
First Name | Enter the contact's first name. |
Created At | Enter the date when the deal, sale, or event occurred. See the list of supported date and time formats. |
Forms
Creates a new form submission.
Connection | |
Form ID | Select the Form ID you want to create and enter the details in the specific form fields. |
Other
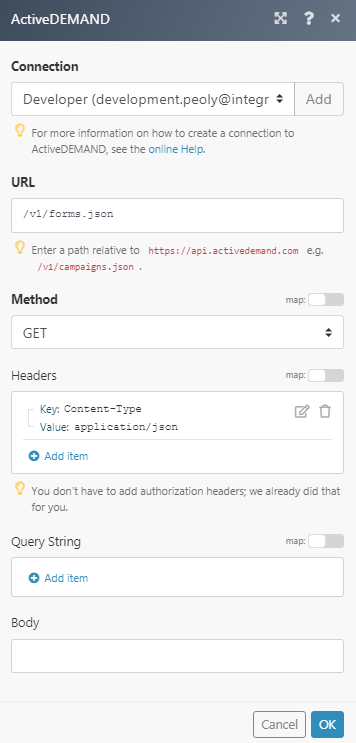
Performs an arbitrary authorized API Call
Connection | |
URL | Enter a path relative to NoteFor the list of available endpoints, refer to the ActiveDEMAND API Documentation. |
Method | Select the HTTP method you want to use: GET to retrieve information for an entry. POST to create a new entry. PUT to update/replace an existing entry. PATCH to make a partial entry update. DELETE to delete an entry. |
Headers | Enter the desired request headers. You don't have to add authorization headers; we already did that for you. |
Query String | Enter the request query string. |
Body | Enter the body content for your API call. |
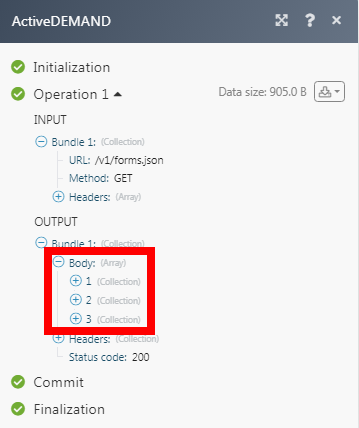
The following API call returns all the forms from your ActiveDEMAND account:
URL:
/v1/forms.json
Method:
GET
Matches of the search can be found in the module's Output under Bundle > Body.
In our example, 3 forms were returned: