PagerDuty
The PagerDuty modules enable you to monitor, retrieve, or update incidents, and create events in your PagerDuty account.
Note
If you are coming from PagerDuty.com looking for assistance with this integration, please submit a support ticket at www.Make.com/en/ticket.
Getting Started with PagerDuty
Prerequisites
A PagerDuty account
In order to use PagerDuty with Make, it is necessary to have a PagerDuty account. If you do not have one, you can create a PagerDuty account at www.pagerduty.com/sign-up.
Note
The module dialog fields that are displayed in bold (in the Make scenario, not in this documentation article) are mandatory.
Connect PagerDuty to Make
To connect your PagerDuty account to Make, follow the general instructions for Connecting to services.
After you click the Continue button, Make will redirect you to the PagerDuty website. After logging in, you will be prompted to grant Make access to your account.

Confirm the dialog by clicking the Authorize button.
Incidents
Retrieves incident details.
Connection | |
Incident | Enter (map) or select the incident you want to retrieve details about. |
Sends an event. Sent events are routed to a PagerDuty service and processed. Sent events may result in a new alert and/or incident being created, or an existing alert or incident being updated or resolved.
Connection | |||||||
Routing key | Enter the 32-character Integration Key for integration on a service or a global ruleset. | ||||||
Event Action | Select the type of event.
| ||||||
Summary | Enter a brief text summary of the event. This is used to generate the summaries/titles of any associated alerts.The maximum permitted length of this property is 1024 characters. | ||||||
Severity | Select the perceived severity of the status the event is describing with respect to the affected system. | ||||||
Source action | Enter the unique location of the affected system, preferably a hostname or FQDN. | ||||||
Timestamp | Enter the time and date when the emitting tool detected or generated the event. Please see the list of supported date and time formats. | ||||||
Component | Specify the component of the source machine that is responsible for the event, for example | ||||||
Group | Enter the logical grouping of components of a service, for example | ||||||
Class | The class/type of the event, for example | ||||||
Dedup Key | Enter a deduplication key for correlating triggers and resolves. The maximum permitted length of this property is 255 characters. Every event has a Submitting subsequent events for the same Subsequent events for the same If a trigger event is sent without Alerts can be further grouped into Incidents, for centralizing incident response and context. For more information on the way events, alerts, and incidents interact, please see this knowledge base article. | ||||||
Client | Enter the name of the monitoring client that is triggering this event, e.g., Sample Monitoring Service. | ||||||
Client URL | Enter the URL of the monitoring client that is triggering this event, e.g., https://monitoring.service.com/. | ||||||
List of images to include | Add images that will be attached to the incident.
| ||||||
List of links to include | Add text links that will be attached to the incident.
|
Allows you to acknowledge, resolve, or escalate an incident.
Connection | |
Incident to update | Select the incident or map the ID of the incident you want to update. |
Event action name | Select the type of incident. |
Status | Select the new status of the incident. |
Incident title | Enter the new title of the incident. |
Escalation level | Enter the number of the escalation level to escalate the incident to this level in the escalation policy. |
Urgency | Enter the urgency of the incident, e.g., High. |
Triggers when a new incident is created or when an existing incident's status is updated.
The webhook URL needs to be generated in Make and then added to PagerDuty service's integration as an extension.
Add Watch Incidents module to your Make scenario.
Generate and copy the webhook URL.
Log in to your PagerDuty account.
Navigate to Configuration > Services, then click the name of the service you want to add a webhook to.
Open the Integrations tab, in the Extensions and Add-Ons section, click Add or manage extensions for this service, and then click the New Extension button.
For the Extension Type, select the Generic V2 Webhook option.
Enter the name of your webhook, and enter the URL you have copied in step 2.
Click Save.
Now, every time the incident is created or its status is updated, the Watch Incidents module in your scenario is triggered.
Other
Retrieves the on-call entries during a given time range for the specified user.
Connection | |
Limit | Set the maximum number of on-calls Make will return during one execution cycle. |
Earliest | Enable this option to filter on-calls so that only the earliest on-call for each combination of escalation policy, escalation level, and user is returned. This is useful for determining when the "next" on-calls are for a given set of filters. |
Escalation policy IDs | Add escalation policies to filter returned on-calls by. |
Include | Specify additional details you want to include in the result. |
Schedule IDs | Add schedule IDs to filter returned on-calls by. |
Since | Enter the start of the time range over which you want to search. If an on-call period overlaps with the range, it will be included in the result. The start of the time range defaults to the current time. The search range cannot exceed 3 months. Please see the list of supported date and time formats. |
Time zone | Specify the time zone in which the dates in the result will be rendered. |
Total | By default, the See PagerDuty Pagination Docs for more information. |
Until | Enter the end of the time range over which you want to search. If an on-call period overlaps with the range, it will be included in the result. Please see the list of supported date and time formats. |
User IDs | Add users you want to filter returned on-calls by. |
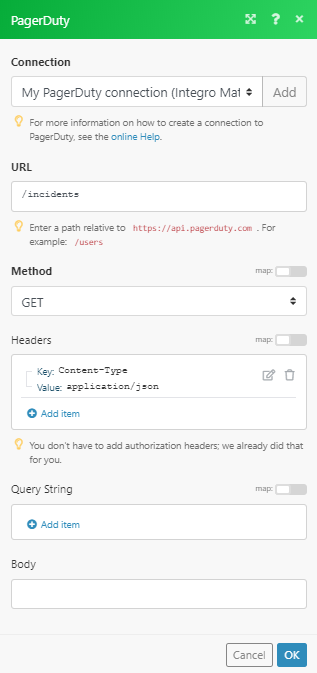
Allows you to perform a custom API call.
Connection | |
URL | Enter a path relative to NoteFor the list of available endpoints, refer to the PagerDuty API Documentation. |
Method | Select the HTTP method you want to use: GET to retrieve information for an entry. POST to create a new entry. PUT to update/replace an existing entry. PATCH to make a partial entry update. DELETE to delete an entry. |
Headers | Enter the desired request headers. You don't have to add authorization headers; we've already done this for you. |
Query String | Enter the request query string. |
Body | Enter the body content for your API call. |
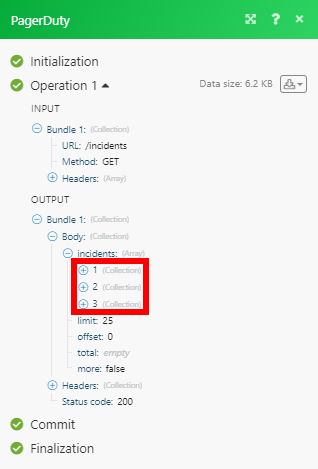
The following API call returns all incidents in your PagerDuty account:
URL:
/incidents
Method:
GET
The result can be found in the module's Output under Bundle > Body > dashboards.
In our example, 3 incidents were returned: