Tumblr
The Tumblr modules enable you to watch, create, update, list, and delete posts in your Tumblr account.
Getting Started with Tumblr
Prerequisites
A Tumblr account
In order to use Tumblr with Make, it is necessary to have a Tumblr account. If you do not have one, you can create a Tumblr account at www.tumblr.com.
Connecting Tumblr to Make
1. Go to Make and open the Tumblr module's Create a connection dialog.
2. Enter the name of the connection to the Connection name field and click Continue.
After you click the Continue button, Make will redirect you to the Tumblr website where you will be prompted to grant Make access to your account.
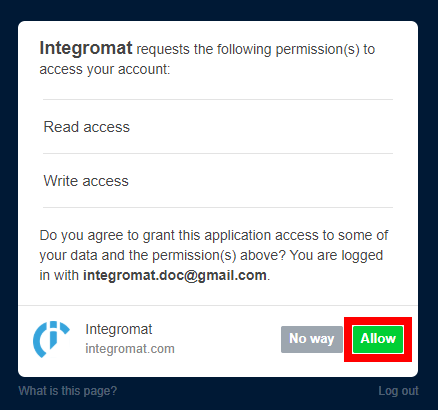
3. Confirm the dialog by clicking the Allow button.
Posts
Retrieves post details when a new post is posted.
Connection | |
Blog | Select the blog you want to watch for new posts. |
Type | Select the type of post you want to return. No option selected – returns all types. |
Limit | Set the maximum number of posts Make will return during one execution cycle. |
Retrieves details of the posts that you liked.
Connection | |
Limit | Set the maximum number of posts Make will return during one execution cycle. |
Retrieves details of a post that is tagged with a specified tag.
Connection | |
Tag | Enter the tag you want to filter returned posts by. |
Limit | Set the maximum number of posts Make will return during one execution cycle. |
Creates a new post.
Connection | |||||||||||||||||||||||||||||||||||||||||||||||||||||||||||||||||
Blog | Select or map the blog you want to create a new post for. | ||||||||||||||||||||||||||||||||||||||||||||||||||||||||||||||||
Type | Select the type of the new post.
| ||||||||||||||||||||||||||||||||||||||||||||||||||||||||||||||||
State | Select the new post state. Default is
| ||||||||||||||||||||||||||||||||||||||||||||||||||||||||||||||||
Tags | Enter tags you want to associate with the post. | ||||||||||||||||||||||||||||||||||||||||||||||||||||||||||||||||
Send to Twitter | Select Yes to share the post via any connected Twitter account when the post is published. Defaults to the blog's global setting. | ||||||||||||||||||||||||||||||||||||||||||||||||||||||||||||||||
Publish On | Enter the exact date and time (ISO 8601 format) to publish the post, if desired. This parameter will be ignored unless the | ||||||||||||||||||||||||||||||||||||||||||||||||||||||||||||||||
Format | Select the format type of the post. | ||||||||||||||||||||||||||||||||||||||||||||||||||||||||||||||||
Slug | Enter a short text summary to the end of the post URL. | ||||||||||||||||||||||||||||||||||||||||||||||||||||||||||||||||
Native inline images | Select the Yes option to Convert any external image URLs to Tumblr image URLs. |
Updates an existing post.
Connection | |
Blog | Select or map the blog you want to update the post for. |
Post ID | Enter (map) the ID of the post you want to update. |
Please find the descriptions of the fields in the Create a Post section above.
Connection | |
Blog | Select or map the blog you want to delete the post from. |
Post ID | Enter (map) the ID of the post you want to delete. |
Other
Retrieves user account details.
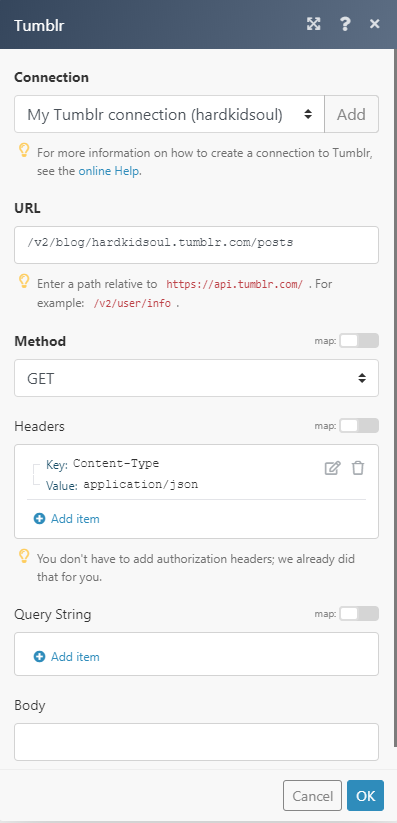
Allows you to perform a custom API call.
Connection | |
URL | Enter a path relative to For example: NoteFor the list of available endpoints, refer to the Tumblr API Documentation. |
Method | Select the HTTP method you want to use:
|
Headers | Enter the desired request headers. You don't have to add authorization headers; we already did that for you. |
Query String | Enter the request query string. |
Body | Enter the body content for your API call. |
The following API call returns all published posts in your Tumblr account:
URL:
/v2/blog/{your-blog-url}/posts/
Method:
GET
The result can be found in the module's Output under Bundle > Body > dashboards.
In our example, 5 posts were returned:
