
Aug 3, 2026 | 5 minutes
How to automate expense reimbursements in Make with AI tools and approvals
A step-by-step guide to building an expense reimbursement scenario in Make that reads receipts with AI, checks them against reported amounts, and routes approvals automatically.

Automating expense reimbursements might seem challenging because it requires comparing reported amounts against actual spending confirmed with receipts and invoices that arrive in various formats and quality. Multiply that by company policies on approving expenses, and you might think it's just not possible and give up.
But in Make, it's pretty straightforward to design an automation for reviewing expenses and sending them for approval or straight to payroll. Especially if you use the new Make AI Content Extractor for reading receipt and invoice content, and the If-Else module for branching.
Here is a breakdown of how to build the scenario.
Make tools to automate expense reimbursements
Before diving into the step-by-step workflow, let's look at the Make features that bring this scenario to life:
Make AI Content Extractor. It reads the content of a file, be it an image, PDF, or audio file. Specifically for the expenses scenario, there are two dedicated modules to extract data from an invoice or a receipt. They work pretty similarly; the key difference is the extra data extracted from the file in addition to line items:
From receipts: Data specific to receipts, such as transaction date, receipt type, and merchant name.
From invoices: Invoice ID, vendor name, and vendor address.
Pick the one that best fits the expense types you usually process.
Make AI Web Search. Comes in handy when there's a data mismatch. Give it instructions on what to look for when the reported amount differs from the confirmed spending, and it will produce a report. That saves a ton of time for both the approver and the accountant.
If-Else and Merge. These are the newest branching modules. We'll use them to split expense review and approval into two routes that eventually return the same outcome, the expense reimbursement request PDF.
Step-by-step: Build the expense reimbursement scenario in Make
Here's the full flow we're going to build:

Step 1: Collect the expense request with Plumsail Forms
The scenario is triggered by a Plumsail Forms → “Watch Form Submitted” module.
Plumsail Forms is a great fit for this kind of workflow, as you can create a single form that collects employee signatures, multi-line expense entries in a table, and receipt or invoice attachments, all without setting up separate file storage.
Step 2: Read all attached files
First, we need to process each attached receipt or invoice individually. Add an Iterator and map it to the attachments array from the submission.
Step 3: Extract data from each receipt with AI
Add the Make AI Content Extractor → “Get data from invoice” module. Map the file content from the iterator output. For every file, the module returns the total amount, vendor, date, and line items. It works out of the box for various file types and formats, and even reads the currency.
Tip: If you expect invoices and receipts to come in various currencies, use the Currency module to convert every extracted invoice amount to your base currency before comparing totals.
Step 4: Aggregate the extracted invoice data into an array
Add an Array aggregator module right after “Get data from invoice”.
We need it to create a single array of line items from all receipts and invoices to later sum the actual spend and analyze mismatches and high spends.
It is important to select the “Read all attached files” iterator as a source module, so you'll get one array per invoice instead of multiple.
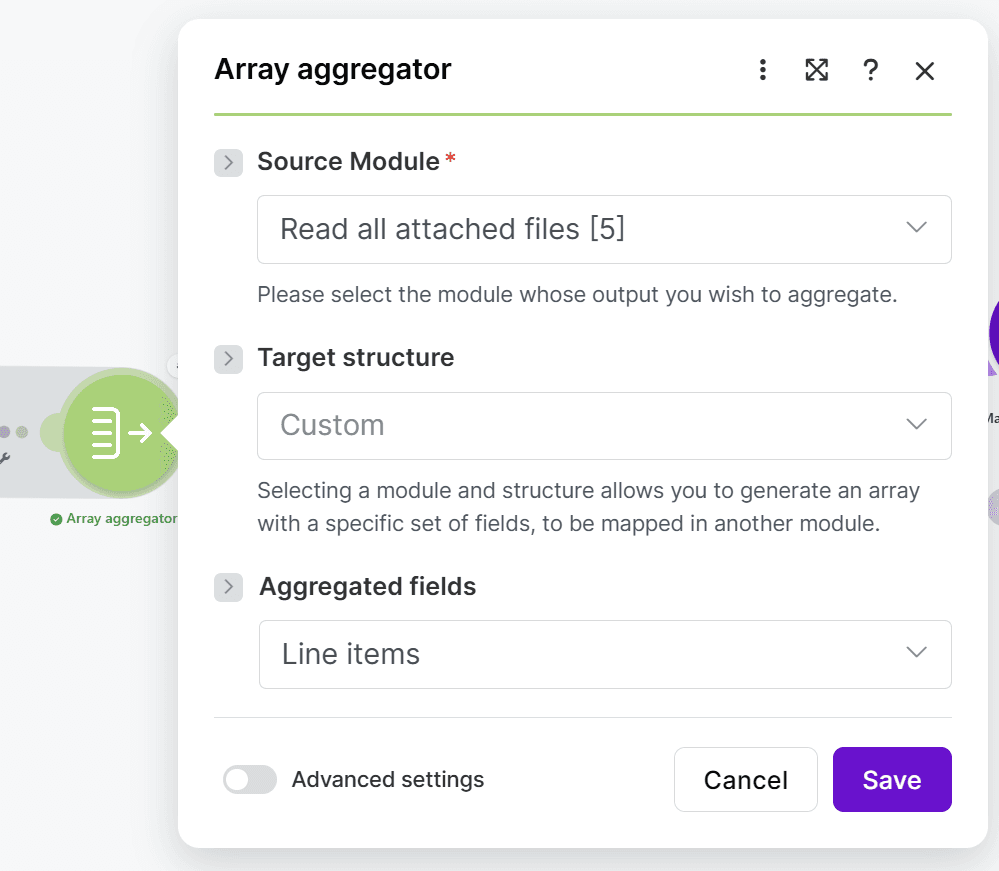
In Aggregated fields, pick only the fields you actually need. Smaller arrays are easier for the AI to reason about later.
Step 5: Sum the extracted invoice totals
Now that we have a single array of invoices, add a Tools → “Set variable” module and name the variable Sum. For the value, use Make's sum() formula directly on the line items inside the aggregated array.
Step 6: Calculate the difference between reported vs. confirmed
Add another Tools → “Set variable” module named Difference and use the abs() formula to calculate the difference between what the employee says they spent and what the receipts prove they spent.
The absolute value means we catch the gap, whether the receipts come up under or over the reported total. We'll use this number in the next step.
Step 7: Route the request with If-Else
We will apply three conditions on the Needs approval branch, each of which triggers the branch:
AmountTotal is greater than $500: large requests always need a manager's eyes.
Difference is greater than $20: the absolute gap between reported and confirmed spending is too big to ignore.
Difference / AmountTotal is greater than or equal to 5%.
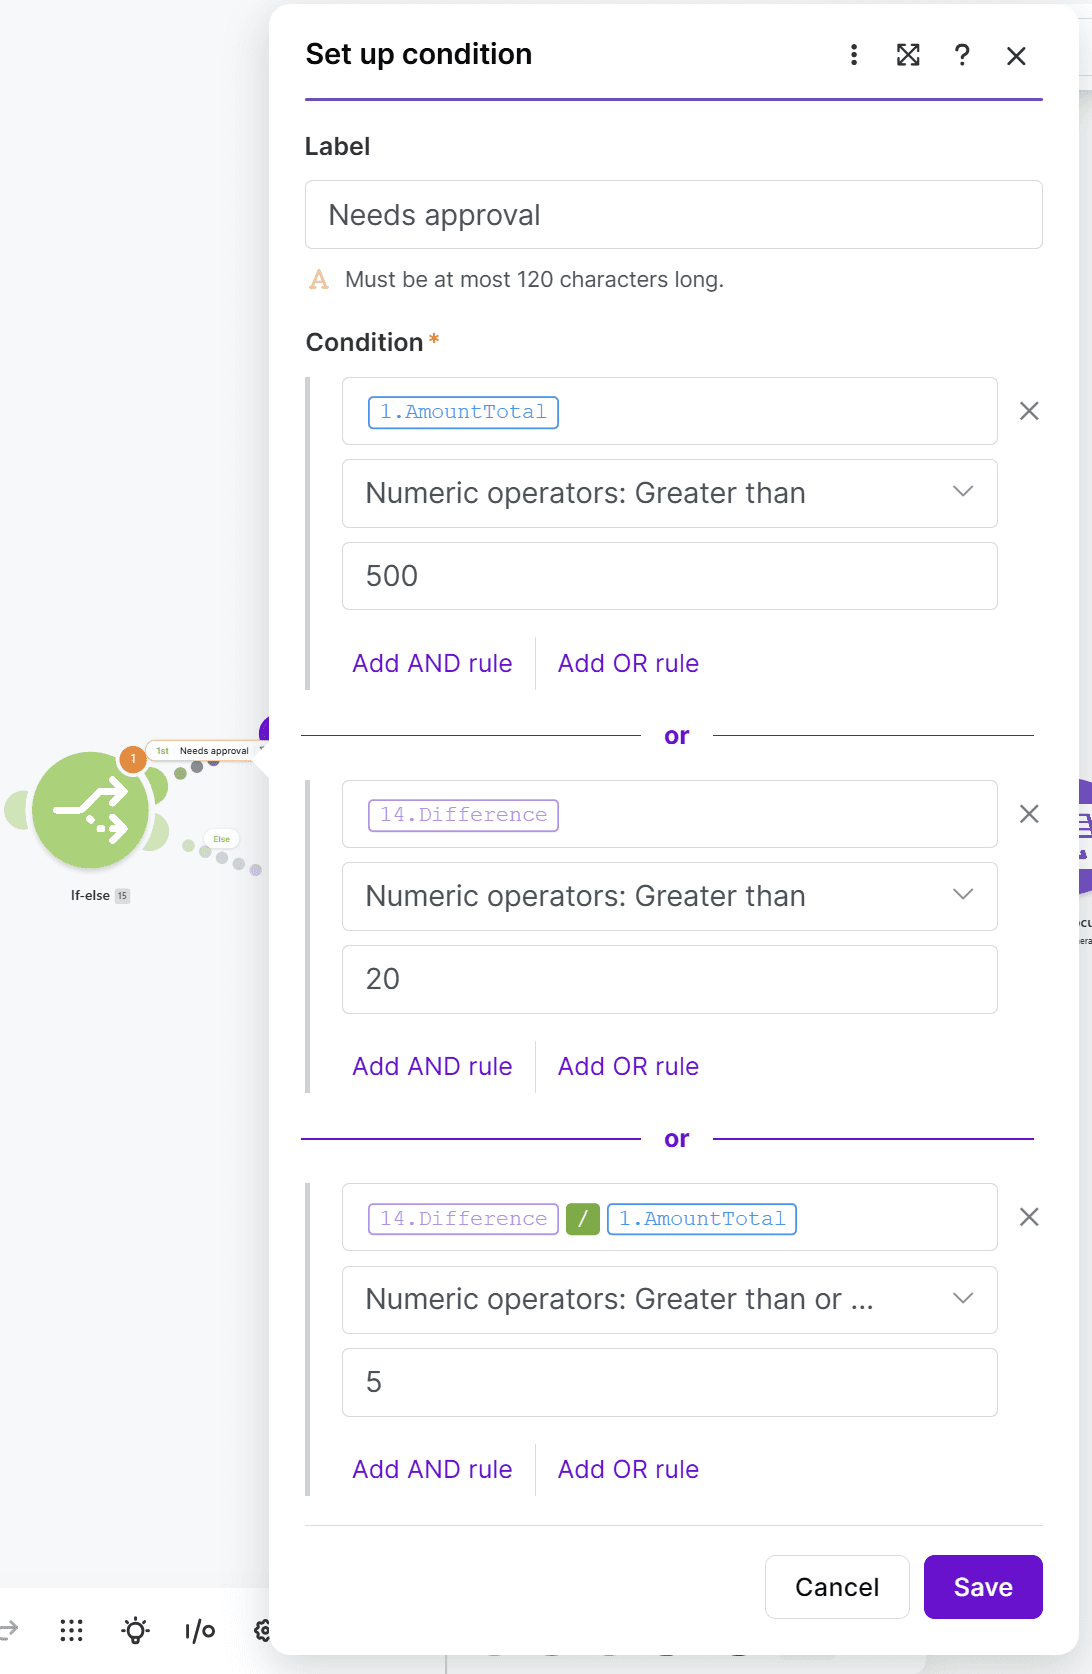
Each branch carries its own context, but the output of each feeds into a single file-creation and email-sending step.
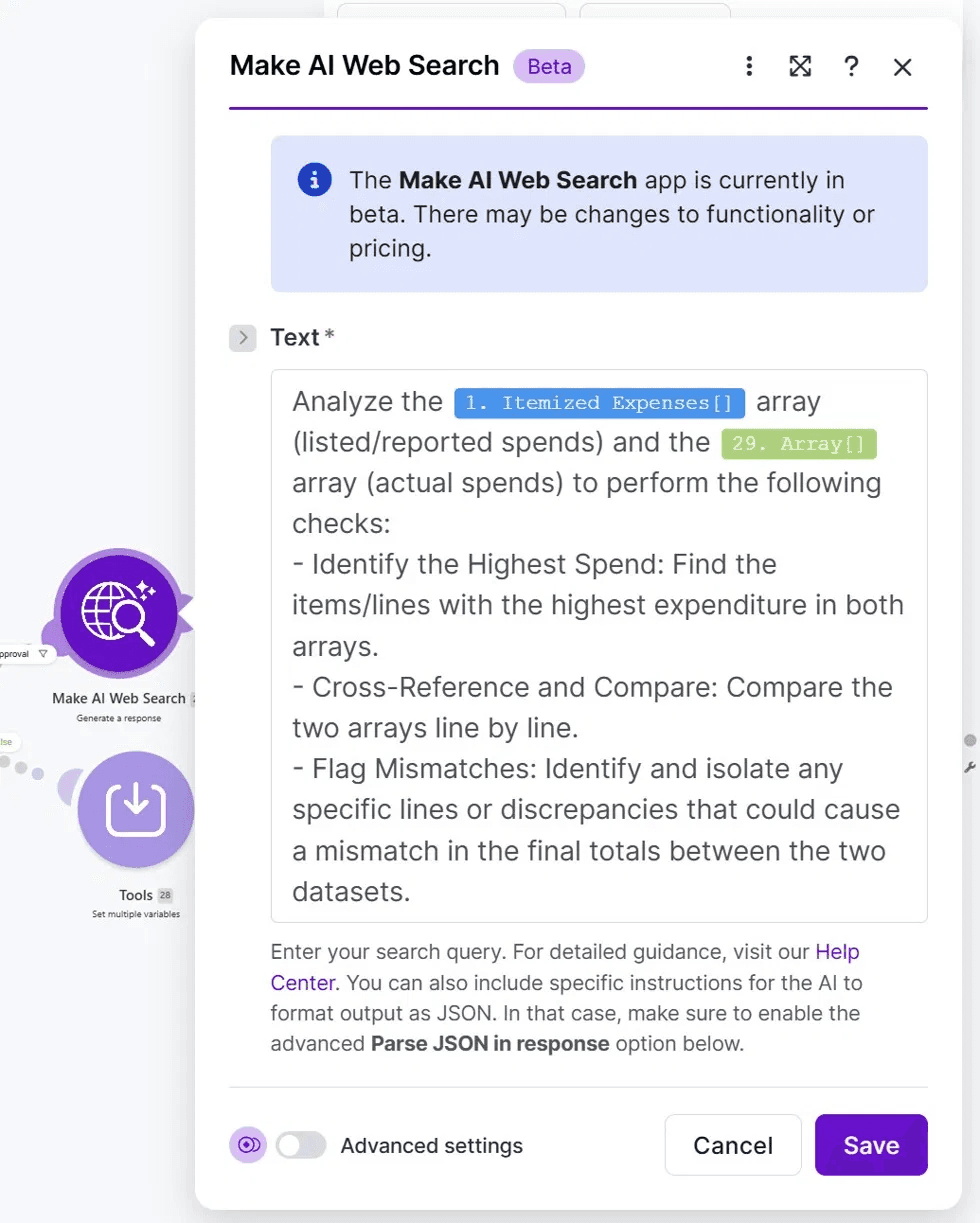
In the Needs approval branch, we add the Make AI Web Search module.
This is where the array we built in Step 4 earns its keep: the AI compares the employee's reported items (the Itemized Expenses array from the form) against the actual items (the aggregated Array from the invoices), line by line.
You can write any instructions you like, but we want ours to identify the highest spends in both arrays, cross-reference them, and flag any specific lines that could cause the mismatch in the totals.
The result becomes part of the message the manager receives.
In both branches, I add an identical Set multiple variables module with three fields: Status, Emails, and Reason.
Needs approval branch: Status = Waiting for approval, Emails = [email protected], Reason = the Make AI Web Search result.
Auto-approve branch: Status = Auto approved, Emails = the payroll address, Reason = a plain note saying the request meets policy.
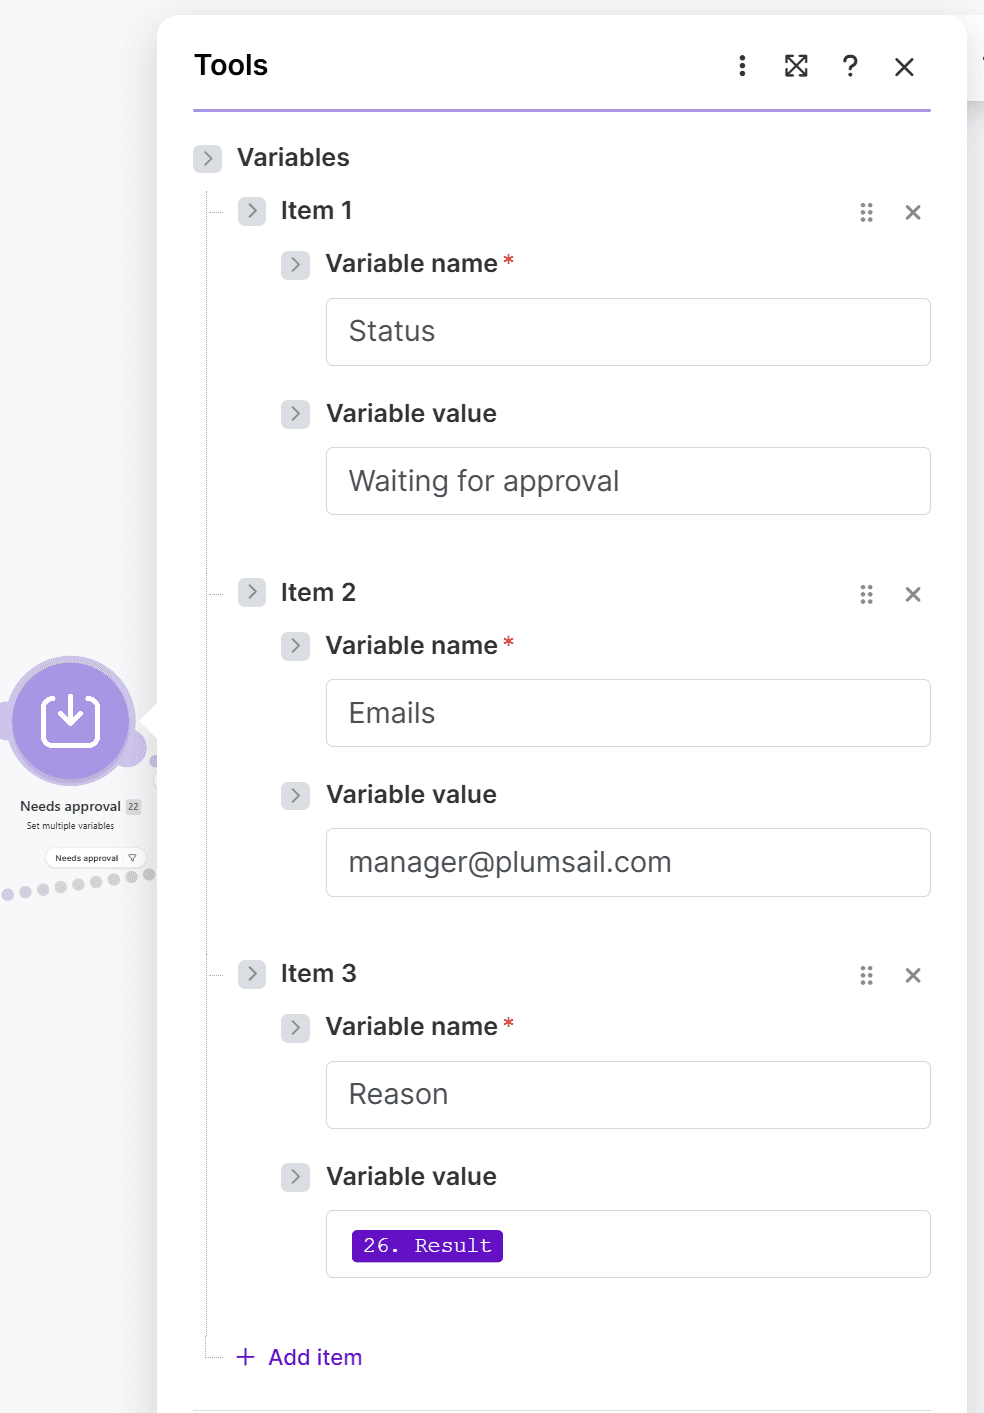
Tip: You can create one module first, then duplicate it and move the copy to the second branch.
Step 8: Merge both branches back into one flow
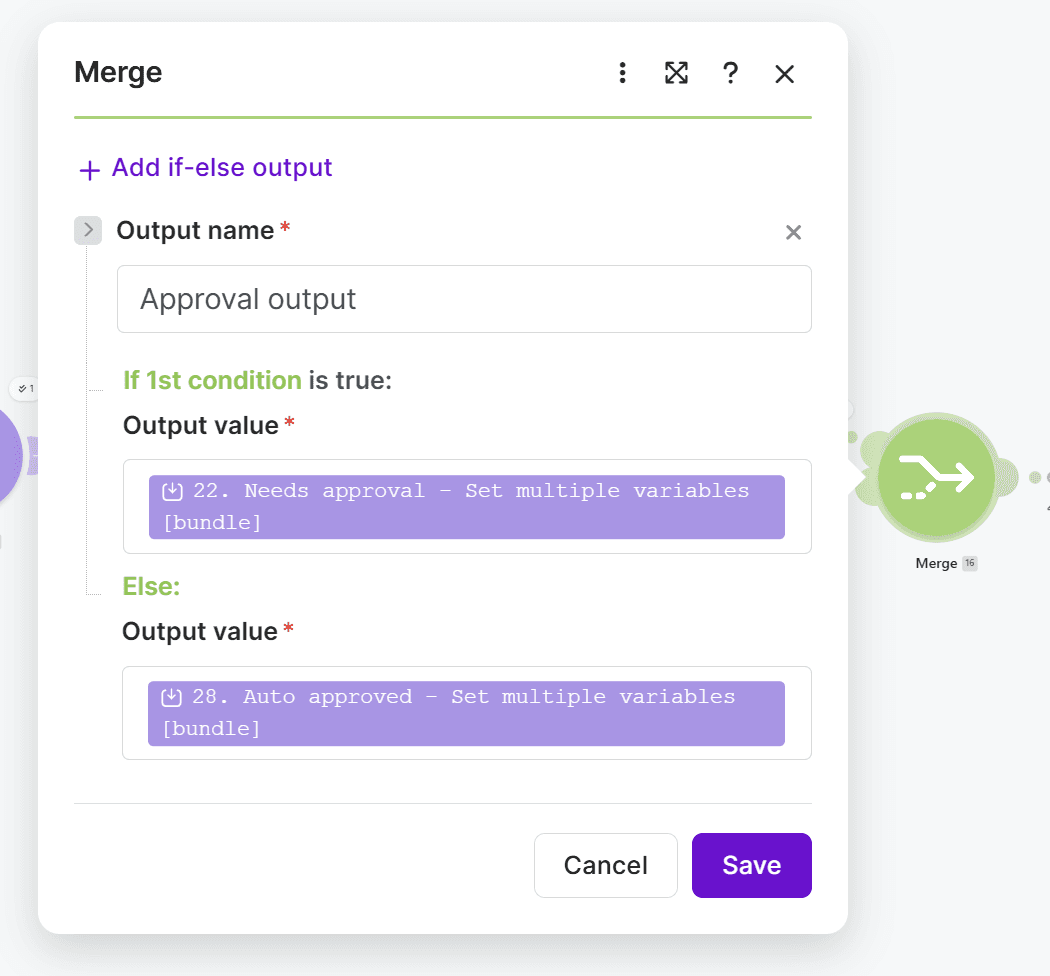
Add a Merge module after the If-Else so both branches feed into the same downstream modules. Name the merge output Approval output and point each route at its respective Set multiple variables bundle.
The variables of each branch (Status, Emails, and Reason) are now available under Approval output to everything that comes after, so the PDF and the email can be generated by a single set of modules instead of duplicated logic.
Step 9: Generate the expense report PDF with Plumsail Documents
Add a Plumsail Documents → “Create document from DOCX template” module after the Merge. You can use your own template or try the one available in Plumsail's template library.
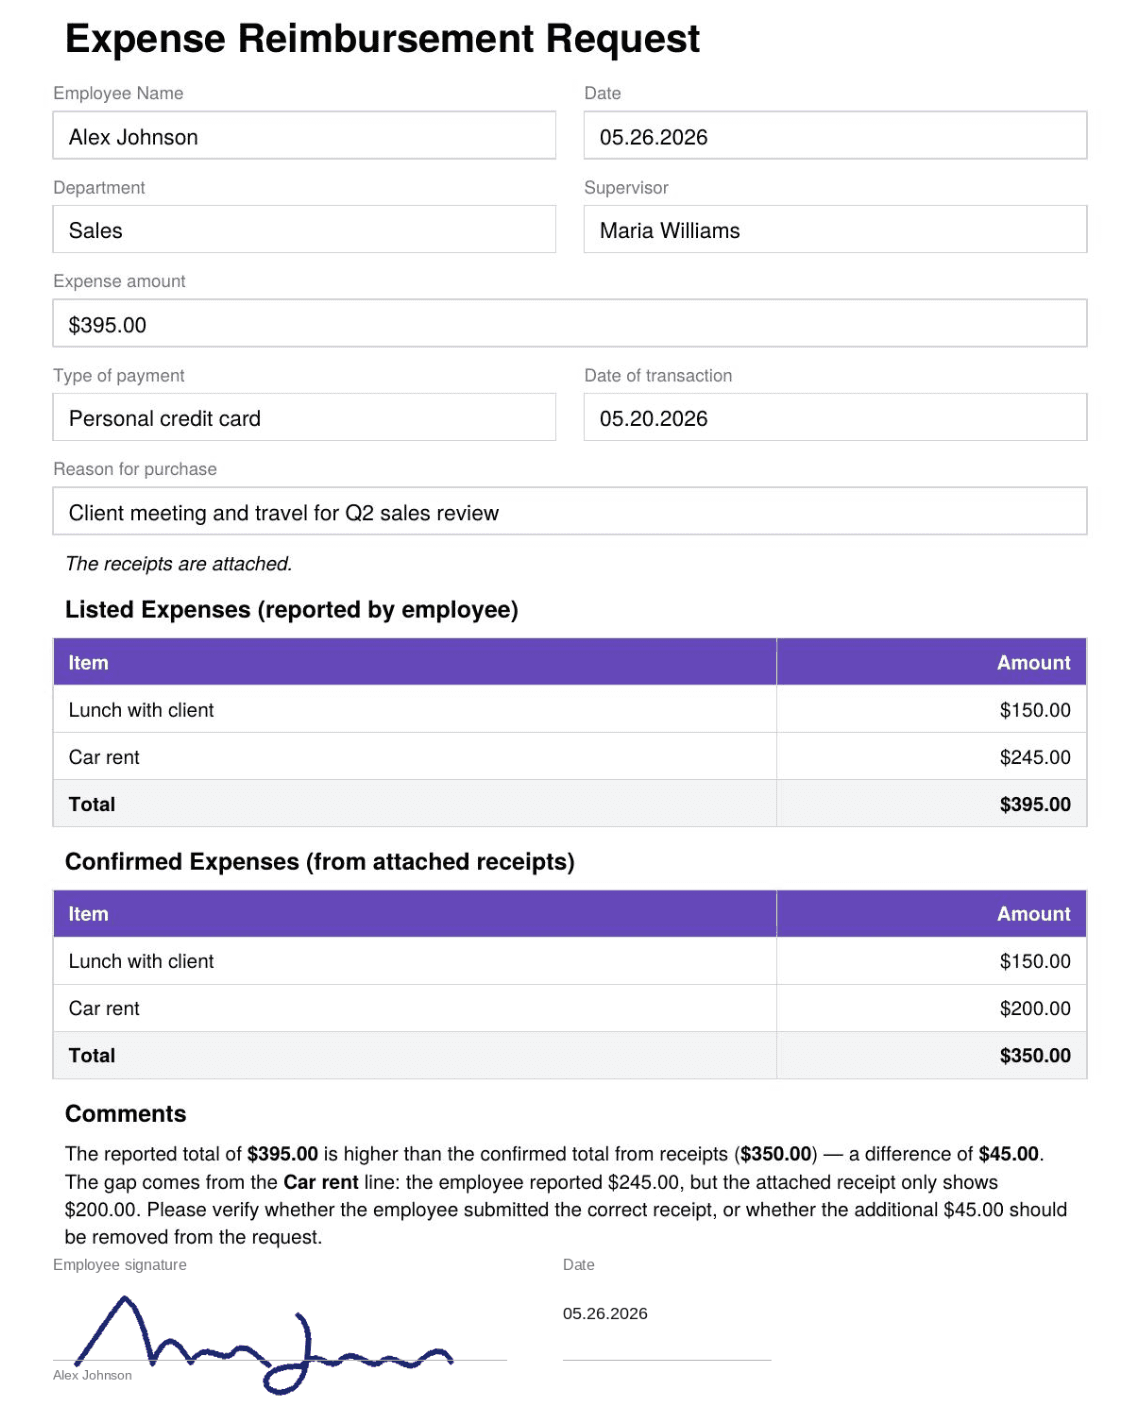
Map the form data and your variables to the template to produce the PDF with a signature.
Here is the PDF we created with this scenario:
Step 10: Send the PDF to the right person
For the final step, share the PDF. You can do this in any way you like: send it to Slack, save it to the system you use for accounting, or forward it by email. We chose to send it via Gmail.
The recipient and email subject are pulled from the variables defined inside the Merge module.
Ways to extend the workflow in Make
Once the core scenario is live, there are plenty of directions to take it:
Policy compliance checks: Use Make AI Tools → Categorize text on each line item to flag categories that don't match your reimbursement policy, like alcohol on a client lunch in a region where it's not allowed.
Multi-level approval: Chain a second If-Else after the first one to route requests over a higher threshold (say, $5,000) to a finance director instead of a line manager, just by setting a different recipient variable.
Wait for approval: Create a separate scenario that triggers after a manager approves or rejects the request. You can use the If-Else and Merge modules in it too.
Getting started
With Make, you can create a scenario that reads every receipt with the AI Content Extractor, compares the actual amounts against the reported total, and routes large or mismatched requests for manager review while auto-approving the rest.
What used to be a back-and-forth of emails, spreadsheets, and receipt-by-receipt checks now runs end-to-end in a single Make scenario, with AI catching the things that would normally need a second pair of eyes.
Ready to make the automation revolution happen?