Feb 13, 2025 | 7 minutes
Make and MindStudio - a solution to email overload
Remember the days of drowning in a sea of emails, desperately trying to sort through newsletters, marketing blasts, and urgent requests? Those days are over.
This guide will walk you through using AI to automatically label and organize all incoming emails. This is important for every professional receiving hundreds of emails per day to keep their sanity and only reply to the ones that matter. AI is incredibly accurate and will replace all deterministic logic in your inbox.
Introduction to AI-powered email labeling
AI email labeling solutions use artificial intelligence to organize emails automatically using advanced models that go far beyond an “if/then” rule you can set up in Gmail. Think of it as a digital assistant that understands the content of your emails and sorts them into relevant categories.
The difference between AI labeling and basic filters that follow match patterns is the fuzzy logic. With AI models, you don’t need to specify rules like “if the email contains ‘stripe’ then label it as ‘billing’”. Large language models are capable of understanding context, have knowledge of the surrounding topics, and can properly assign your emails to one of your predefined labels without any real trigger or rule other than... asking.
This effectively means that no matter what and who sends you an email, AI will be able to read it, understand it, label it, and organize it for you in a few seconds. And it can do so programmatically, 24/7.
Building your AI email tagging workflow
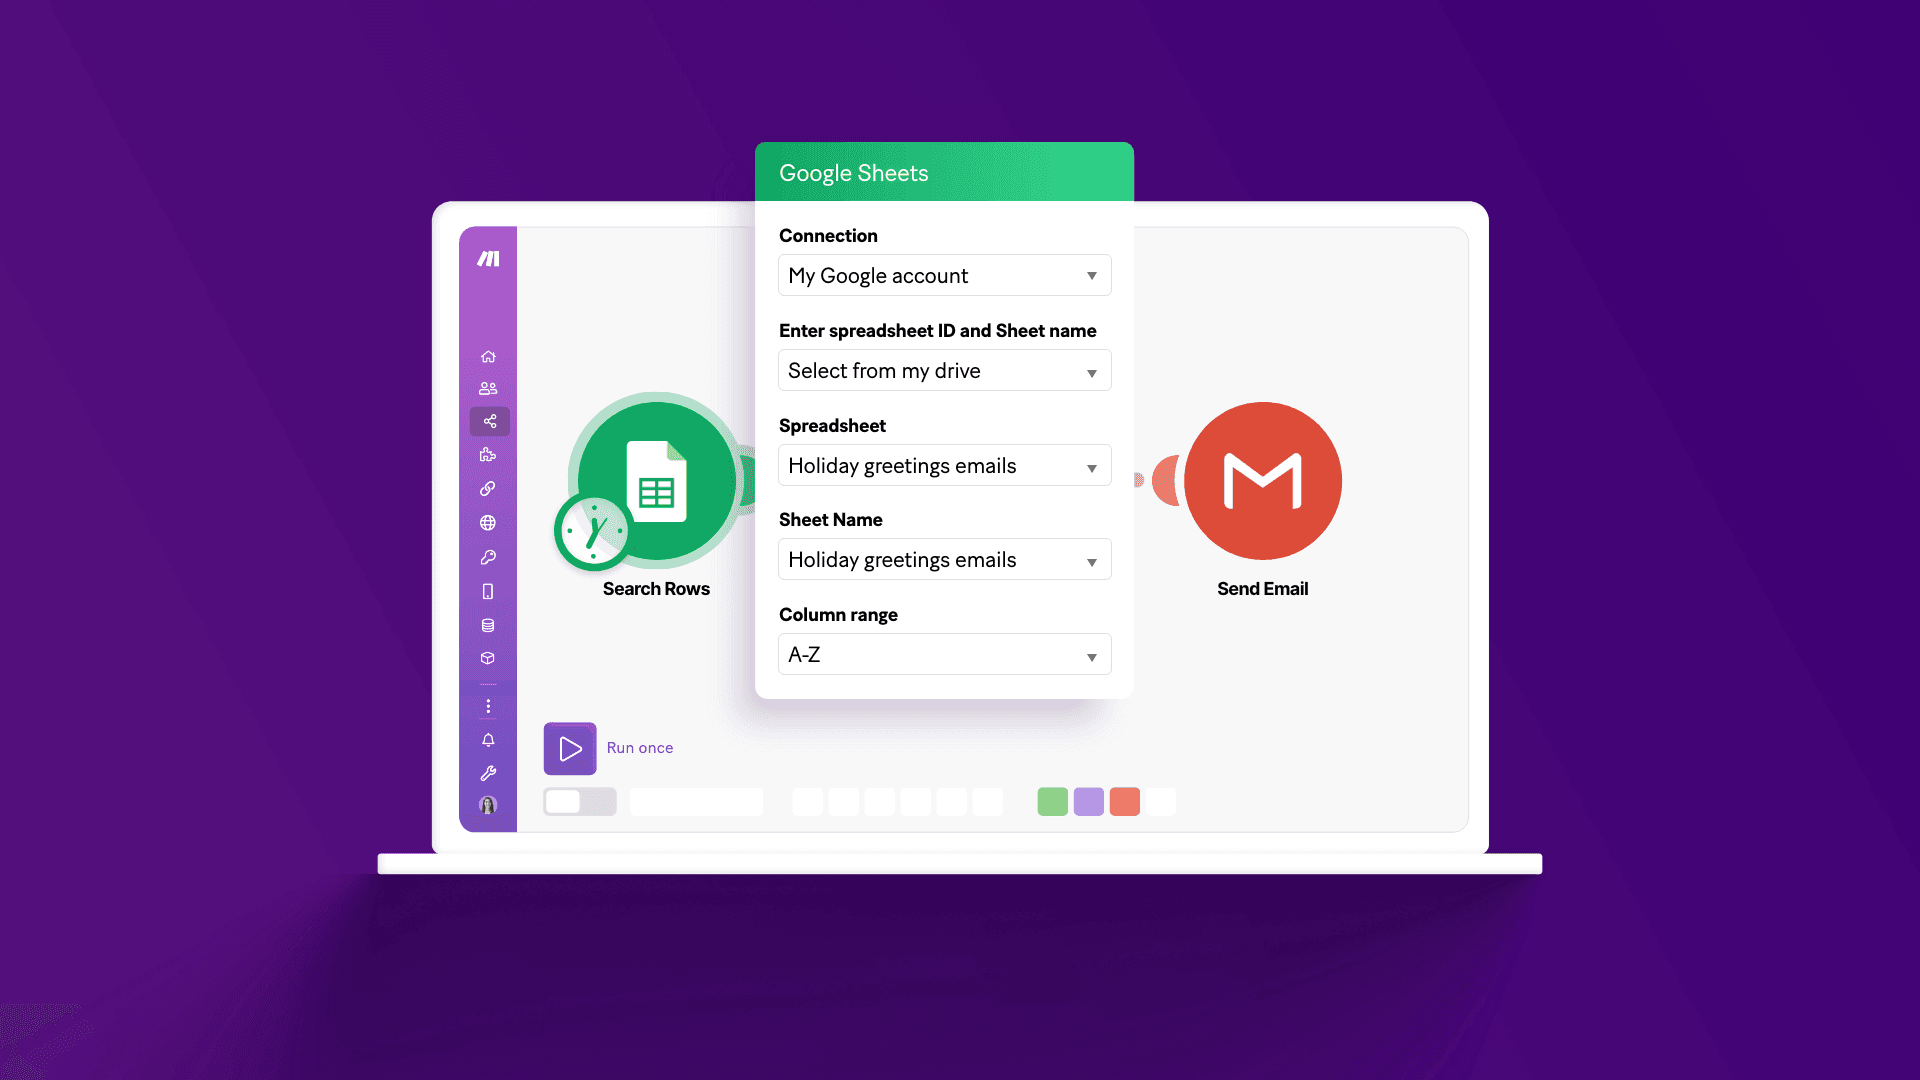
To get started, you’ll need a workflow that takes in all incoming emails, labels them, and outputs the label for each. This is what the organization actually looks like: automatic labels for your account.
You can fetch all emails and tag them using Make.com, but you’ll need AI to create the logic for tagging. In this example, we’re going to use MindStudio.
MindStudio is a powerful low-code platform that allows you to build custom AI workflows without writing code. Think of it as your IDE whether you’re technical, non-technical, or a mix of the two.
When using MindStudio flows through Make.com, you get several advantages over using OpenAI's module directly:
Access to over 50 different AI models
The platform is model-agnostic, so you're not locked into one provider
It supports image, audio, and text generation
It includes web scrapers and integrations with platforms like X, LinkedIn, and Google Trends
Multi-step AI workflows, you can have 10+ steps in one and call only one operation from Make
You can access all these features by calling your MindStudio flow directly from Make.com. It’s as easy as copying and pasting a couple of authorization tokens.
Let’s get started with the build.
Create the AI Agent in MindStudio
Sign up for free
You'll need an account to build any workflow in the platform. Signing up is free, and there’s no need to pay for a subscription. The forever free plan comes with $5 one-time in AI compute credits (that’s over 14,000 articles generated with cheap models like Gemini 1.5 Flash) and 10,000 free API runs per month.
Generate your first agent
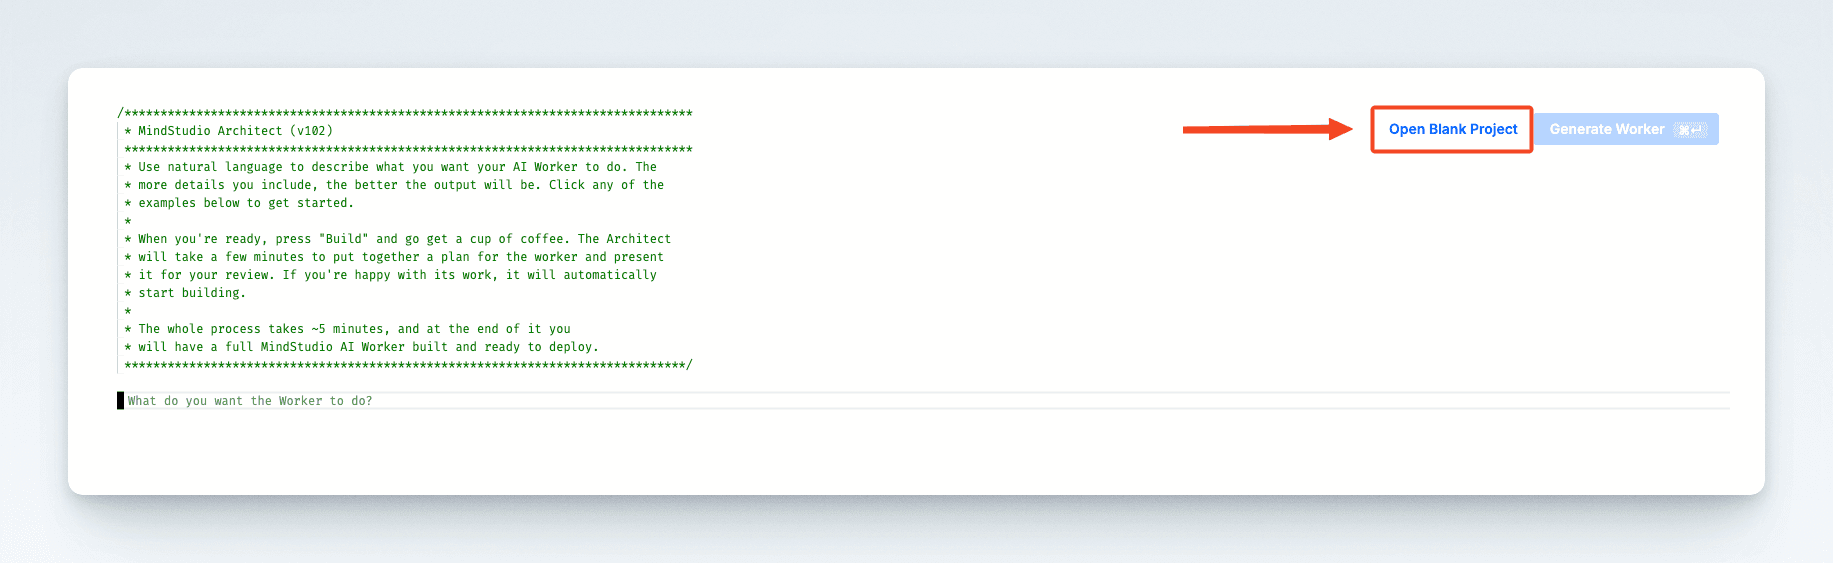
To create your first agent, click on “Create AI Agent” and “Open Blank Project”
MindStudio agents can run within the user interface or through API. Given the emails will be coming from Make modules, we need an agent that runs through API.
Note: if you don’t want to set all this up manually, you can use the “Generate Agent” feature.
Set up the API variables
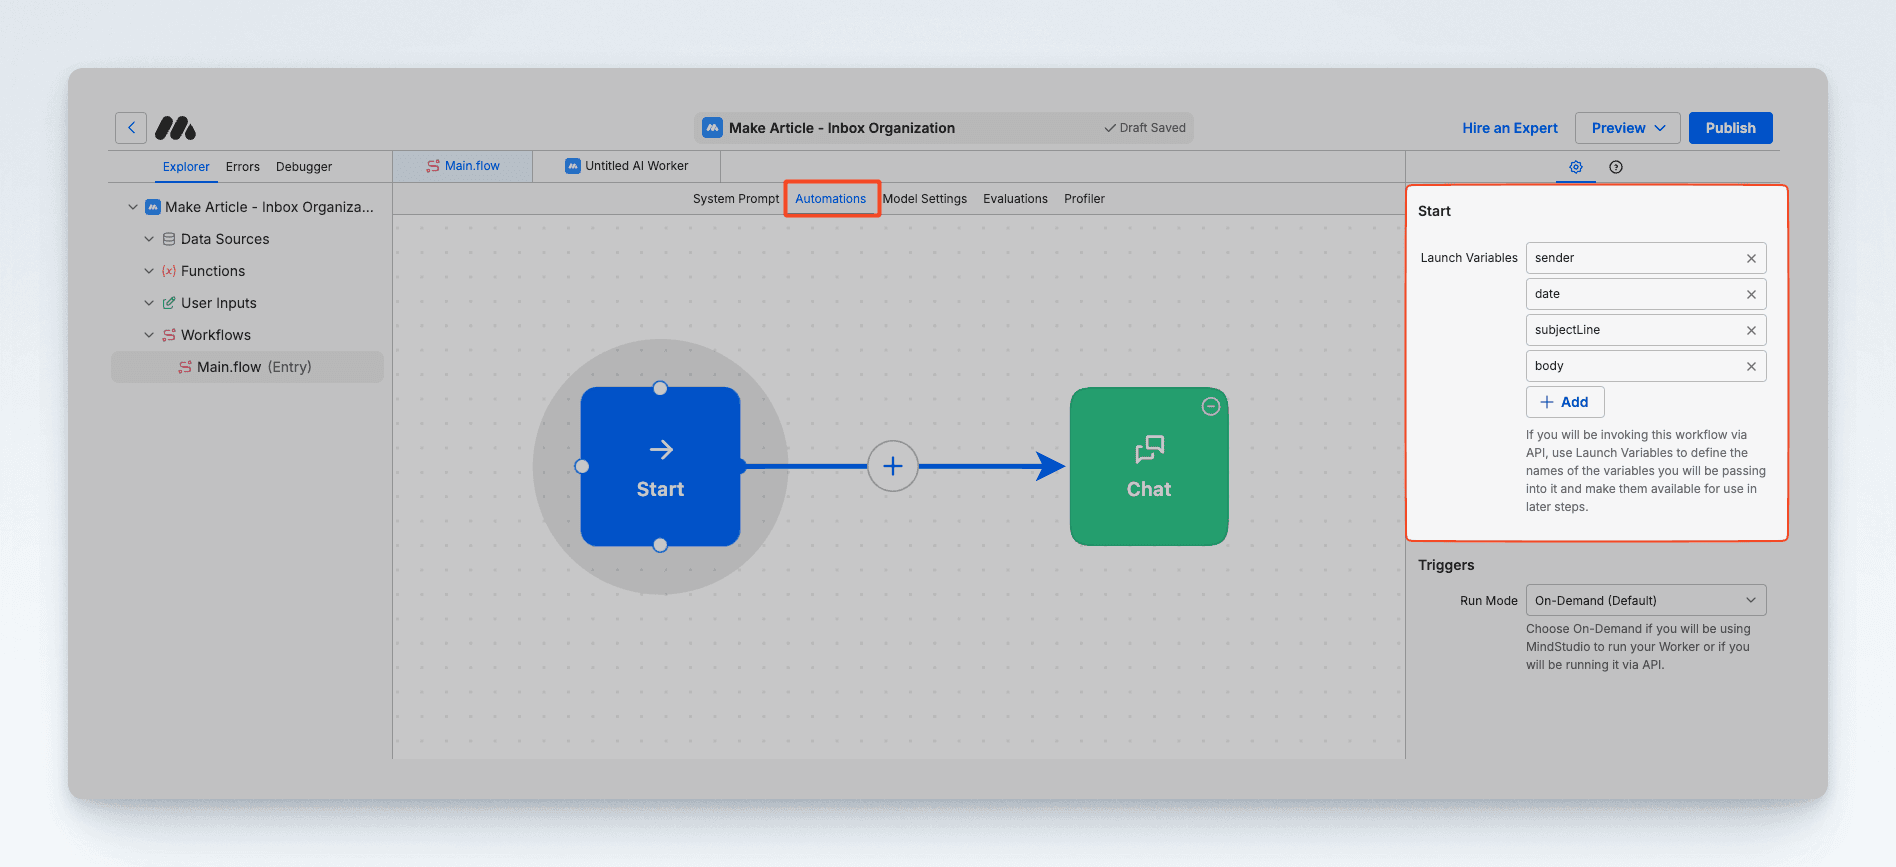
To initialize variables in the workflow, click on the “Start” block, the first blue module in the automation canvas, and initialize the variables you need to label the emails. For example:
Sender: this is important to recognize if it’s an internal or external email
Date: to give AI context about urgency and deadlines
Subject Line: to understand the topics
Body: to finalize the labeling with complete understanding
Generate the labels
It’s time to decide on labels. In our example, we’ll use billing, internal, urgent, newsletter, and announcement.
You can have as many or as few as you like. The best part about building your AI solutions is that you get to decide what matters most to your business.
To uphold the labels, we need two components: a system message, which is the AI’s main prompt (aka the “personality” or scope of the tool), and a Generate Text block, the actual prompt to generate the label. Let’s start with the main prompt. Something along the lines of:
“Assistant is an email inbox organizer.
It takes in emails from the user's Gmail inbox (passed via API) and labels them according to the user requirements.
Assistant does not assist in anything unrelated to email labeling, and strives to be truthful”
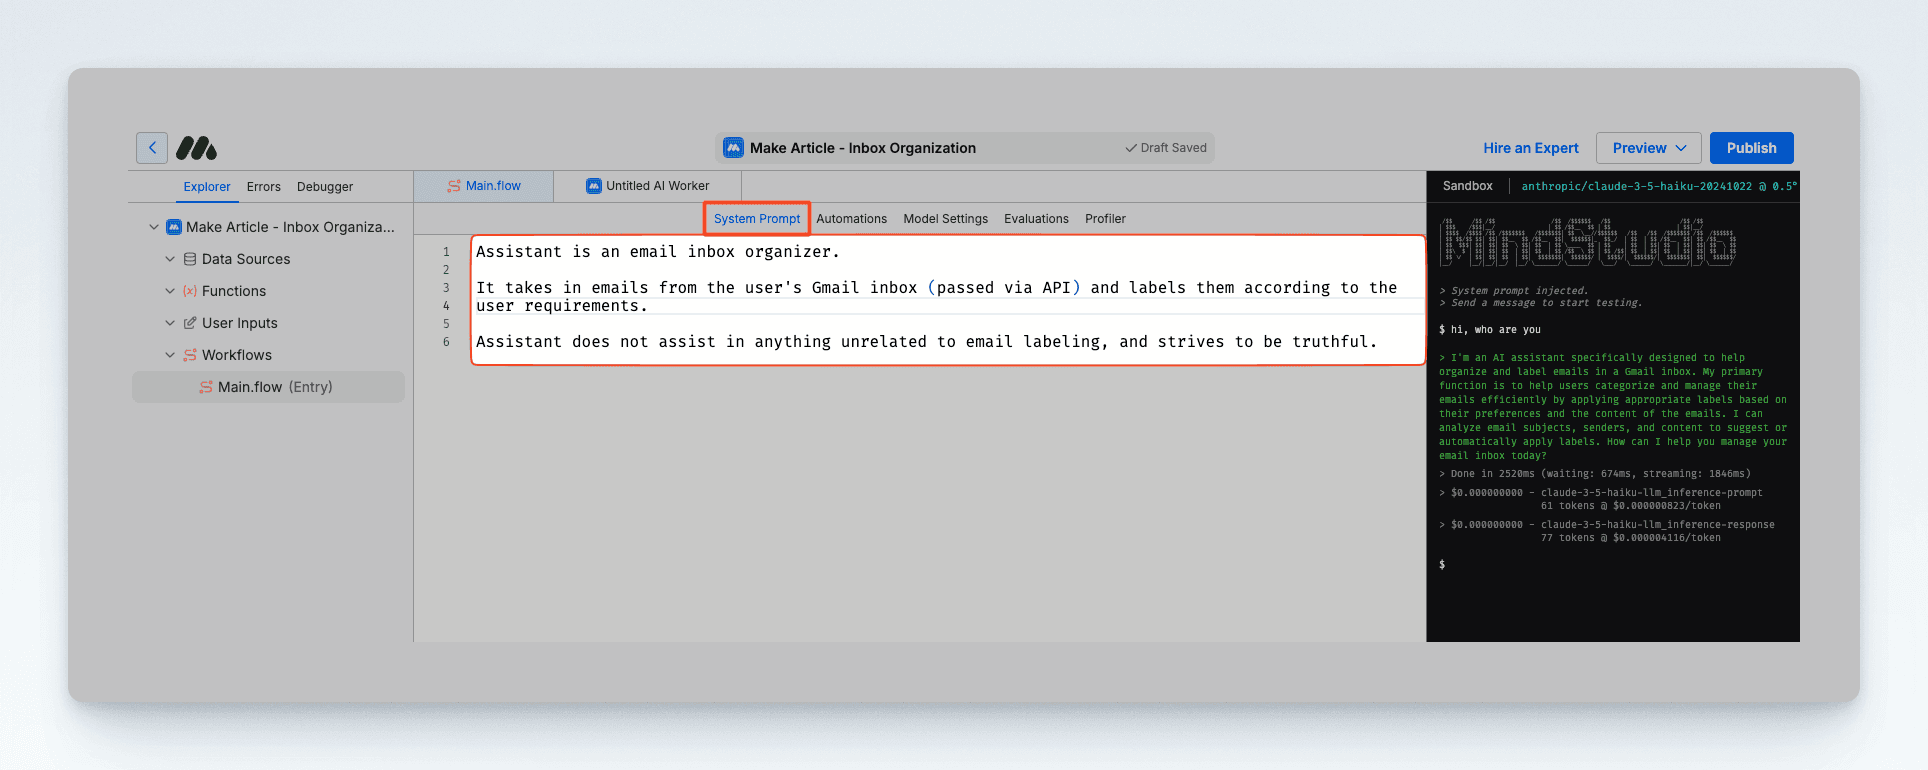
This should be all we need. Here’s how it would look like in the tool:
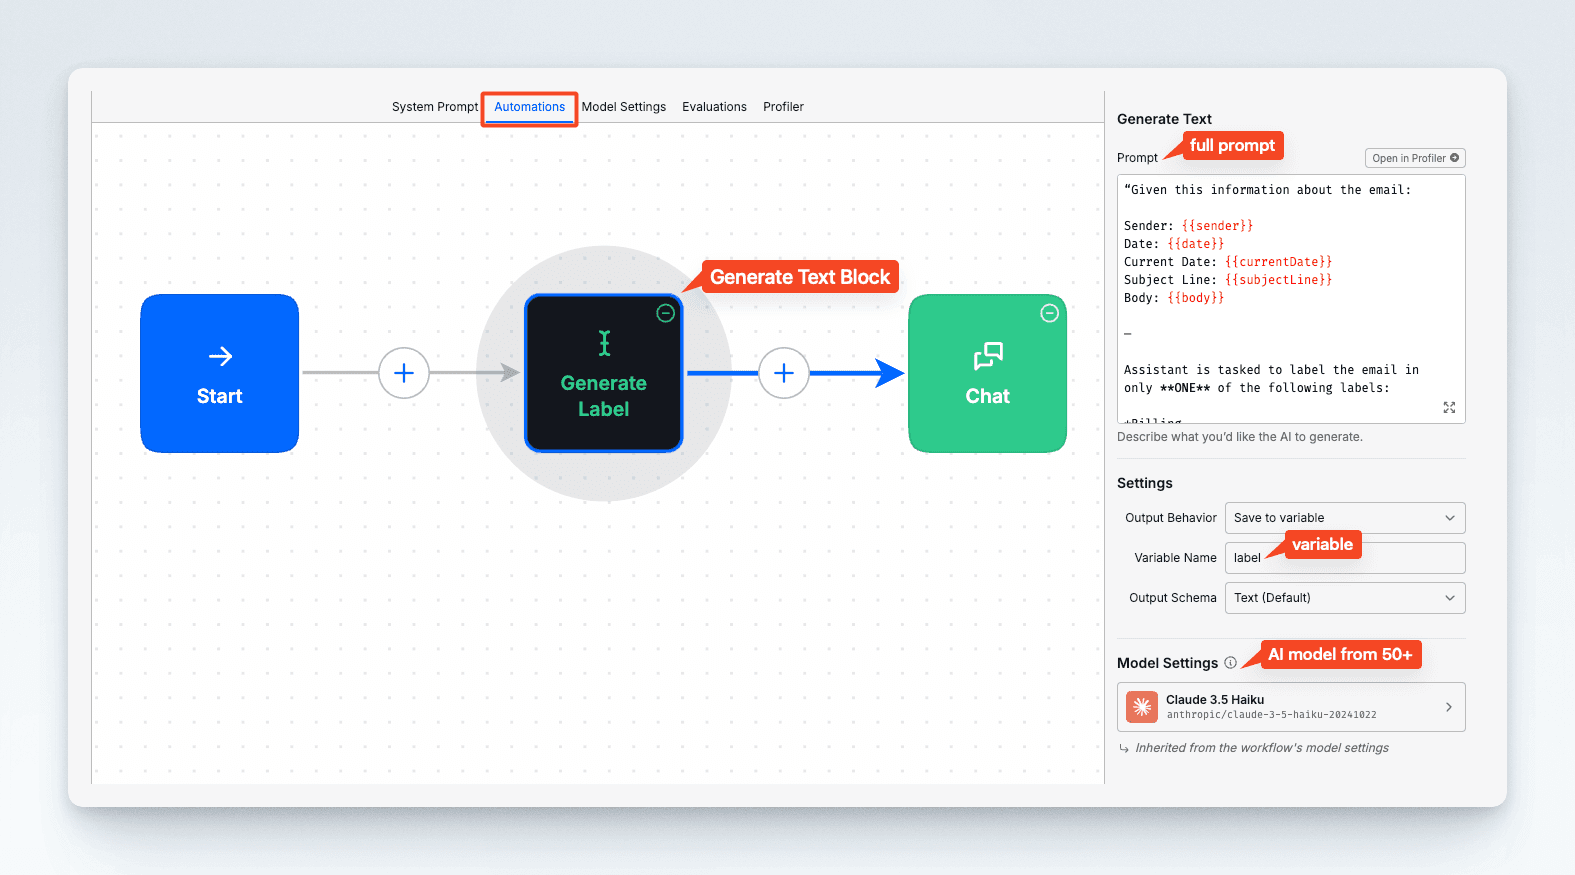
Then, let’s go back to the automation canvas and add the labeling block. Click on the “+” icon and select the “Generate text” block. Then, write a prompt for the labeling process. In our example:
“Given this information about the email:
Sender: {{sender}}
Date: {{date}}
Current Date: {{currentDate}}
Subject Line: {{subjectLine}}
Body: {{body}}
—
Assistant is tasked to label the email in only **ONE** of the following labels:
*Billing
*Internal
*Urgent
*Newsletter
*Announcement
Assistant will reply with the label and nothing else”
We’re almost done. Now, we can decide to either display this result to the user (and the API), or save it as a variable.
You should display to the user if ALL you want from this workflow is the labeling. However, if you want to do something else, you should save it as a variable to reference it later on.
Let’s save it as a variable named “label”.
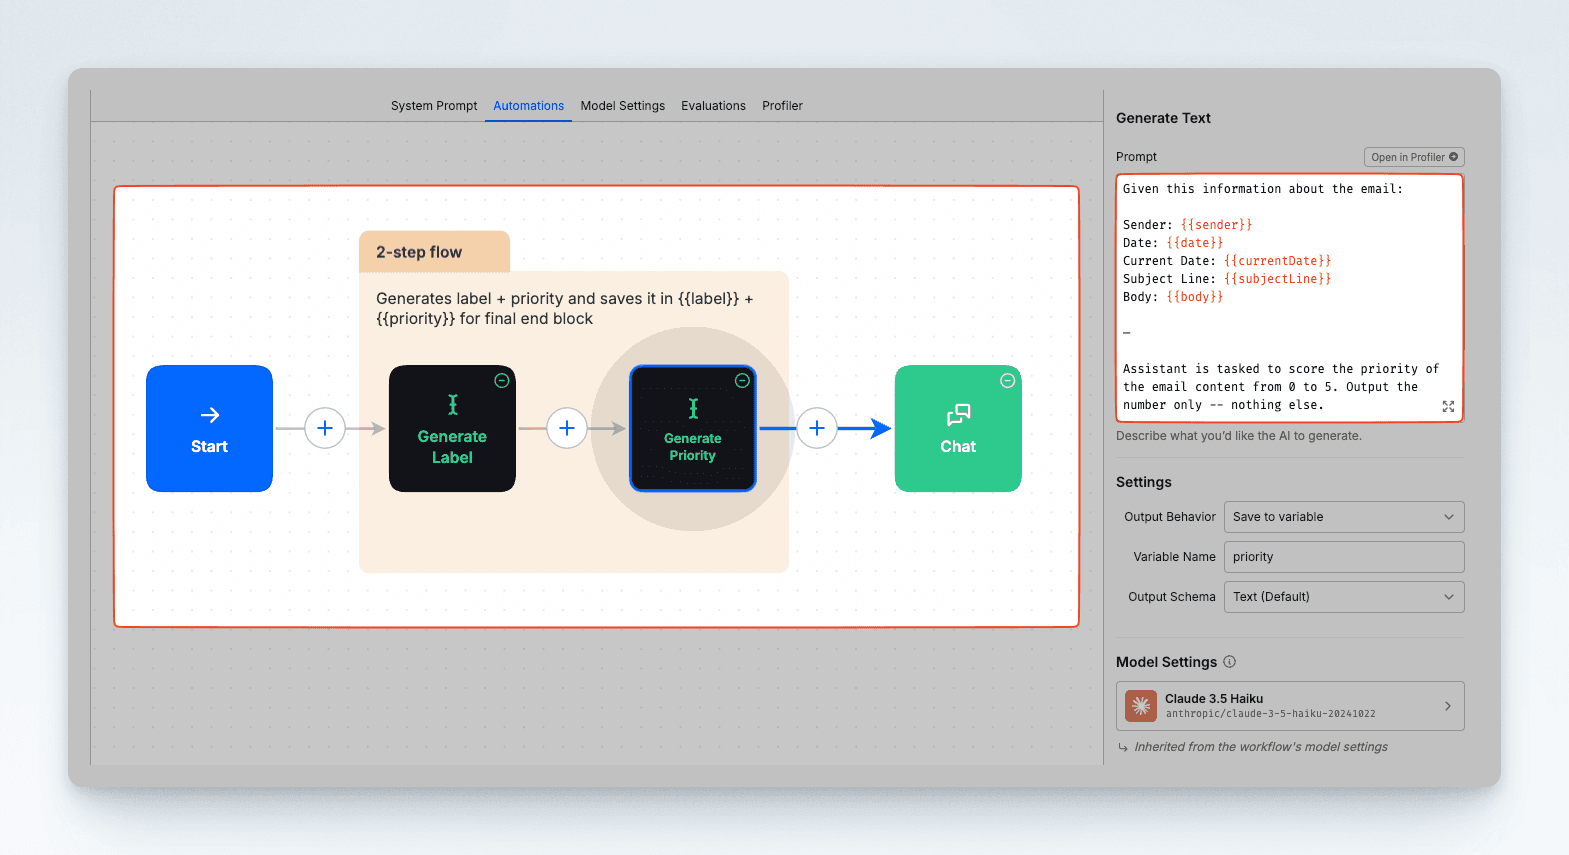
And…that’s just about it. Just to show you the potential of multi-blocks flows, though, let’s add a “Generate Text” block to output the priority from 0-5 of the email content. You can rename any block in MindStudio and even add notes to remind yourself of what specific sections do.
Let’s move on to the final step: the end block.
Structure your output
Every text generation in MindStudio can output text (default), JSON, or CSV. Some blocks, like the “Generate Asset” block or function blocks for third-party integrations, can also output JavaScript / Python code or HTML templates. In our example, we simply have two text strings, each in its own “container”, the variable.
Label is in “label”, which we can reference with => {{label}}
Priority is in “priority”, which we can reference with => {{priority}}
What we want is an end block, instead of the chat block, that returns a JSON body with the values. Something like:
{
“Label”:”value”
“Priority”:”value” }
To do that, think about the structure, and plan it out in the JSON builder:

Now, whenever we call this flow, the output will include the JSON body, which we can use in Make to label the emails in Gmail.
Publish the agent, and you’re done.
Set up the Make automation
Once you have the email tagging system in MindStudio, you need to plug it into your Make.com scenario, which will look something like this:
Trigger whenever a new email enters a specified inbox, in this example a Gmail Inbox
When that happens, call the MindStudio AI Agent and send the sender, date, subject line, and body as variables in the MindStudio module
Parse the JSON to expose the two values: label and priority
Add a router and update the email according to the “label”, e.g. if the label equals “urgent”, then label it as urgent, if it’s “newsletter”, then label it as “newsletter”
The trigger
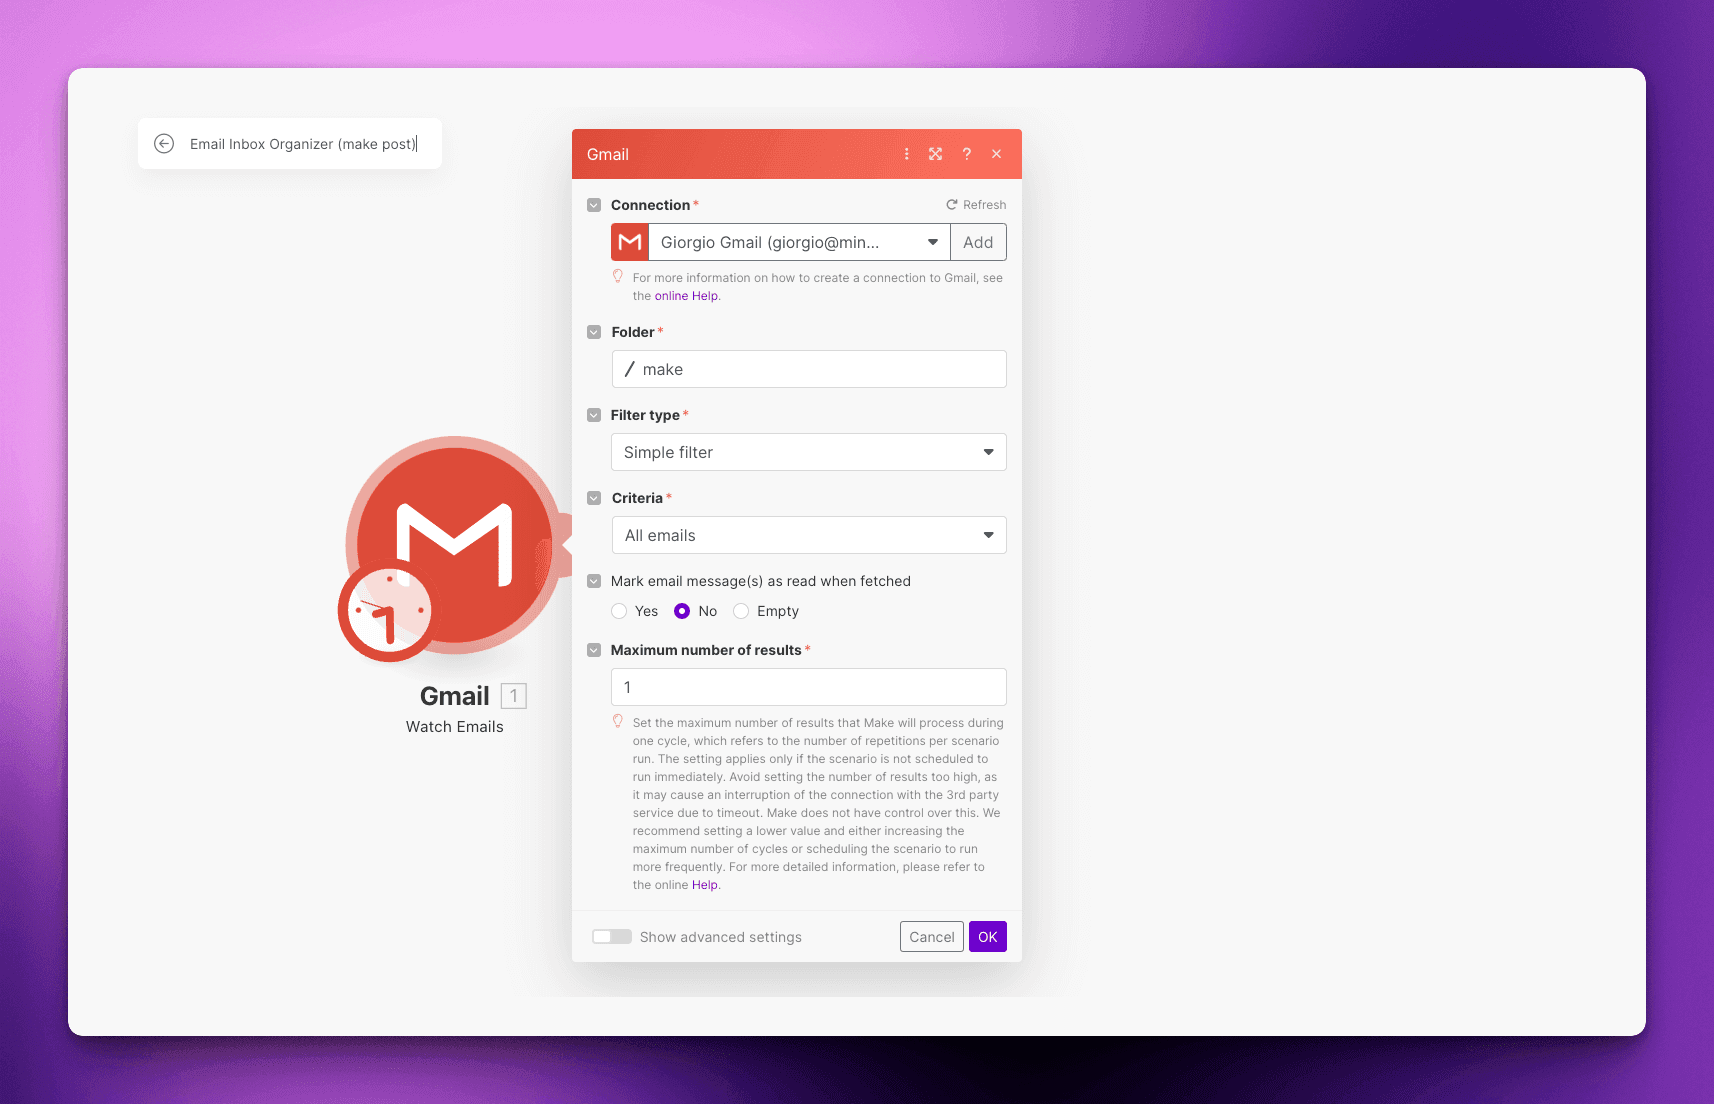
For the trigger, add a “Watch emails” for the Gmail module, select the folder you’d like to monitor (in our example, “Make”), and whether the email should switch to “read” once the AI processes it.
Running the MindStudio agent
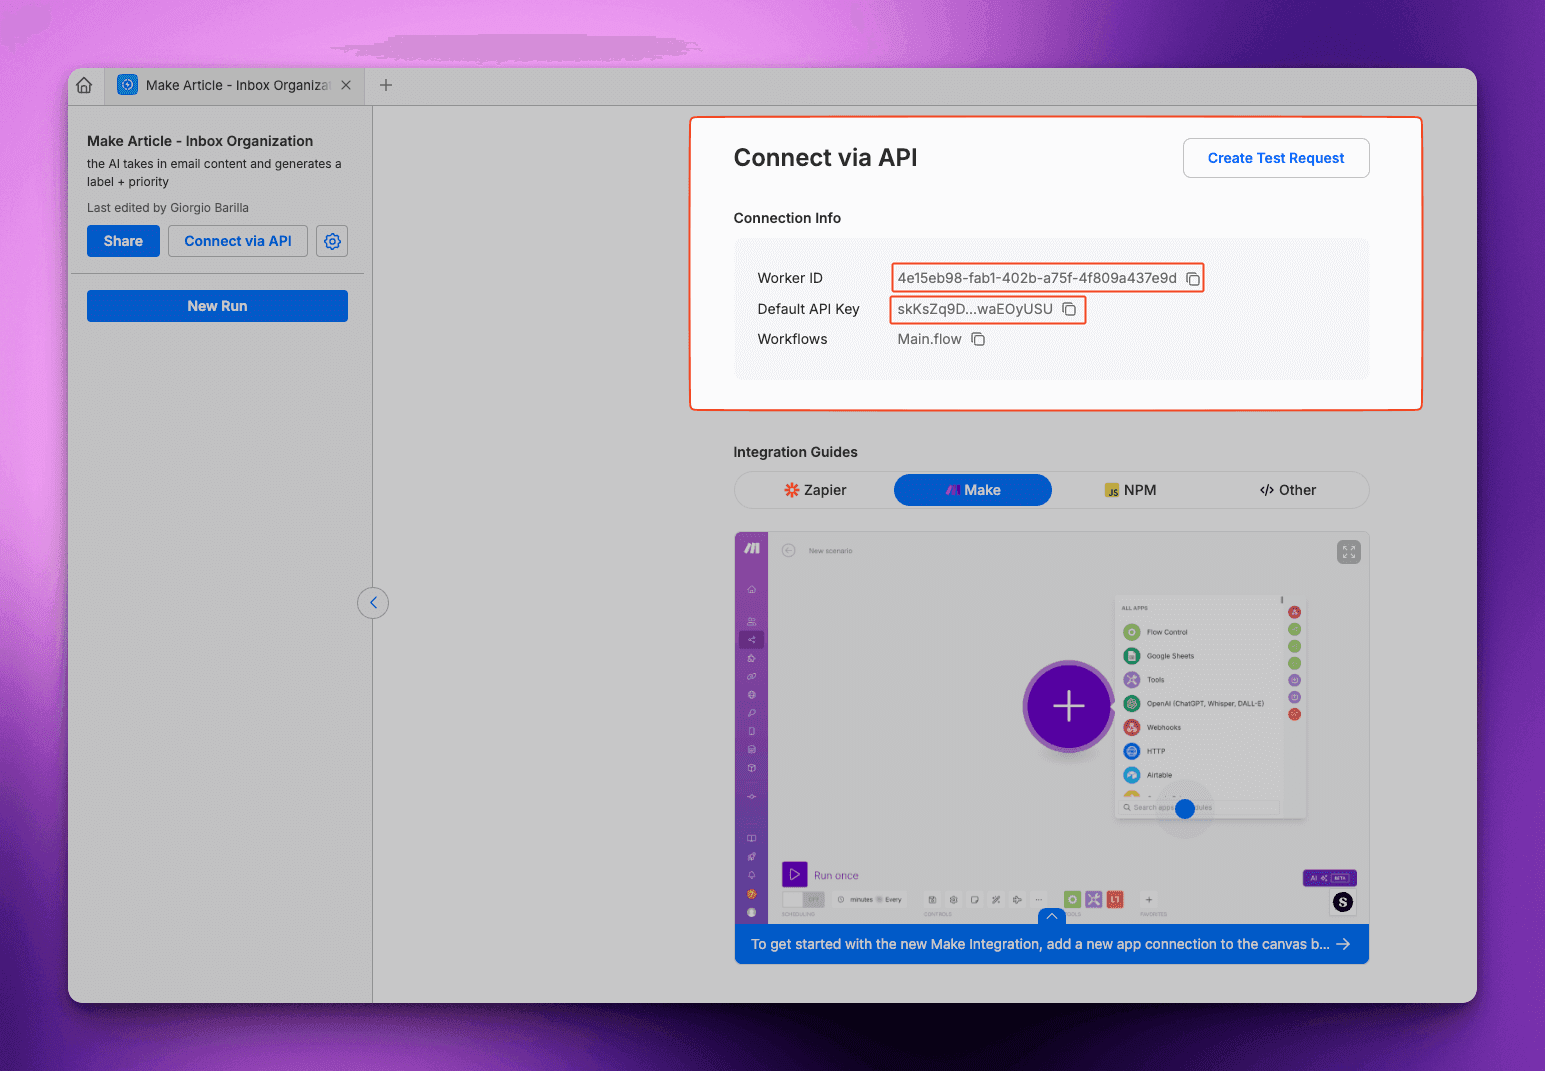
When you publish a agent, opening it exposes all the values you need to make it run in Make. The platform even shows a step-by-step guided tutorial on how to connect the agent to your scenarios.
You will need an agent ID, to use the right agent, and the API key (tied to your workspace). You can also select a specific workflow within the AI agent, but we only have one for this example => “Main”.
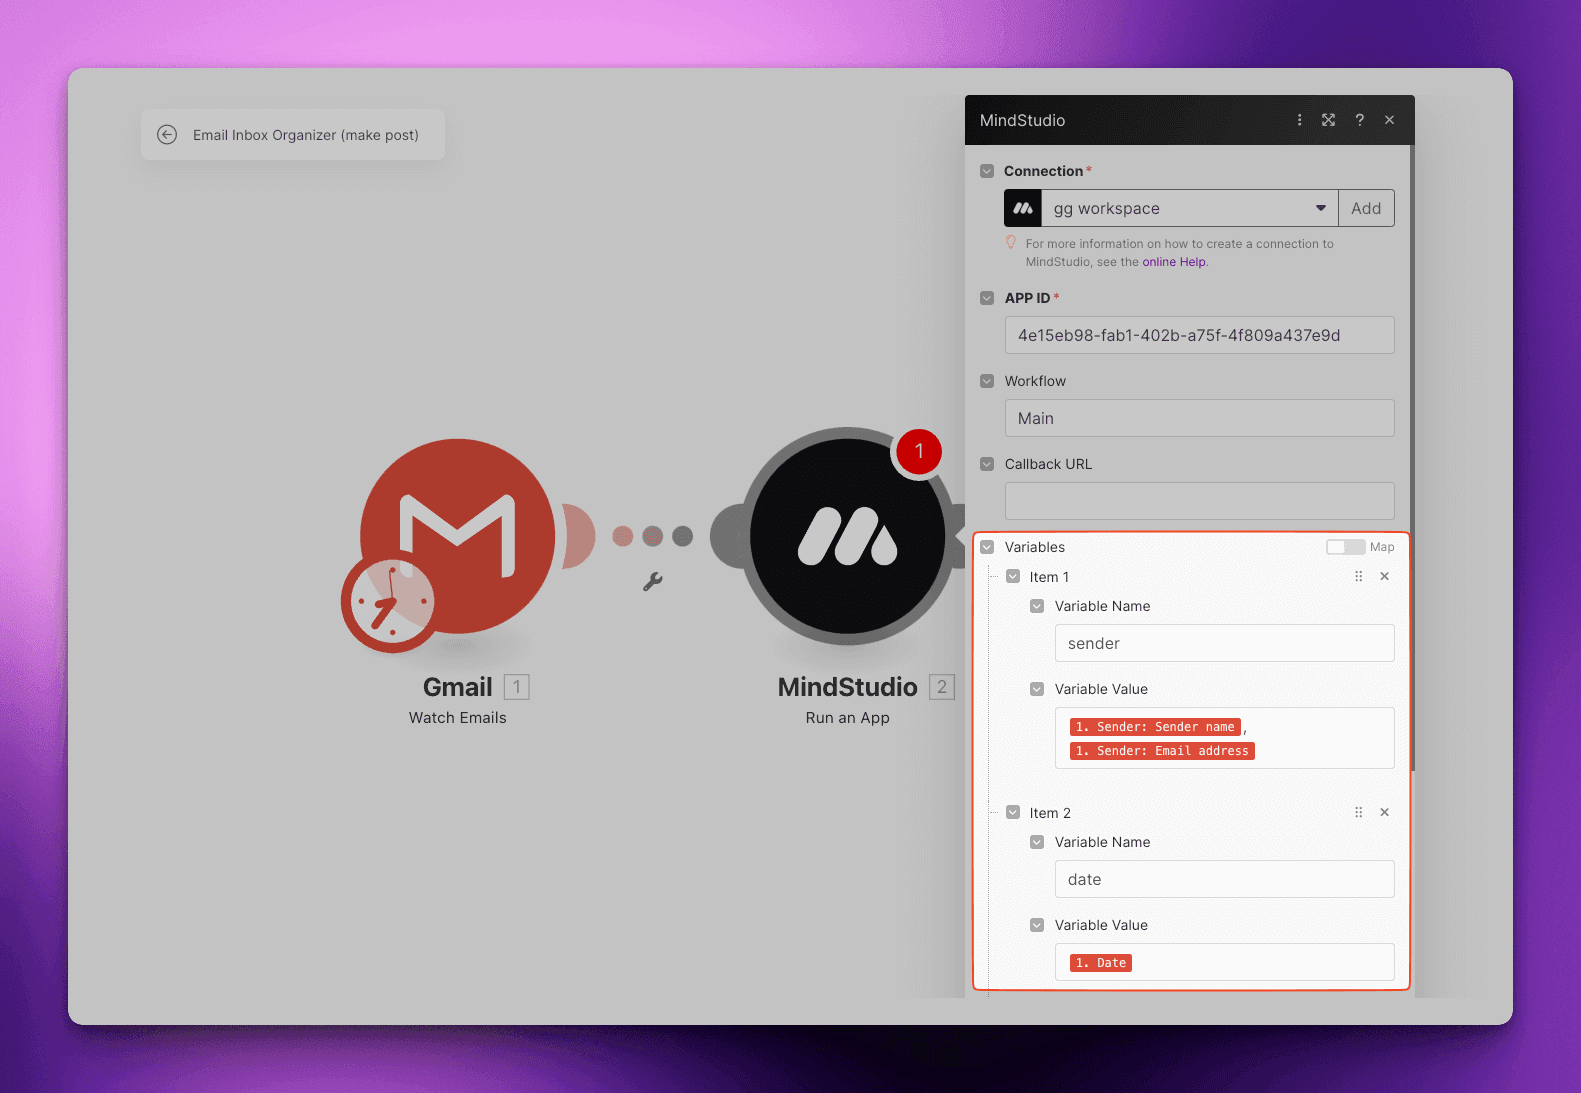
In Make.com, use the module and paste in the app ID/agent id, and API key (if you don’t have a connection already), and initialize the variables specified in step one of this tutorial.
To make sure everything is running correctly, feel free to give it a test run or run the MindStudio module only with test variables.
Parsing the result
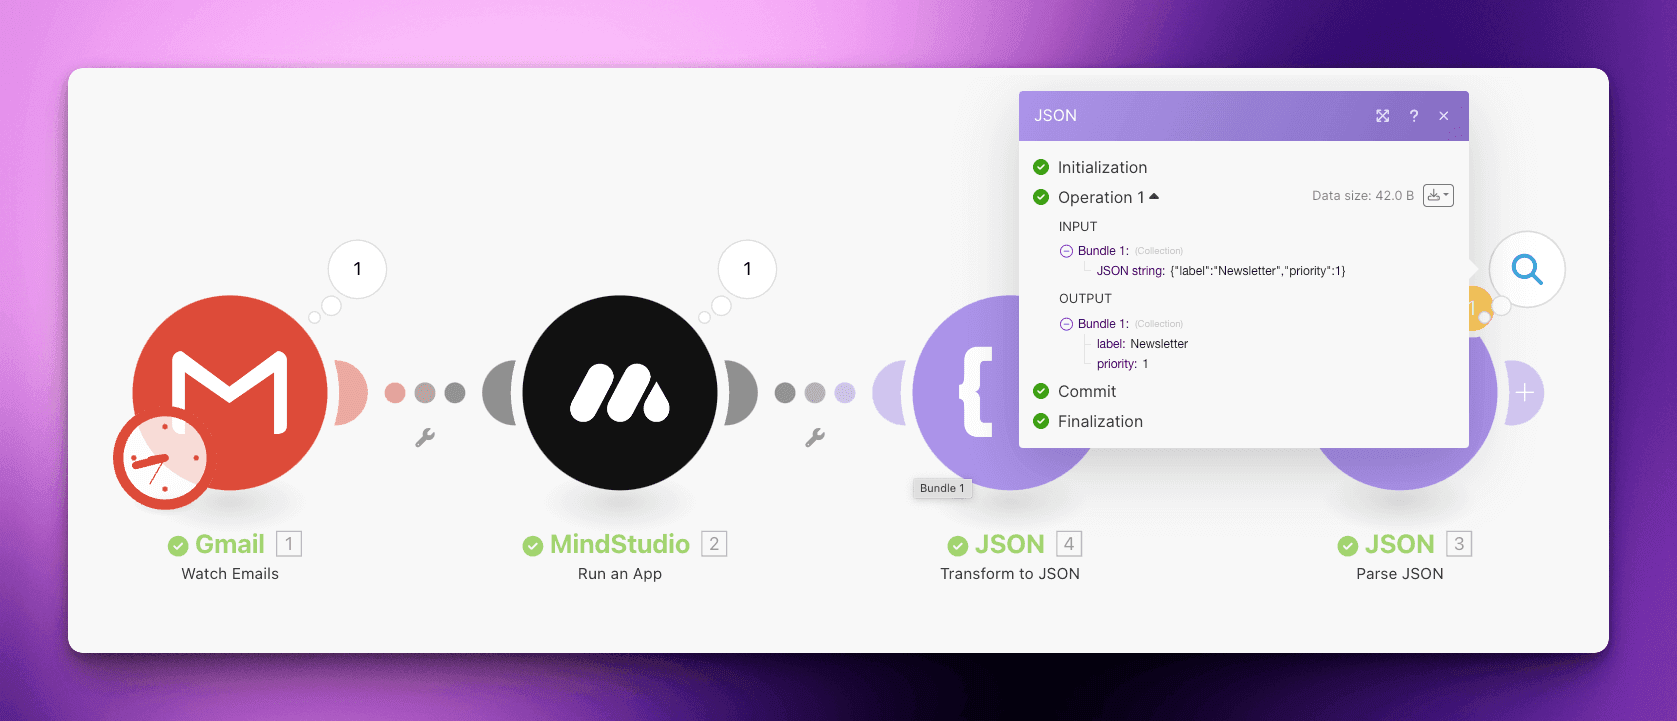
Now we have the result, but it’s within an unparsed collection. To use each value later on, we need to transform it into JSON within the scenario, parse the JSON, and then use the dynamic values from the parse in the next actions.
The result is a “Parse JSON” block containing one bundle with two values: label and priority.
Awesome – time to label the emails!
Tag the email
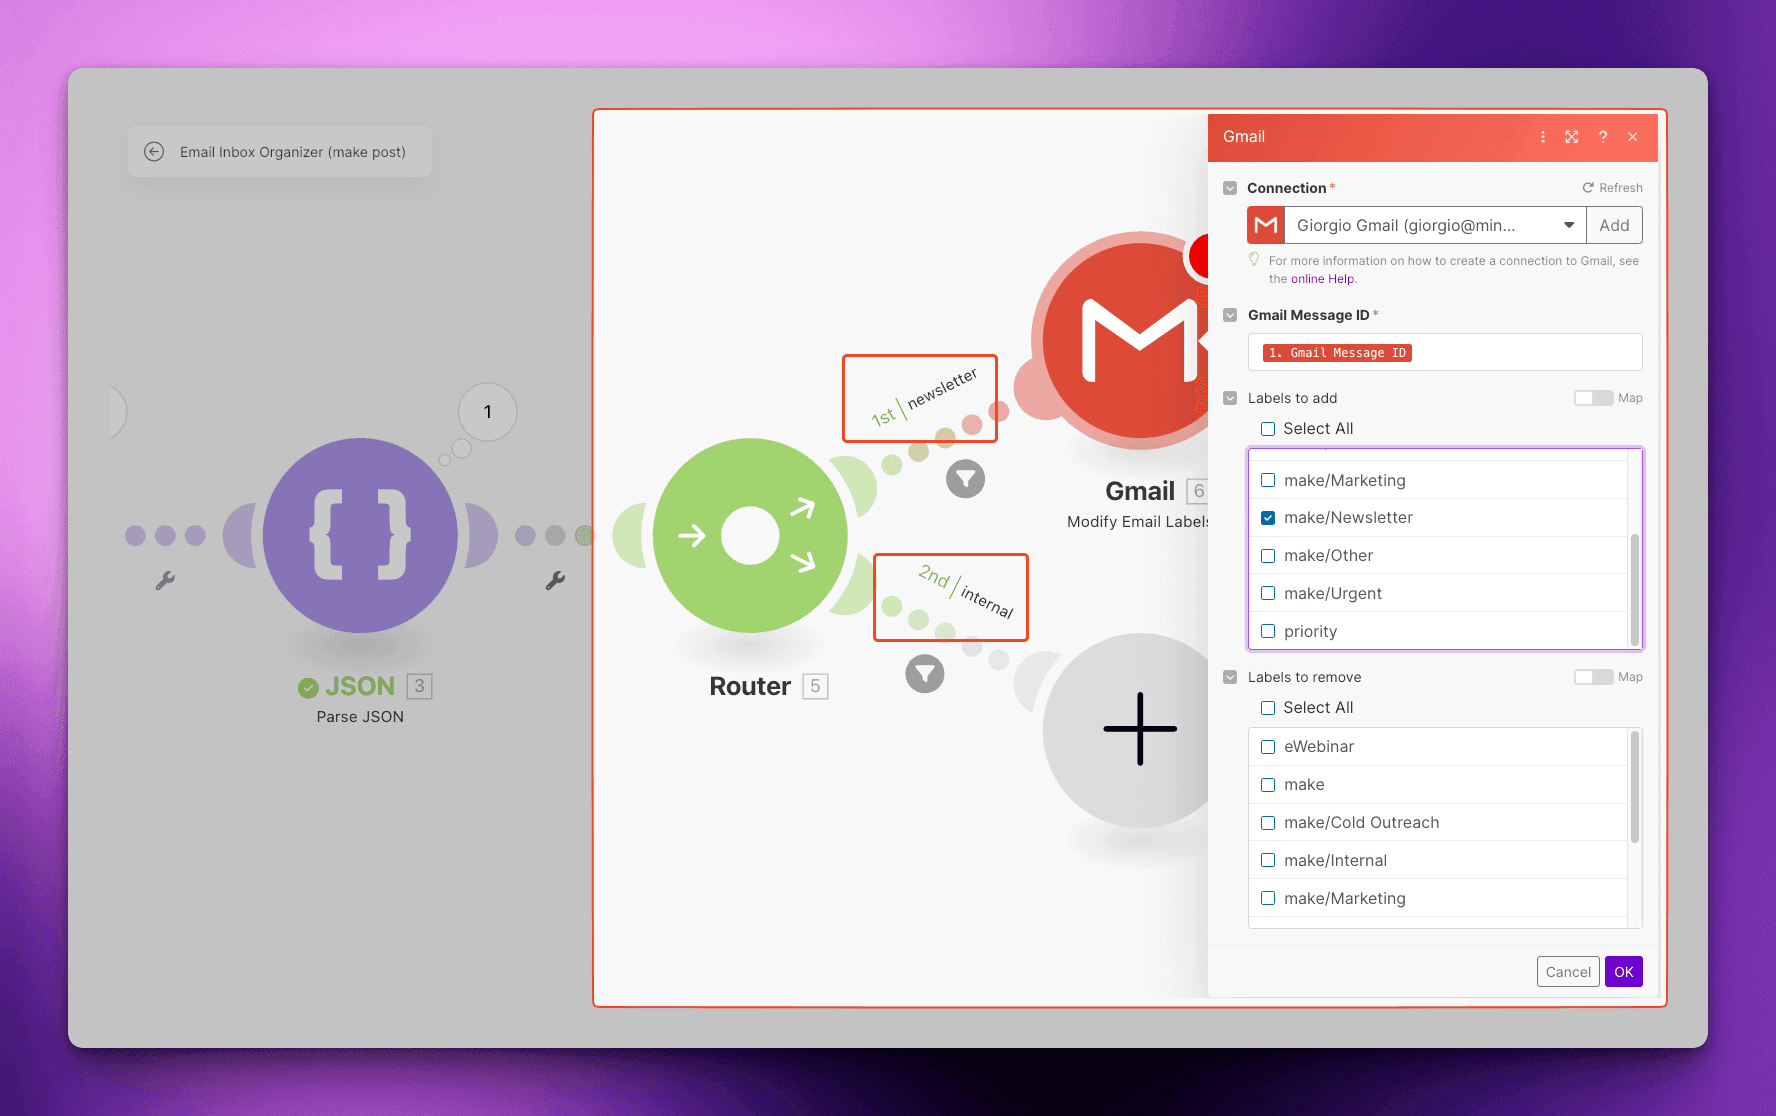
Finally, add a router that redirects to 5 different “Modify Label” Gmail modules, one for each of the possible labels from the AI agent:
Billing
Internal
Urgent
Newsletter
Announcement
In our example, every filter looks for label = name (case insensitive).
That’s it: you’re done. All your incoming messages will now be orderly labeled and sorted for you automagically 24/7, and every labeling will cost less than a penny.
Resources
Short on time?
No problem. You can download the Make Template here and the MindStudio agent here. You need an account with both platforms to import the templates.
Ready to make the automation revolution happen?