Jun 4, 2025 | 10 minutes
How to build an AI recruiting agent with Make
Automate resume screening with Make’s AI recruiting agent. Learn how to build a no-code workflow that fetches, evaluates, and ranks candidates - so your team can hire faster and smarter.
Screening resumes eats up hours of HR time. Downloading PDFs, copying basic details, and answering the same questions again and again - it’s tedious, error-prone, and complex to scale.
With a Make AI Agent, you can automate early-stage screening from end to end. Instead of switching between tools, your agent follows instructions to fetch new resumes, analyze them, and log structured results - all in one seamless scenario.
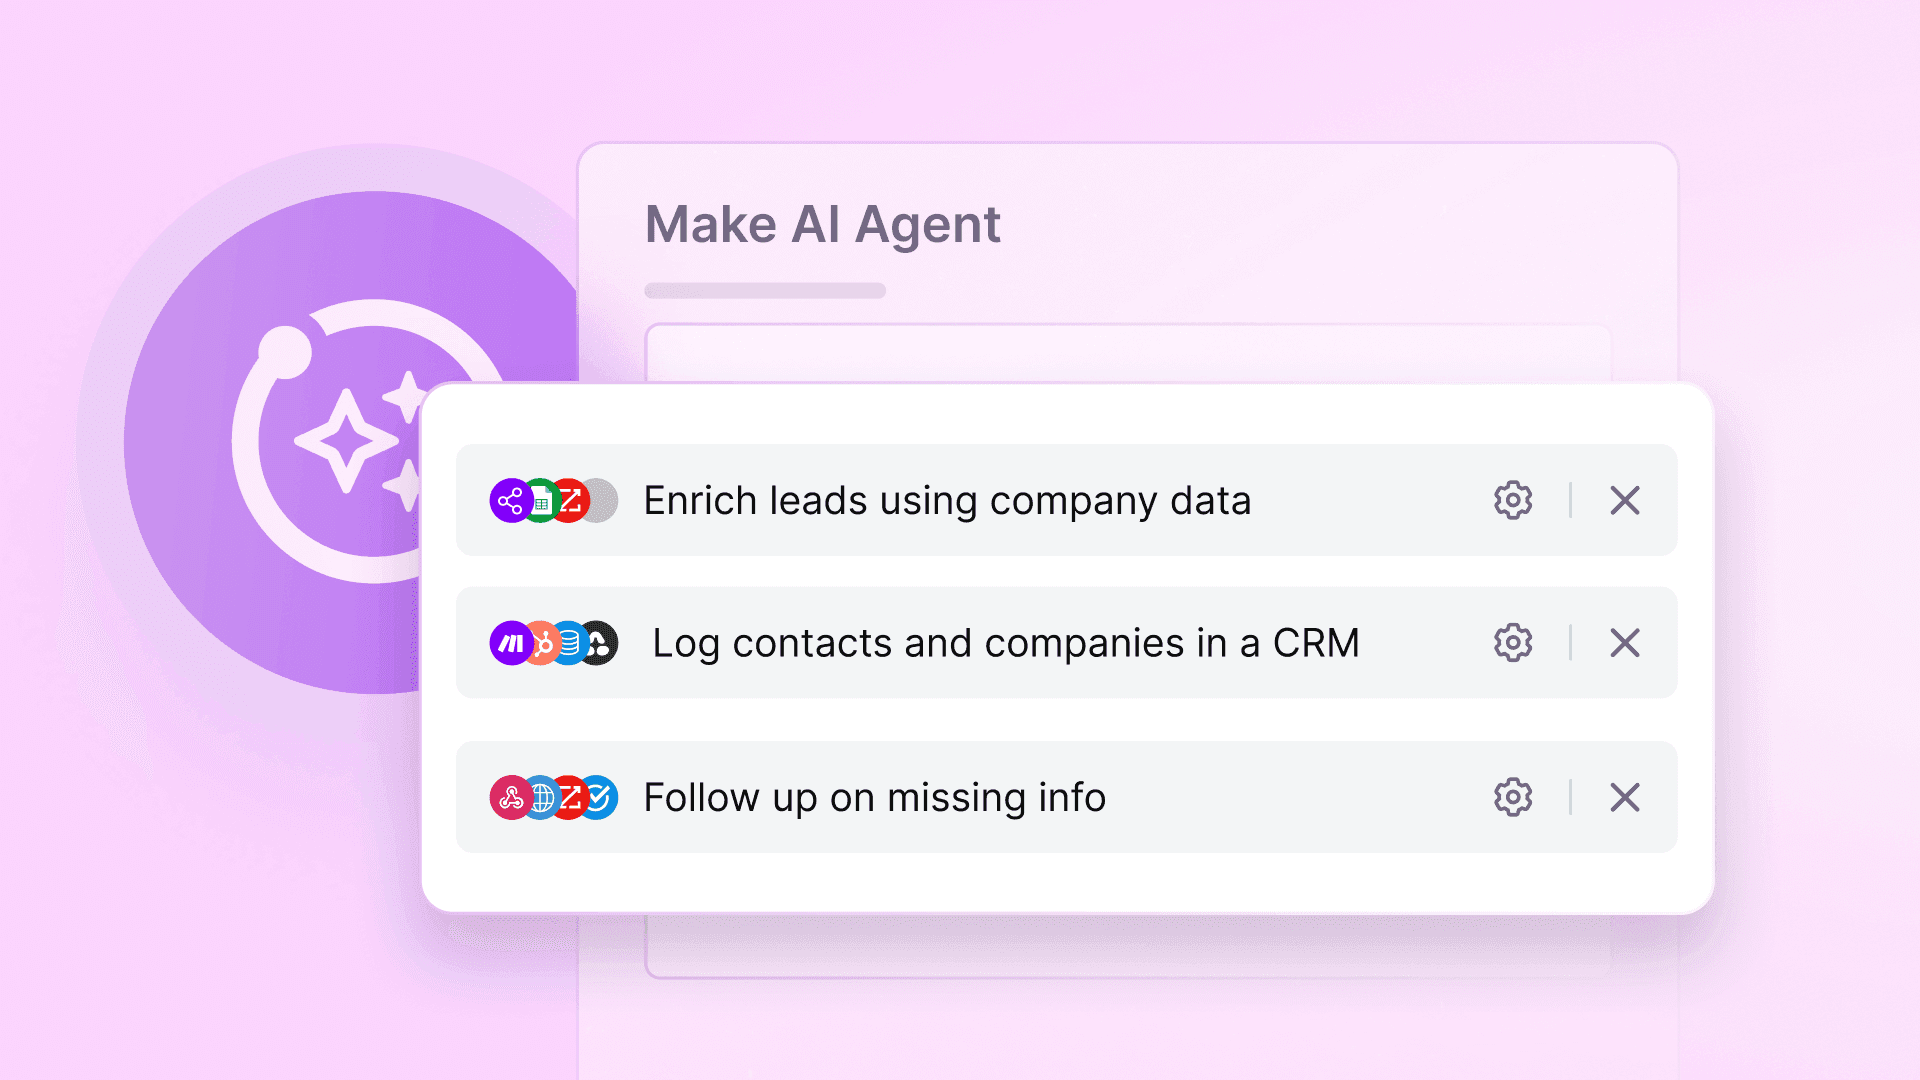
In this guide, you’ll learn how to build an AI-powered resume-screening assistant that can:
Monitor a folder of incoming resumes (for example in Google Drive).
Extract key candidate details (name, email, LinkedIn, etc).
Answer predefined screening questions based on resume content.
Score each answer from 0–2 points.
Log results and scores in Google Sheets.
This scenario combines AI Agents with Make’s drag-and-drop modules to streamline recruitment. Instead of hours spent per batch, your team gets instant visibility into top candidates, ranked and ready to review.
You can also watch our AI Agent use case video, where we show how to transform any CRM into a powerful automated resume screening software:
What is an AI recruiting agent?
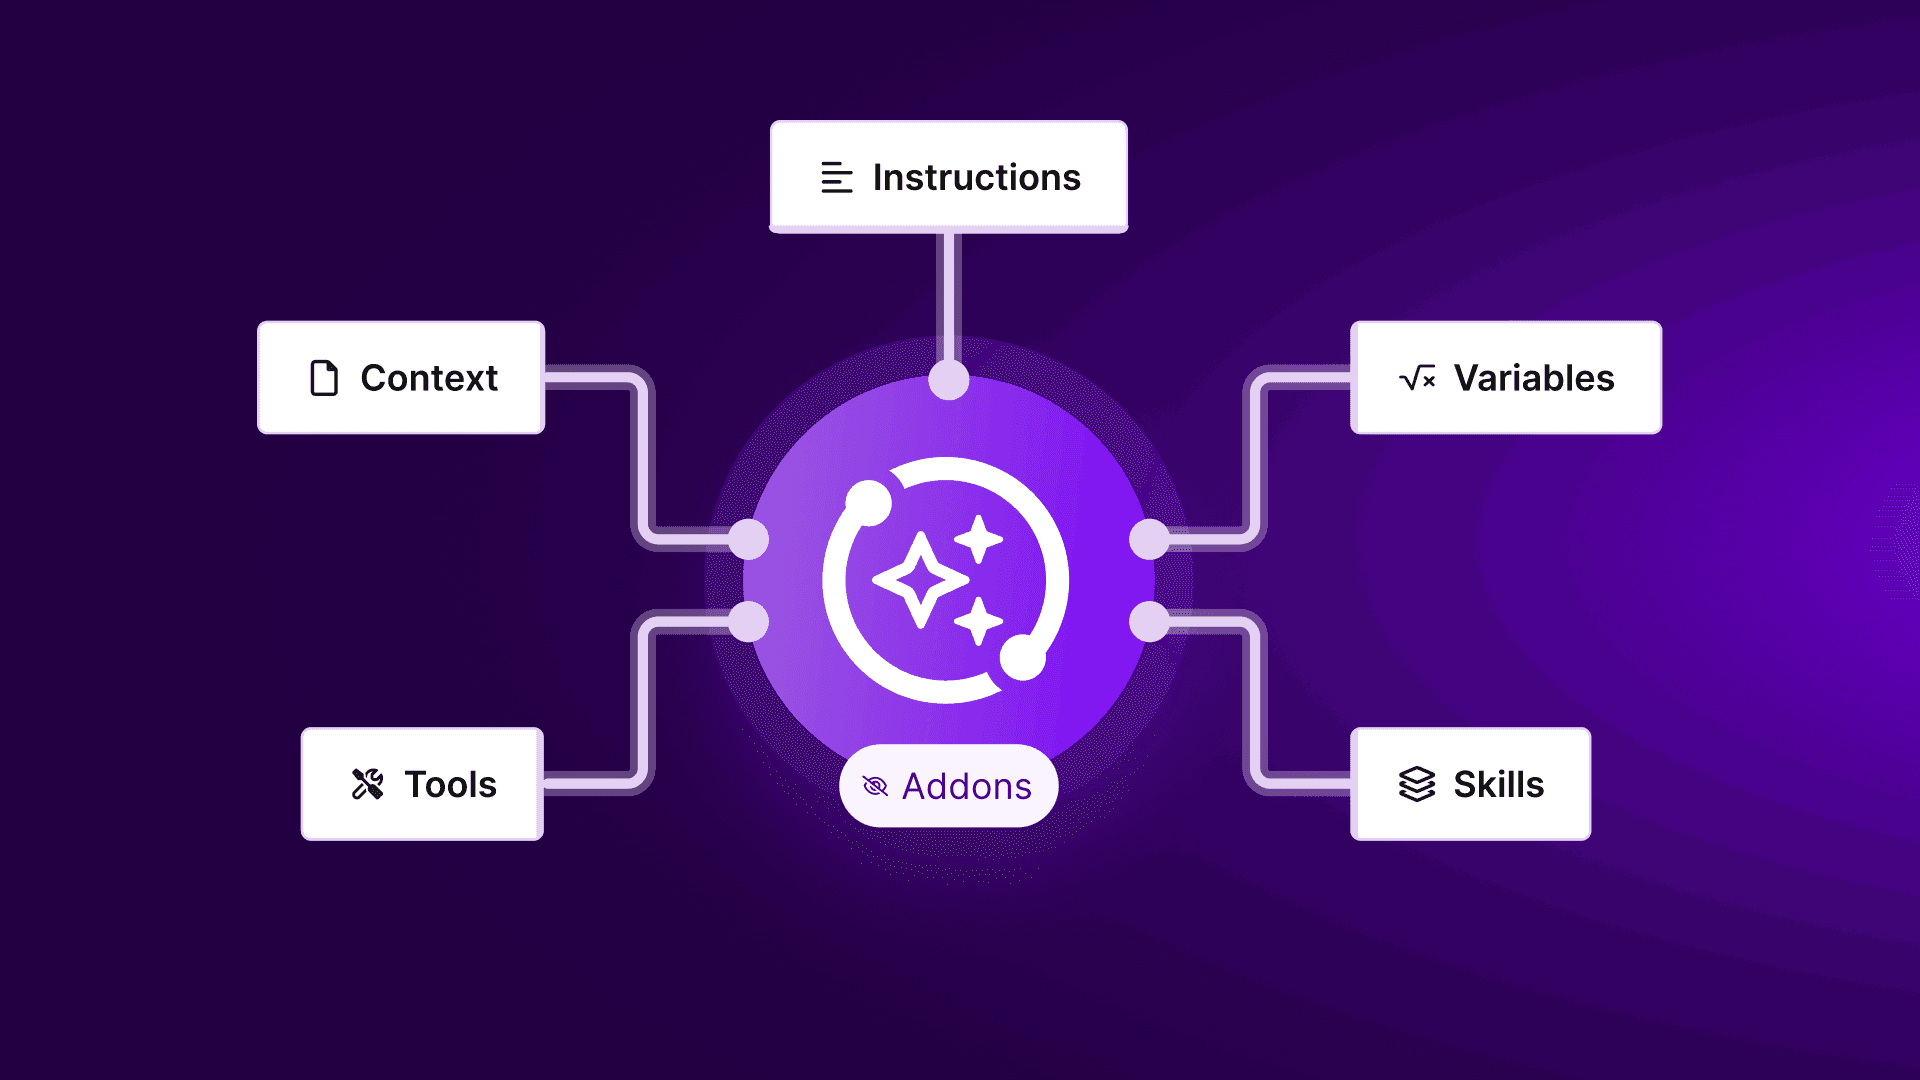
An AI Recruiting Agent is a goal-based assistant that automates early hiring tasks. Instead of manually opening each CV, it extracts candidate data and runs evaluations based on your instructions.
In Make, you set a clear goal (for example, “screen marketing applicants”), link supporting scenarios, and connect an input, such as a resume folder. When new resumes arrive, the agent selects the right scenarios to run and returns structured results - fast, consistent, and ready to review.
What an AI recruiting agent does (and why it’s useful)
Manual resume screening is slow and inconsistent. This AI recruiting agent automates early-stage hiring to deliver fast, objective results. Here’s how it works:
Detects new resumes: Monitors a Google Drive folder (or other cloud storage) for incoming PDFs.
Extracts candidate info: Parses each file to pull name, email, LinkedIn URL, and other contact details.
Answers screening questions: Reads the resume to answer four predefined questions (for example, “Has this person written scripts for YouTube?”).
Scores responses: Assigns a score from 0–2 for each answer, along with a short explanation.
Logs results in a sheet: Adds a row to Google Sheets with contact info, answers, scores, and total points—ready to sort by top candidates.
With this setup, every resume is screened the same way - no bias, no bottlenecks - just structured, actionable results for your team.
How it works: two-scenario architecture
This setup uses two connected scenarios:
Resume Processing scenario: Triggers when a new resume is added to a Google Drive folder. It converts the PDF to JSON and sends the data to the AI Agent.
Google Sheets Logging scenario: Receives the agent’s output - contact info, answers, and scores - and appends a new row to a Google Sheet.
These scenarios act as tools for the AI agent. When a resume arrives, the first scenario handles conversion and parsing. The agent answers four screening questions, assigns scores (0–2), and triggers the second scenario to log results.
Convert this data into a Google Sheet. The full flow:
Fetch new resumes from Drive.
Extract and structure candidate info.
Run the AI Agent to evaluate and score.
Add results to Google Sheets, sorted by total points.
The result? A clear, ranked list of candidates - automatically generated and easy to review.
Apps used in this example
This recruiting agent uses several Make modules. You can swap in equivalents if needed:
Google Drive – Monitors a folder of resumes and fetches new files. (Any cloud drive with a watcher will work.)
PDF.co – Converts each PDF resume into structured JSON text. (This is a PDF parsing service; you could use another PDF-to-text API if you prefer.)
HTTP – Makes a simple HTTP GET request to download the JSON output from PDF.co.
Make AI Agent – The core AI agent that reads the resume data and produces structured answers.
Google Sheets – Logs each candidate’s details and scores as a new row. (You could use Airtable, Excel, or another database module instead.)
Step-by-step: How to build the recruiting AI agent
Now let’s assemble everything in Make step by step.
Step 1: Set up the Resume Monitor scenario
Create a new scenario (call it “Resume Intake”) and add a Google Drive > Watch Files in a Folder module. Point it to the folder where candidates will submit resumes. For example, set Watch by = “Created Time” (to catch newly added files) and Limit = 1 (process one file at a time). You can filter for files with the extensions *.pdf or *.docx if needed. This module will trigger whenever HR drops a new resume into Drive.

Step 2: Get the resume file
Add a Google Drive > Download a File module, linking it to your Watch Files module. Map the File ID to the output of the Watch module (for example, use {{2. File ID}} if your Watch Files module has ID 2). In the Get File settings, set “Convert Google Document to” to MS Word (so that even Google Docs get fetched as a .docx file). This ensures we have the resume content in a transferable format.
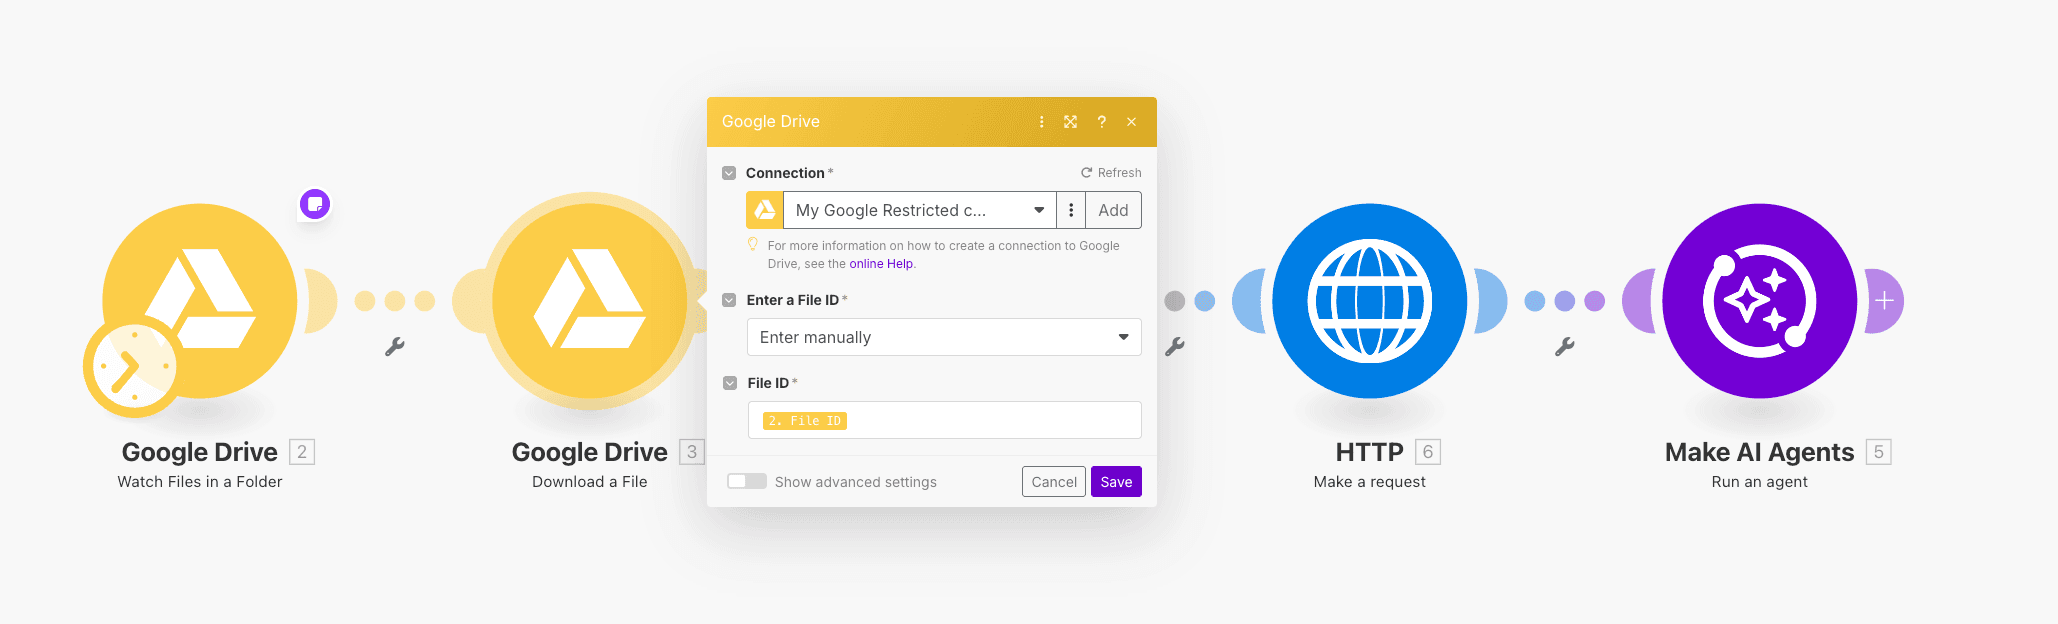
Step 3: Convert PDF to JSON
Next, insert a PDF.co > Convert from PDF module. Select your PDF.co connection and configure it to accept an Upload (not a URL). In the Import Options fields, choose the Google Drive option under File. Then, set 'Convert to JSON2' under Convert Type and select JSON Output under Export Type.

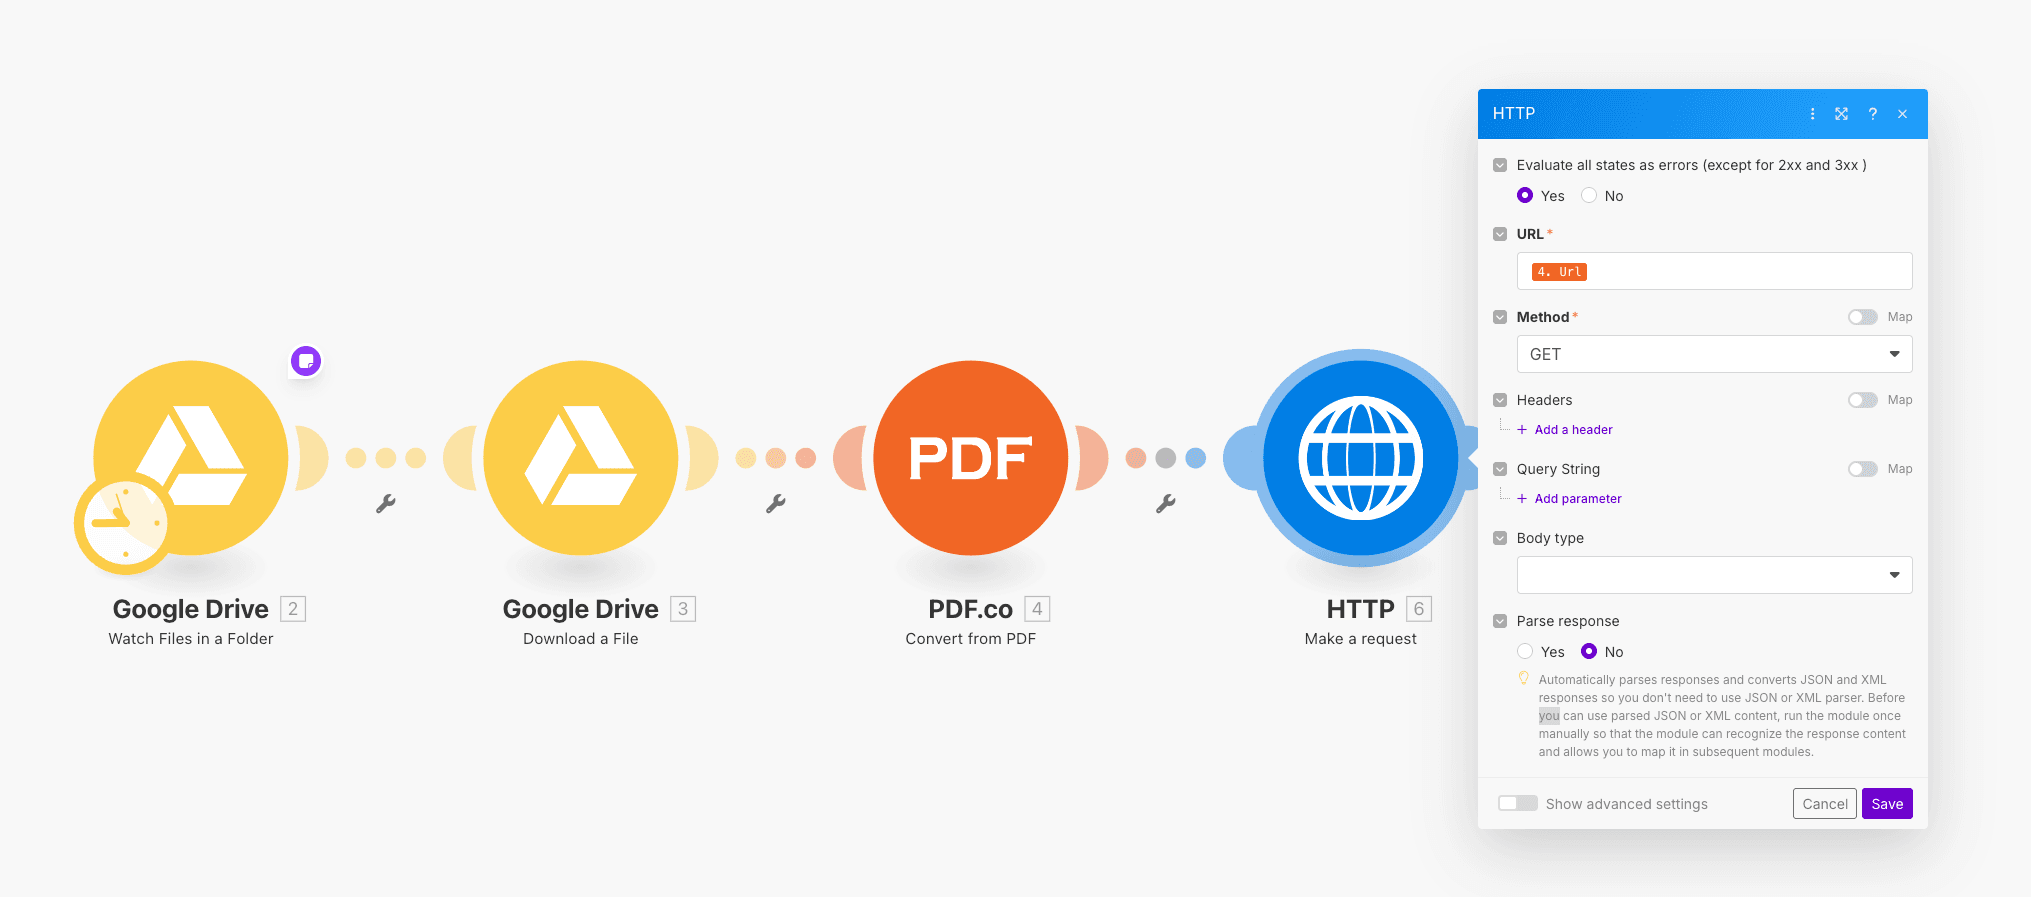
Step 4: Fetch the JSON via HTTP
Add an HTTP > Make a Request module. For the URL, map it to the PDF.co output URL (for example, {{4.url}} from the PDF.co module). Set Method = GET and enable Follow redirects under Show advanced settings. Leave the Body empty. This module will download the full JSON content of the resume into its output ({{5.data}} or a similar variable).
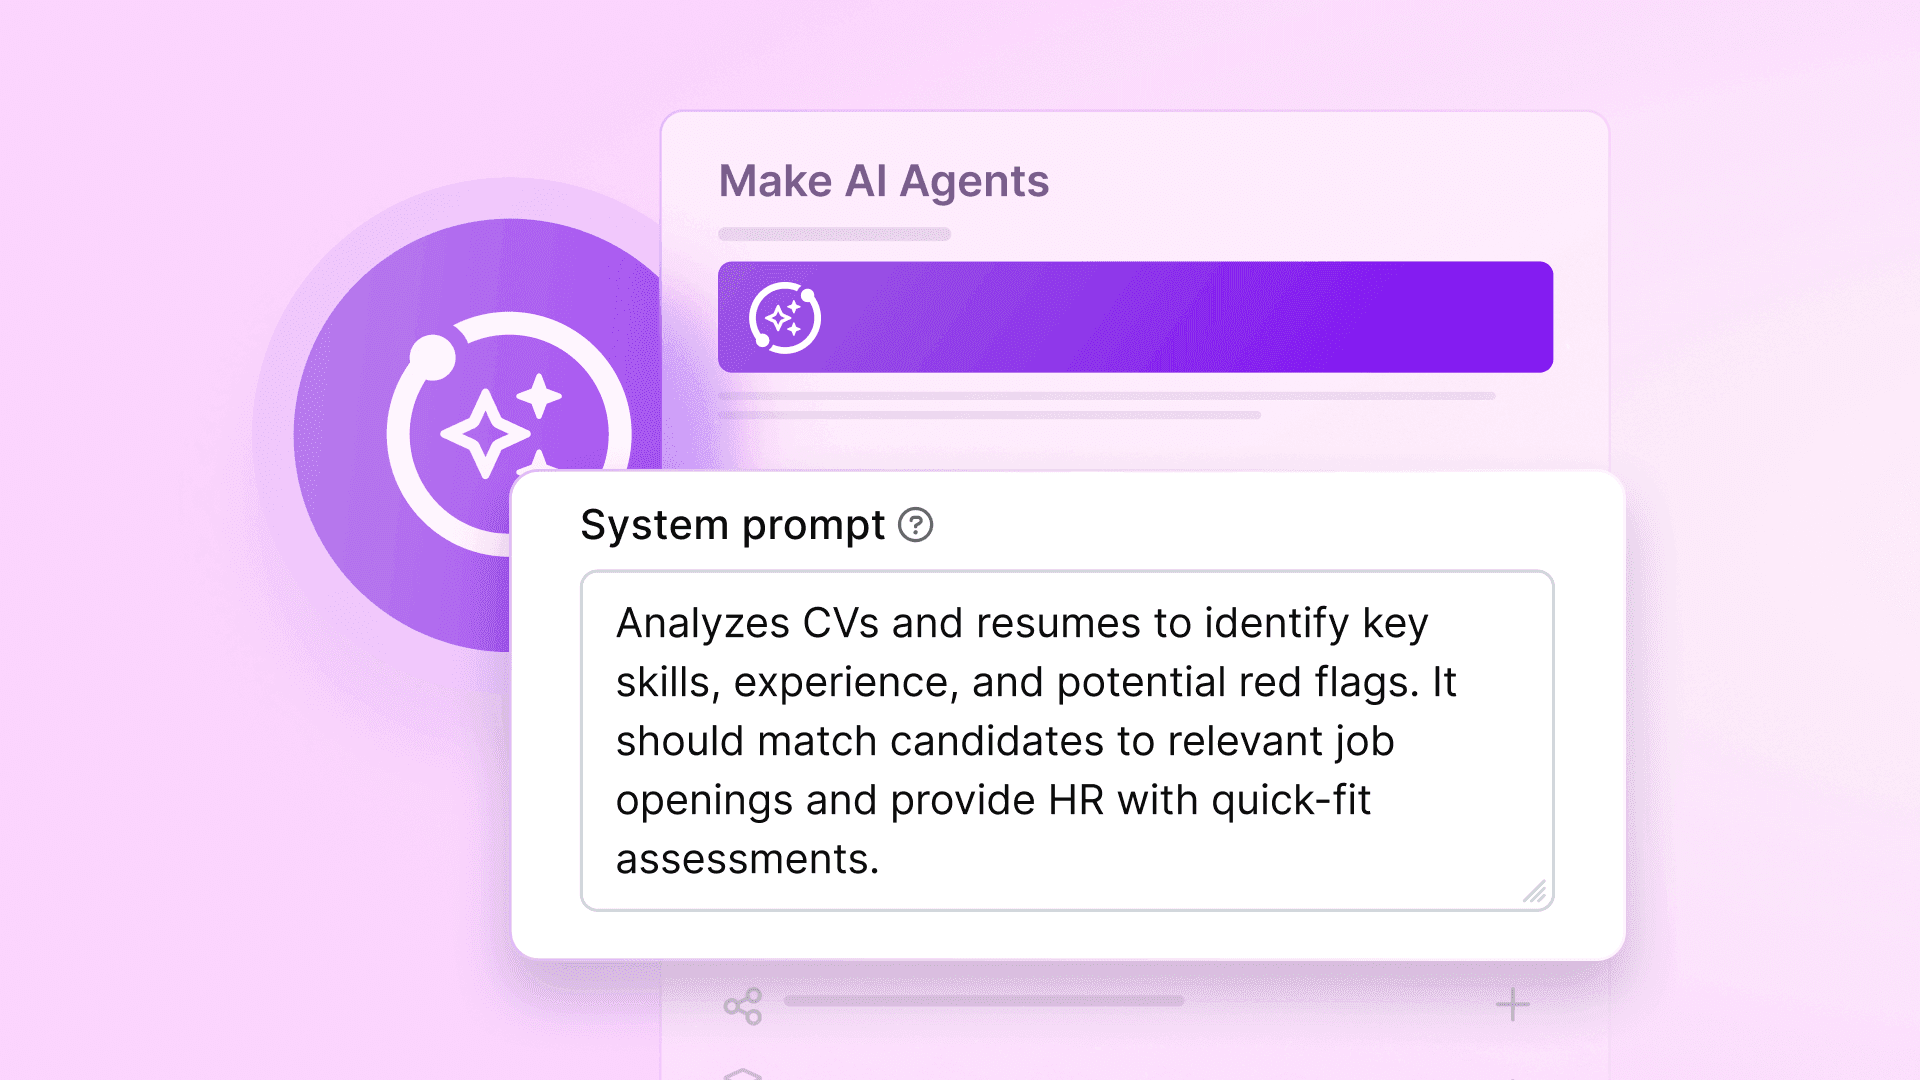
Step 5: Add the AI Agent module
Insert a Make AI Agents > Run an Agent module as the next step. Here’s how to configure it:
Agent: Select your recruiting agent (e.g., “HR Screening Agent”).
Thread ID: Set this to the resume’s file name, e.g. {{4.File Name}}. (This keeps a unique “thread” for each resume. You could also use email or candidate ID if preferred.)
Messages: This is where you prompt the agent. Write a system/user message that includes the screening instructions and the resume data. For example: Here is the resume of a new candidate (in JSON format). Answer the following four questions. Each question’s answer should include a short text response and a numeric score (0–2). If a question cannot be answered from the resume, write "Not found" and give 0 points. {{6.data}}
In practice, you’ll format this in Make’s UI by adding one or more message lines. Ensure that you include {{6.data}} (or your HTTP module’s output) so that the agent can see the resume.
Additional Tools (Scenarios): Use “Add tools” and pick your Google Sheets scenario (the one you’ll create next). This allows the agent to invoke the Sheets scenario with the data.
By the end of this step, your Resume Intake scenario will fetch a resume, convert it to text, and hand it off to the AI Agent with the original file name as the thread ID (for context).

Step 6: Create the Google Sheets logging scenario
Now build the second scenario to receive the agent’s results. Create a new scenario (e.g., “Log Candidate to Sheet”) and add a Google Sheets > Add a Row module. Select your Google connection. In the module settings:
Spreadsheet ID: Enter the ID of your candidate-tracking spreadsheet (click ID Finder if needed).
Sheet Name: Choose the correct tab (e.g., “Sheet1”) and set Table contains headers to Yes.
Values: For each column, use the scenario inputs (we’ll set these next). For example:
Row value 0 (Name) → {{var.input.name}}
Row value 1 (Email) → {{var.input.email}}
Row value 2 (LinkedIn URL) → {{var.input.linkedin_url}}
Row value 3 (Question 1 answer) → {{var.input.q1}}
Row value 4 (Question 1 points) → {{var.input.q1p}}
… continuing for q2, q2p, q3, q3p, q4, q4p …
Row value 11 (Total points) → {{var.input.qtp}}file-akpp26czndlchhab6vyw3z.
This mapping tells Make to populate the sheet’s columns with the agent’s output. (You can add or remove columns depending on your questions.)

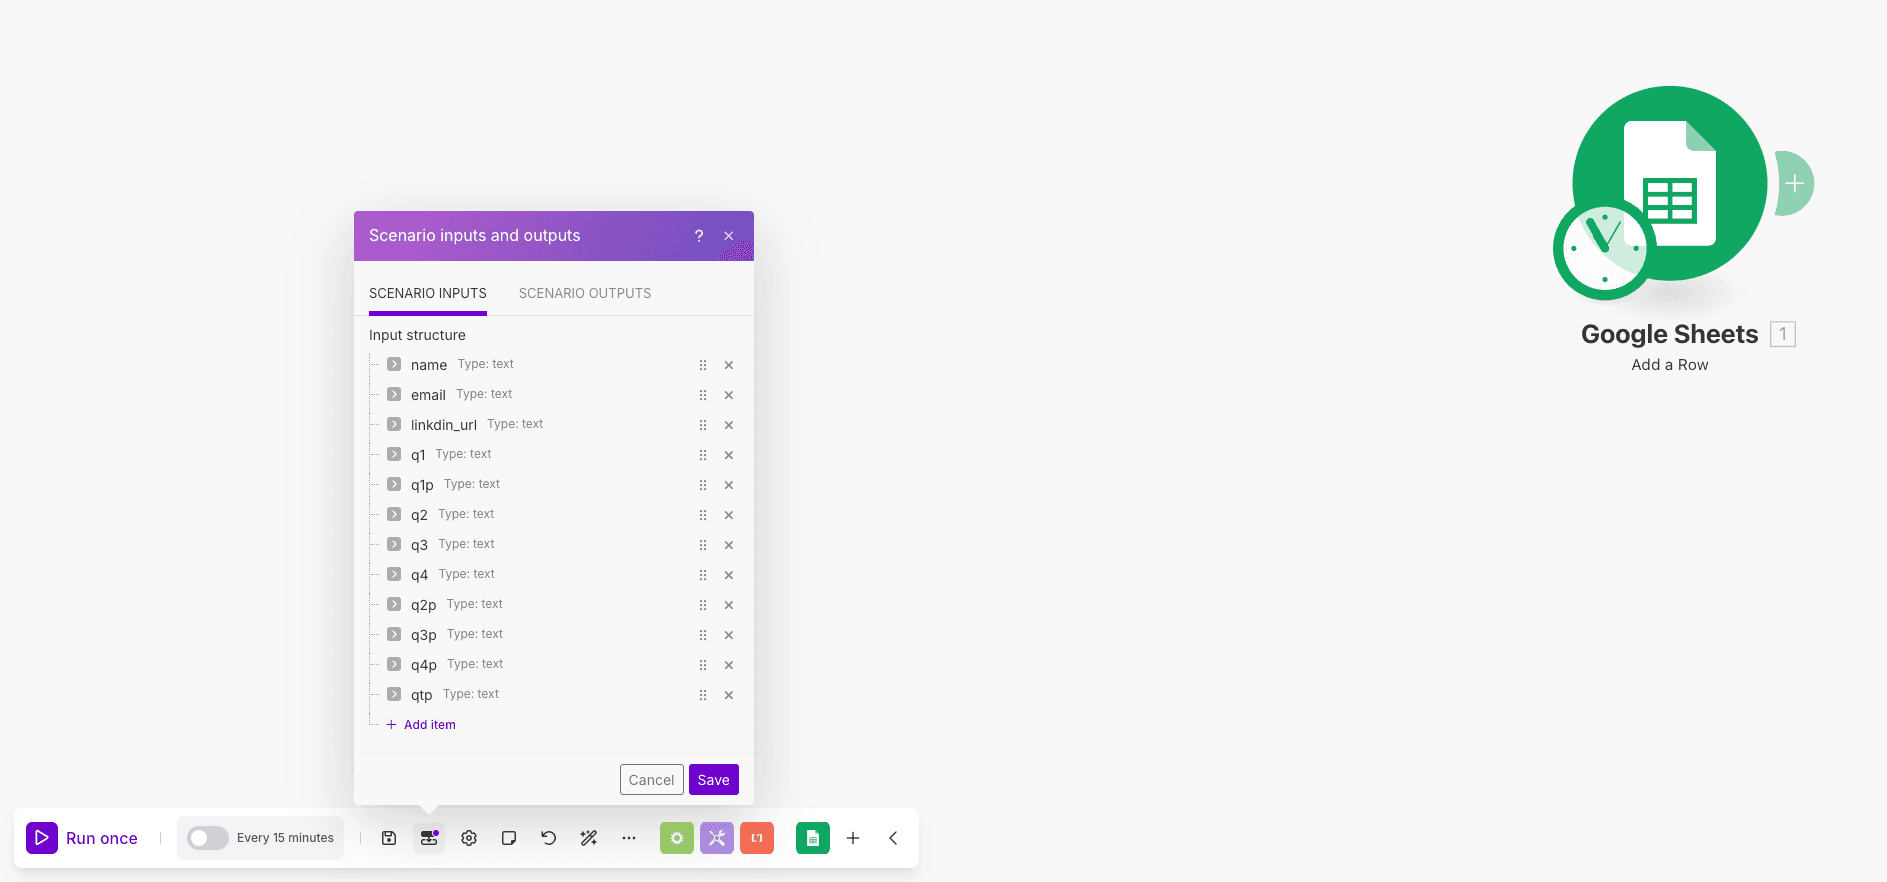
Step 7: Define scenario inputs (and connect the agent)
Click the Scenario inputs and outputs button. Add a new input for each piece of data the agent will provide:
name (Type: Text) – Candidate name.
email – Candidate email.
linkedin_url – LinkedIn profile URL.
q1, q2, q3, q4 – Answers to each of the four screening questions.
q1p, q2p, q3p, q4p – Numeric points (0–2) for each answer.
qtp – Total points (sum of q1p–q4p).
These scenario inputs become variables ({{var.input.name}}, etc) that the Google Sheets module can use. When you set up the “Add a Row” step, you’re mapping each column to one of these inputs as shown. (In other words, the agent will fill those inputs in its response, and Make will insert those values into the sheet.)
Finally, make sure the Sheets scenario is available to your agent. In the Run AI Agent module of Scenario 1, under Additional tools, add this new “Log Candidate” scenario. The agent will then know it can call this tool.
Step 8: Test the workflow
Your setup is complete. Try it out by dropping a sample resume into the watched folder on the Drive. Then run the Resume Intake scenario once (or wait for the next scheduled trigger). In the logs, you should see the PDF converted and the agent’s output. Check the Google Sheet – a new row should appear with the candidate’s name, contact info, answers, and points. If something is off, you can adjust the prompt or mappings to correct it. However, once it’s working, any new resume will be automatically processed and logged.
Prompt Writing Tips
The AI agent’s behavior depends heavily on how you prompt it. Use these tips to craft an effective prompt for screening resumes:
Ask the questions explicitly. In your agent prompt, list the exact questions you want answered. For example: “Does this candidate have experience writing video scripts?” This ensures the agent knows which criteria to evaluate. Provide context like “Answer the following questions based on the resume: …” followed by each question in a clear list or bullet points.
Specify answer format and scoring. Tell the agent to respond with both a text answer and a score. For example: “For each question, give a brief answer and then ‘Points: X’ where X is 0–2.” Or instruct it to output JSON with keys matching q1, q1p, etc. Consistency lets Make map the outputs to your scenario inputs automatically.
Include fallback instructions. Cover cases where a detail might be missing. E.g., “If the resume doesn’t mention YouTube experience, respond ‘Not found’ and give 0 points.” This prevents vague answers and ensures consistent scoring.
Control language and tone. If your resumes are in another language, you can add instructions like “Answer in the same language as the resume” or “Translate non-English resumes to English before answering.” In one test, the agent responded in Spanish when presented with a Spanish CV – consider explicitly specifying the resume language if needed.
Format for clarity. Ask the agent to use line breaks, numbered answers, or JSON so the output is easy to parse. For example: “Return the answers in JSON with keys q1, q1p, etc.” Or “Use clear bullet points and label each answer.” This helps avoid formatting errors.
Test and refine. Run the agent on several sample resumes. Check if it missed anything or mis-scored. Tweak your prompts based on what you see. Maybe the agent needs a reminder to “only use 0,1,2 for scores,” or to “explain the reasoning briefly.” Iteration will get you the most accurate screening.
Customizing the workflow
The beauty of Make is its flexibility. You can adapt and extend this Recruiting Agent easily:
Add communication. Send automated interview invites or rejection emails. For example, after adding the row, use an Email or Slack module to notify HR with a summary of the candidate’s scores.
Use a database or ATS. Instead of Google Sheets, you could log candidates in Airtable, Salesforce, or a dedicated ATS via API.
Expand screening questions. Change the prompt to ask different or more questions (e.g., “Have they managed a team? Do they have the required certification?”). Simply add more inputs (e.g., q5) and sheet columns.
Multi-turn interactions. If you want a chatty assistant, you could trigger follow-ups. For instance, use a Slack chatbot or email thread where you reference the candidate’s file name (we used thread ID = file) to pull up the previous context and ask additional questions.
Alternative tools. Use OneDrive, Dropbox, or even an email inbox as the trigger. Swap PDF.co for another parser or OCR tool if needed. Use any AI model or API instead of Make’s built-in agent.
Conclusion
With , you now have a scalable way to automate resume screening - from upload to evaluation - without writing a single line of code.
In this guide, we built an agent that fetches new CVs, answers your screening questions, and logs results in Google Sheets. Whether you’re using Google Drive, PDF.co, or other tools, the steps stay the same: define your questions, build your scenarios, and let the agent handle the rest.
Ready to try it? , create a new AI Agent, and connect your modules. In minutes, you’ll turn manual hiring into a smart, automated flow - built to scale with your team.
Ready to make the automation revolution happen?