Apr 24, 2023
How to Automate Lead Enrichment with Make [Tutorial]
In this tutorial, we’ll show you how to automate lead enrichment, scoring, and distribution with Make.

As marketing and sales become more sophisticated, companies are continuously searching for new ways to reach their quotas, and one of the most effective strategies to achieve this is lead enrichment.
What is lead enrichment?
Lead enrichment is a marketing strategy that involves gathering data on potential leads, analyzing them, and using the results to create highly personalized campaigns that convert at better rates than other marketing and sales approaches.
Lead enrichment is typically accomplished through various methods, such as data appending, social media monitoring, web scraping, and third-party integrations.
Ultimately, lead enrichment aims to build stronger connections with potential customers by providing them with relevant and valuable information that meets their specific needs and interests.
However, gathering and enriching lead data is time-consuming and repetitive, turning automation into the next logical step.
In this tutorial, we’ll show you how to automate lead enrichment, scoring, and distribution with Make.
Before jumping into details, let’s take a look at our lead enrichment solution, and the apps it involves.
Automated lead enrichment: Build the solution, understand the process
Receiving new leads with minimal information (engagement and basic prospect info) makes it difficult to accurately score them, and eventually convert them as well.
This is the problem that lead enrichment solves.
Without basic information, leads won't get assigned to the appropriate sales rep, and in turn, won’t get their particular requirements handled the way it should.
The result: A slowed-down sales cycle that costs companies resources and opportunities.
To solve this, we’ll build a Make scenario that enriches lead data, scores the leads, and distributes them across a sales team automatically.
And we’ll do so with apps you may already have, such as Clearbit, Salesforce, and Slack.
It all starts with a custom webhook that receives new leads from your website (i.e. leads that fill out a form on your website).
The domain of each lead’s company email is then used by Make to enrich the data in Clearbit.
Depending on a combination of metrics (for example, company location, company size, and industry) a lead is created in Salesforce, and a score is assigned to the lead.
Then, Make will route the leads to the right salesperson depending on this score.
Ready to get started? Get your Make account, and gear up for building something incredibly useful!
Step 1: Create the Make scenario and set up the webhook
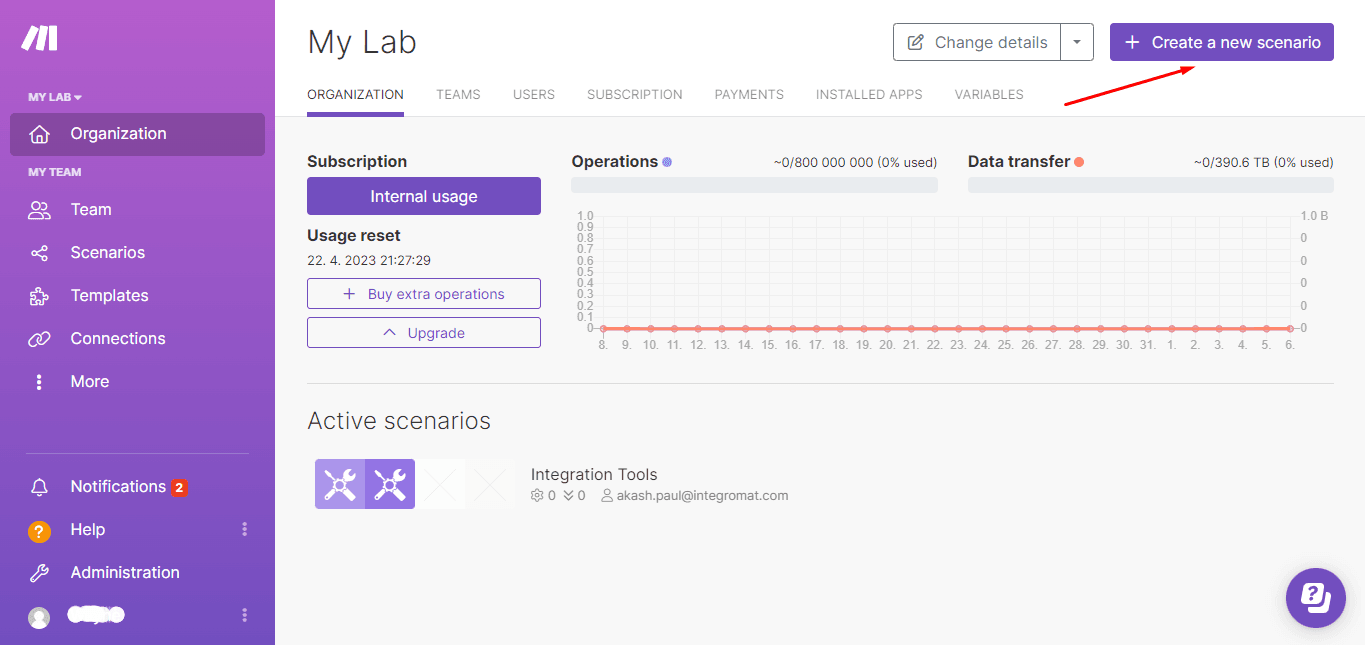
Within your Make organization, click the Create a new scenario button located at the top right of the scenario tab. This will open the scenario builder.
This scenario uses a custom webhook as a trigger.
After a lead fills out the form on your website, the webhook will instantly receive the data that will trigger this automation.
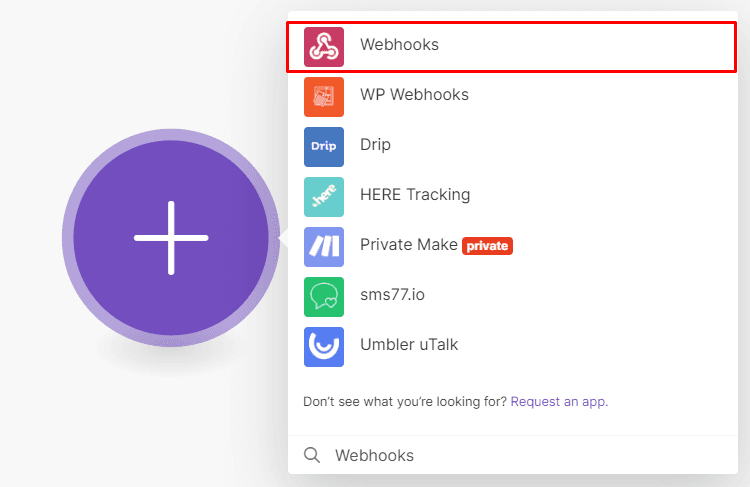
To add a webhook to your scenario, search for the Webhooks app:
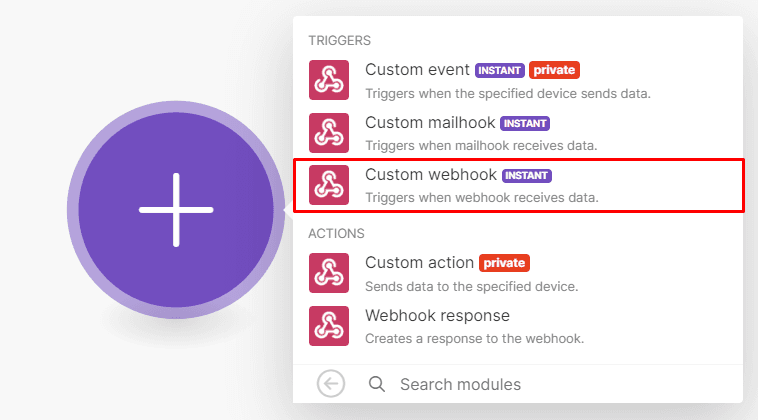
And then select the Custom Webhook module:
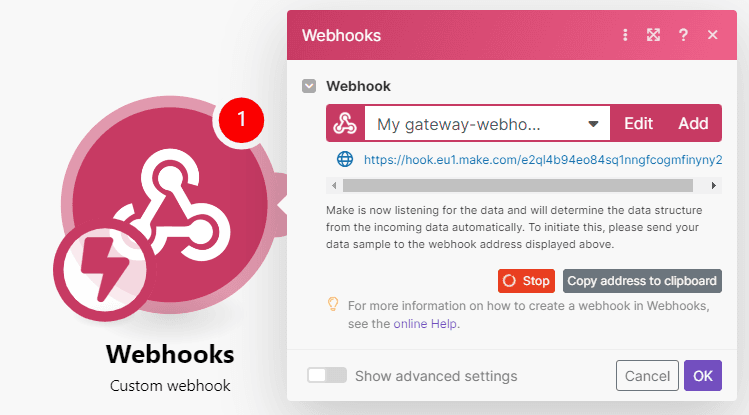
Now it’s time to configure the webhook.
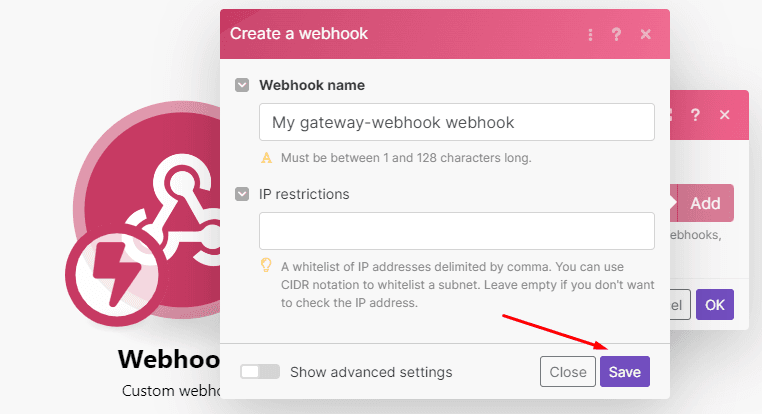
Click Add, give your webhook a name, and then click Save.
The webhook is now “listening” for new data to determine the data structure.
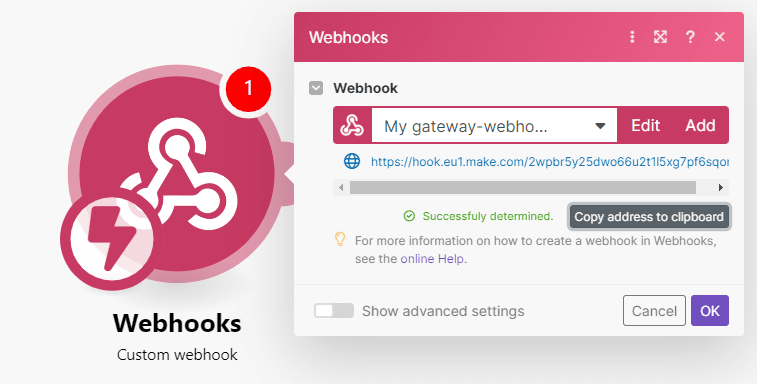
Copy the webhook URL (see the image above), head over to your website admin panel, and paste the webhook into the correct place.
If you’re using WordPress, you can find this feature by adding /wp-admin/options-general.php?page=webhooks to the end of your site’s URL (i.e. example.wordpress.com/wp-admin/options-general.php?page=webhooks).
Then, select the correct action that watches for new lead submissions.
Ensure that your lead sign-up form has fields for First name, Last name, and Email address.
Now it’s time to help the webhook determine the structure of the data that leads will be submitting.
To do this, submit a test lead through your website’s form.
If done right, you’ll notice the words “Successfully determined” in the Webhook module you’ve been configuring in Make. This means that the data has been received and that your webhook is fully operational.
Now that the webhook is set up and the data structure determined, it’s time to move on to the next step.
Step 2: Add the Clearbit module
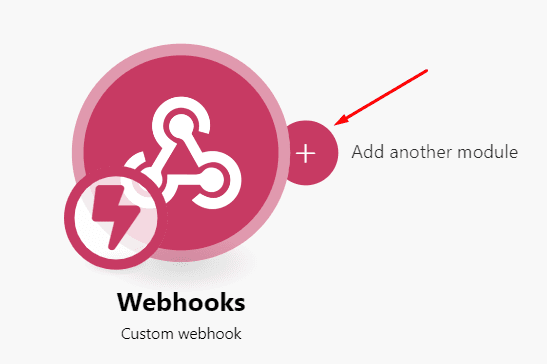
When you hover your cursor on the right side of the module, a plus sign appears. Click on it to add the next module.
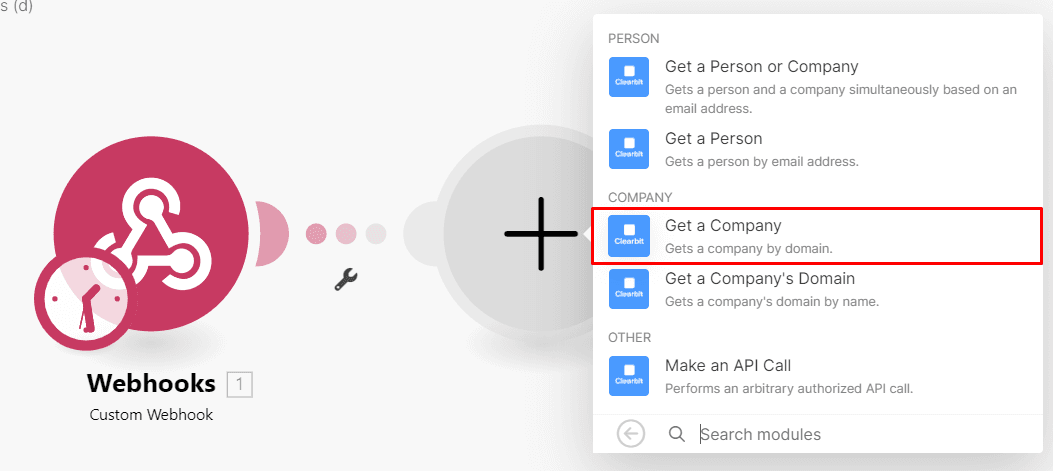
Then, search for the Clearbit app and select the Get a Company module from the list.
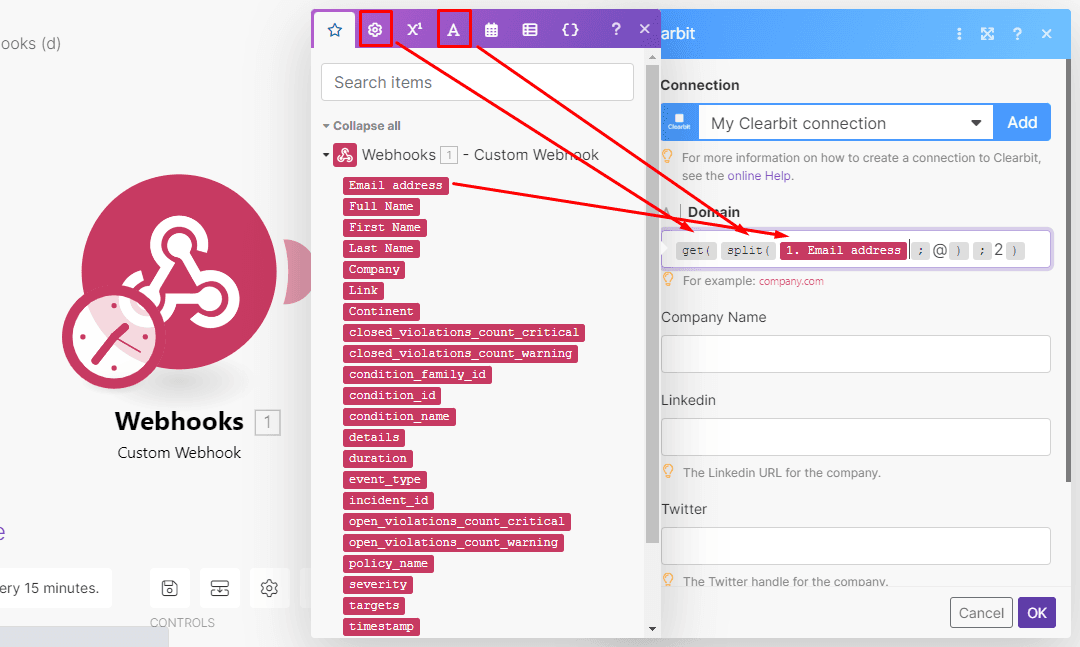
From the Webhooks module, map the Email address data element to the Domain field.
Use the get() and split() functions to extract the domain from the address - we will use them as the search criteria to enrich the lead.
In case you’re not familiar with functions, don’t worry. You can check the screenshot below to learn how to configure the module:
That’s all we need to configure this module. Once done, hit OK, and move to the next step.
Step 3: Add a router and configure the filters
At this point, the combined data from our Webhook and Clearbit will be used to calculate the score for the lead.
In this scenario, there are three scores: High (hot), Medium (warm), and Low (cold).
We are keeping it to just three for this demo, but you can create as many scores as you wish. Each score is a combination of:
The continent of the company.
The company size.
The industry/category of the company.
And here are the examples we’ll use for this demo.
High score:
Continent: Europe
Company size > 100
Category: Software
Medium score:
Continent: Europe
Company size < 100
Category: Software
Low score will be any other company that doesn’t match the criteria above.
Understandably, your criteria will probably be different than this one, so feel free to match your exact needs.
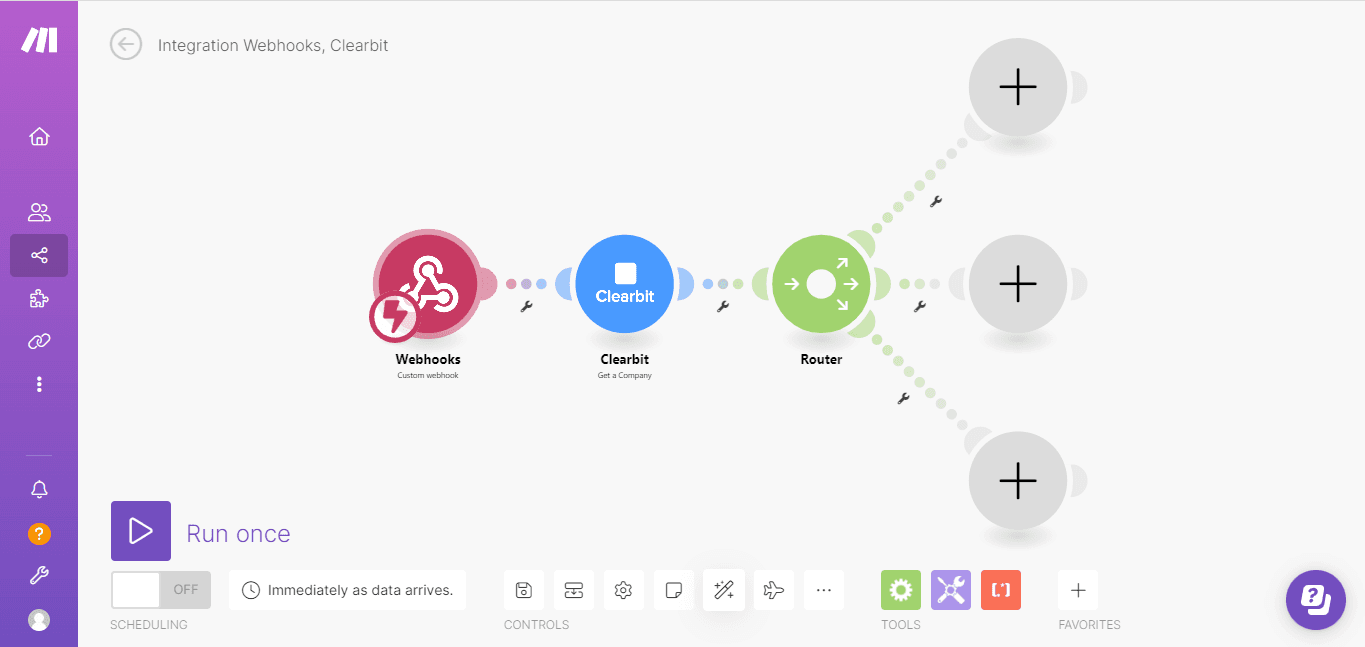
Back to our scenario. Since there are three scores, the scenario needs to be split into three routes - one route for each score.
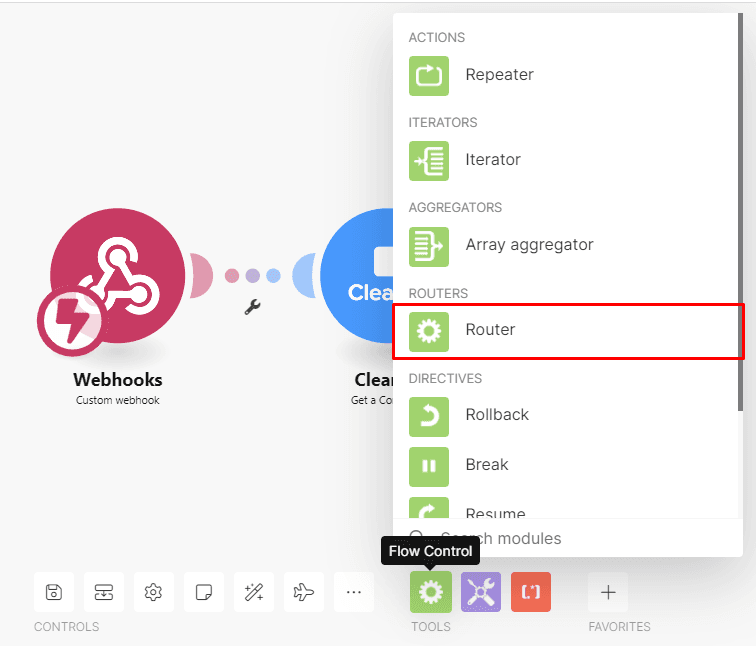
The way to do this in Make is to add a Router. You can find the Router in the tools menu.
Drag the Router to the side of the Clearbit module to attach it.
If you click it once it opens two routes; click it twice to open three routes like you see below.
Each route is assigned to each score, and to ensure that the wrong routes aren’t taken a Filter is required on each one.
To add a Filter, click on the link between the Router and the empty module.
Note: We’ll show you how to add a filter with specific conditions that must be met in order for the data to pass through. Use this as a guide so that you can set your own conditions, which may differ from the ones in this tutorial.
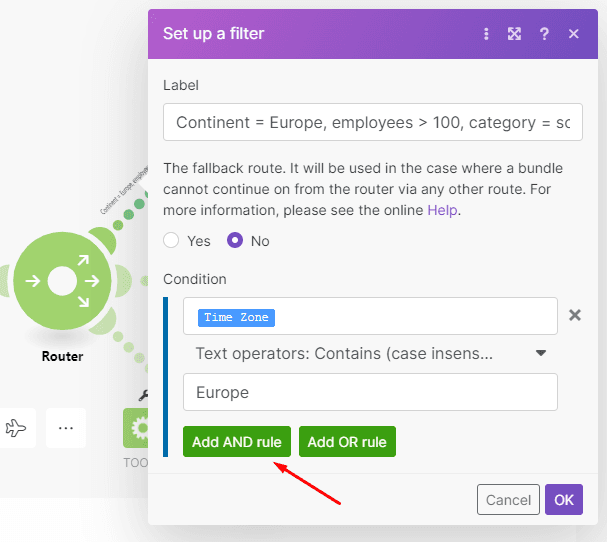
Once you click on the little wrench between the Router and the module, you’ll be opening the filter’s configuration box.
Start by giving the filter a name according to the score.
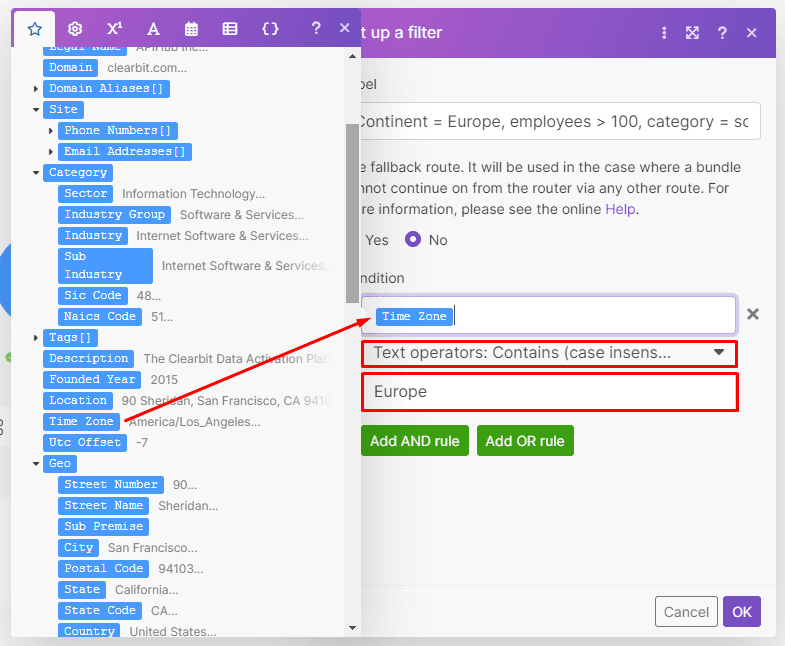
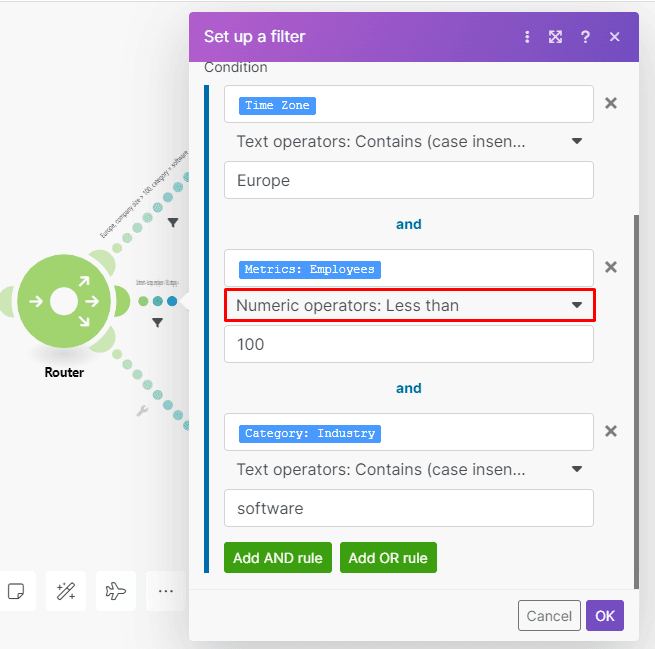
In the first Condition box, map the Time Zone metric data element from the Clearbit module.
Then, select the Text operators: Contains (case insensitive) operator since the Time Zone has the continent and city names. Then, enter the continent below.
That's the first condition but we need two more for this filter.
All three conditions must be met in order for the data to pass through the filter.
This means you need to select the Add AND rule option.
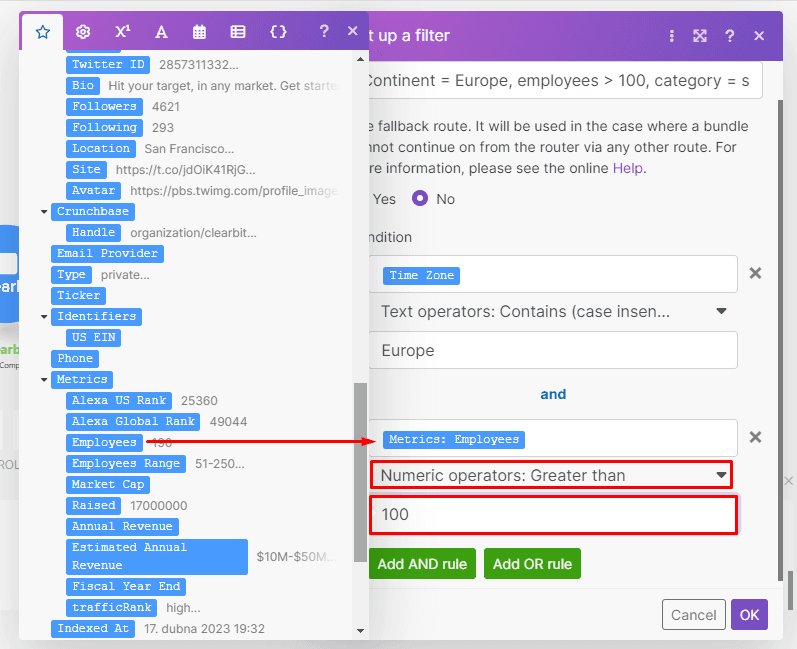
In the next condition, map the Metrics: Employees data element from Clearbit to the top field.
Then, select the Numeric operators: Greater than (since it’s a number) and enter the size of the company/number of employees that the companies must be greater than.
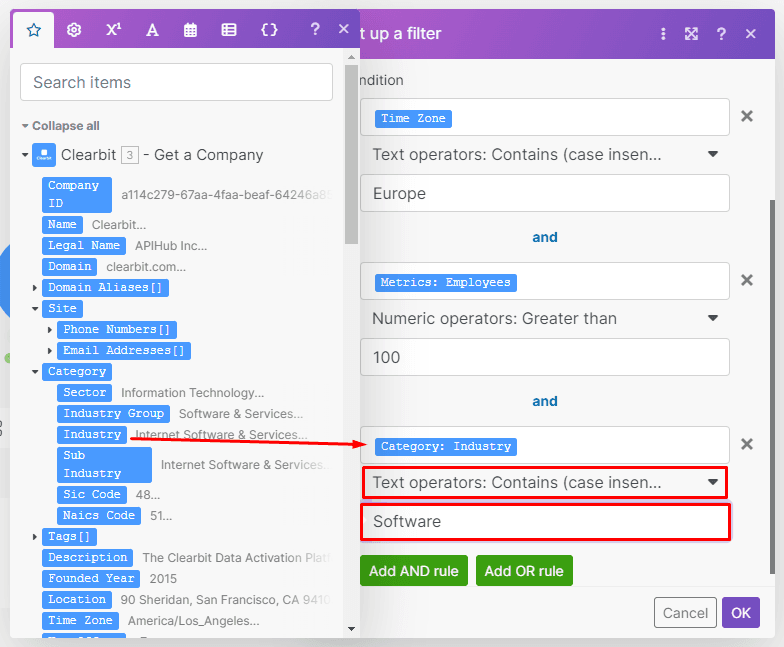
Next, click the Add AND rule again to add the final condition.
Map the Category: Industry data element, and select the Text operators: Contains (case insensitive) operator.
And that’s how you configure the filter.
Just remember, to vary the conditions in each one so they match the lead scoring criteria that you create.
Step 4: Configure the top route in your scenario
Sticking on the top route, let’s go into Salesforce to create a new lead for the sales team.
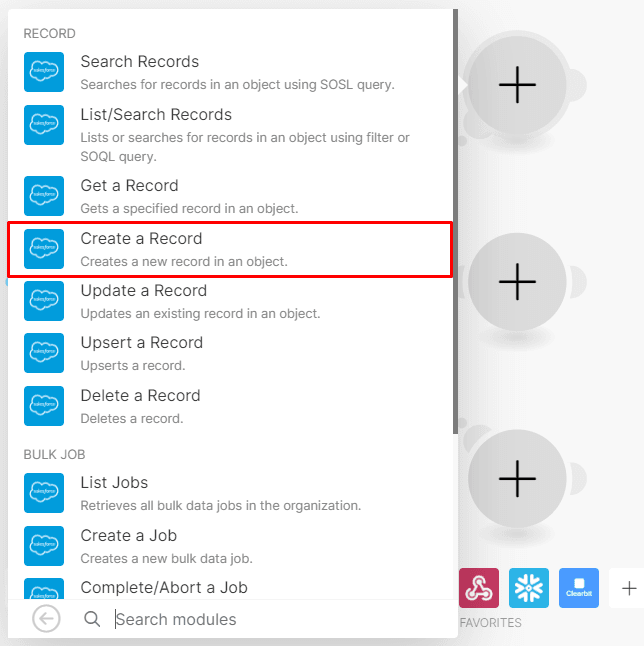
Search for the Salesforce app and select the Create a Record module.
First of all, click Add to connect your Salesforce account to Make.
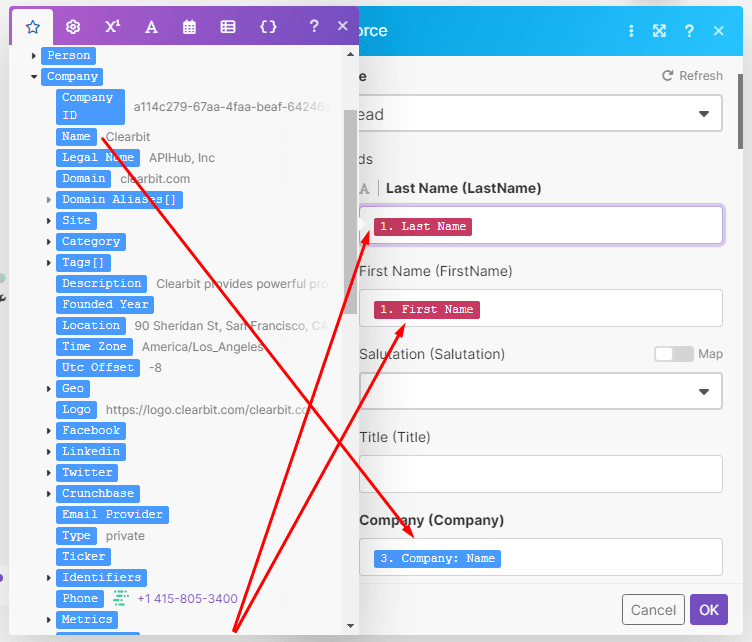
Next, select Lead as the Type, and map the First and Last name elements to the matching fields in the module from the Webhooks module.
For the company field, map the Company:name data element from the Clearbit module.
You can map any other details as you require!
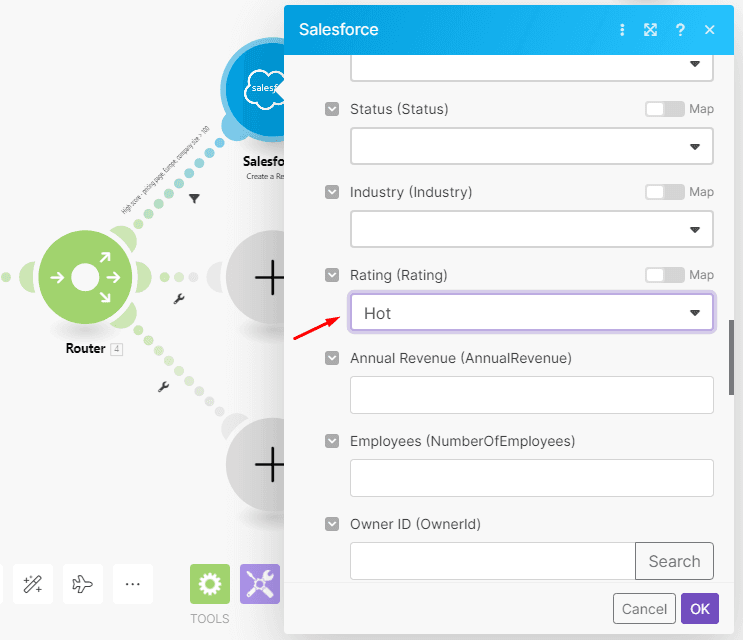
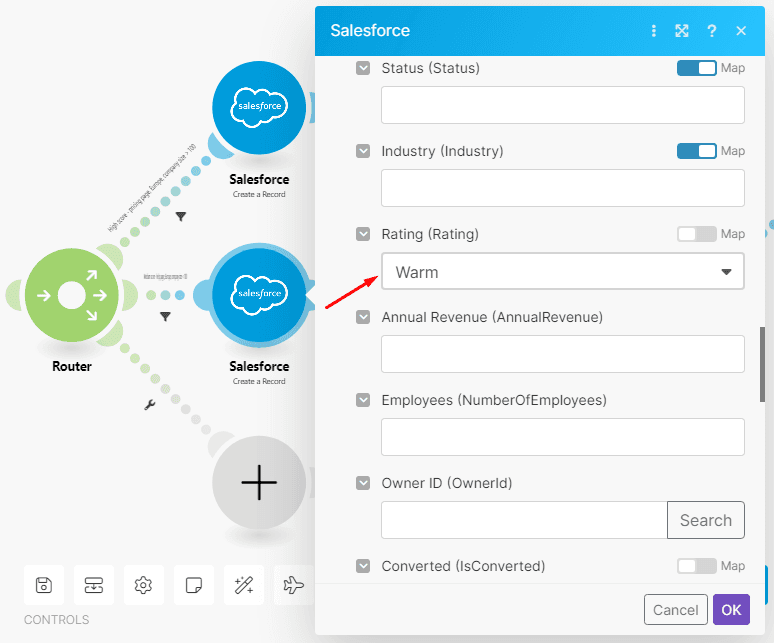
Since this route is only for high-scoring leads, scroll down to the Rating field, and select the Hot option.
And that’s all we need for now. Click OK, and move to the next step.
Step 5: Add the Slack module to notify Sales about a new, enriched, qualified lead
The last step is to notify your sales team about the brand-new lead. We’ll use Slack, but there are other IM apps that Make support in case you need to change it (such as Microsoft Teams).
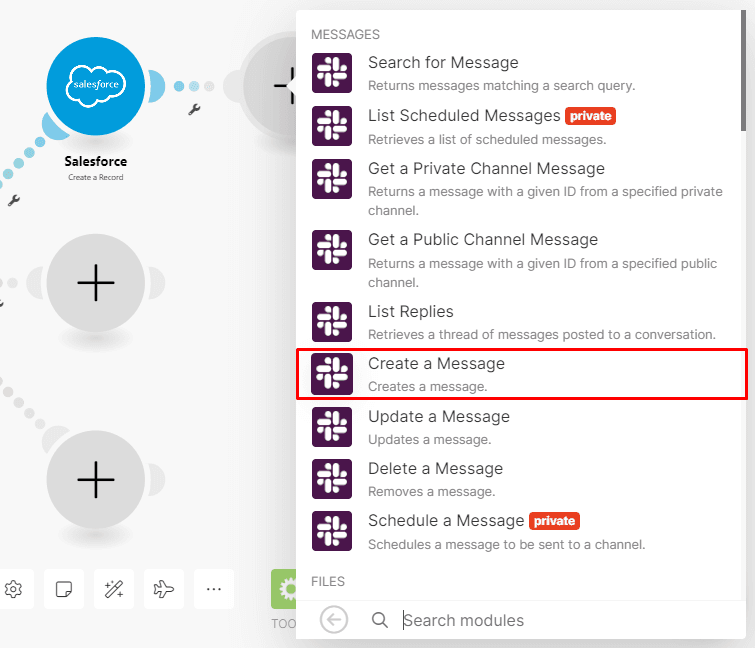
In your scenario, search for Slack and select the Create a message module.
As you did with other modules, start by connecting your Slack account to Make.
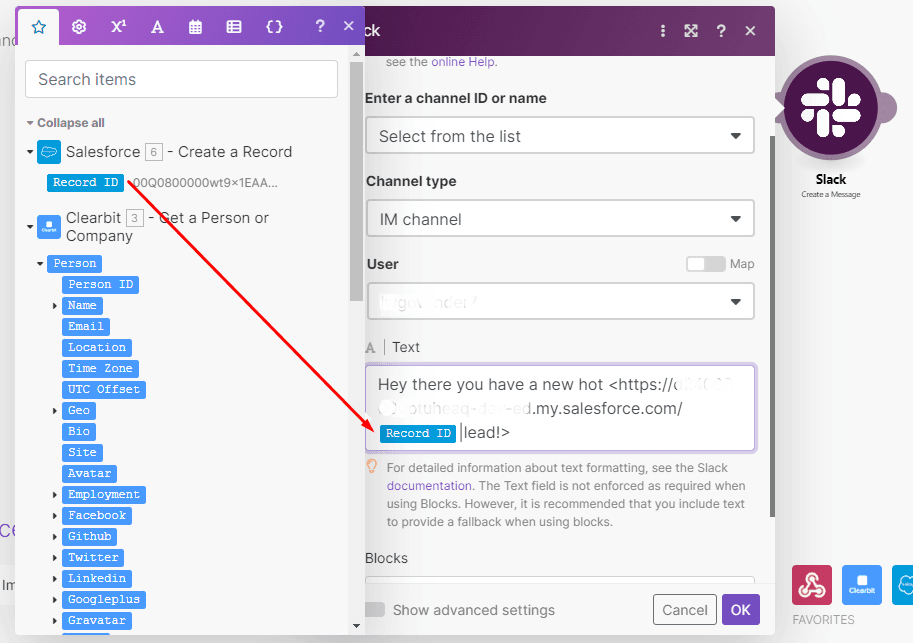
Once you do this, configure the module as follows:
Enter a channel ID or name: Select from the list.
Channel type: IM channel (for direct messages to a specific person or select public/private channel).
Select the User/Channel to which you want to send the notification.
Enter the message in the Text box. We have included the link to the record in Salesforce for easy access.
And that’s all we need for now. Once ready, click OK to finish configuring this module.
Step 6: Middle and bottom routes
These two are similar to the top route, with changes to the filters and the subsequent modules.
Let’s take a look at the filter on the middle route, which is used for the medium score/warm leads.
You’ll notice just the size of the company has changed to “less than 100” from “greater than 100”.
The Salesforce module here is mapped the same as the one we just configured, except that the rating is different.
For the Slack modules, the IM/channel (where the message is sent to) changes, and the text changes from “hot” to “warm” lead.
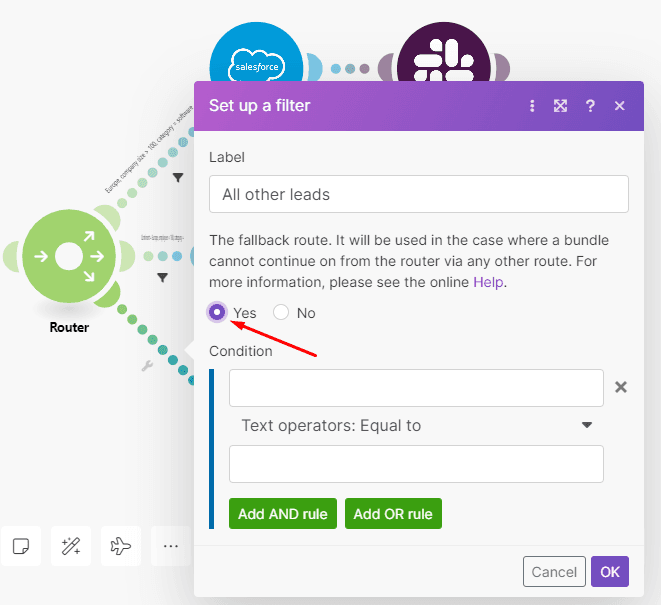
The filter on the bottom route is very easy to set up; in fact, you just need to select the fallback route option.
This means that only if the data doesn’t meet the criteria of the filters on the top and middle routes, this route will be taken. In order words, all the low rating/cold leads will go through this route.
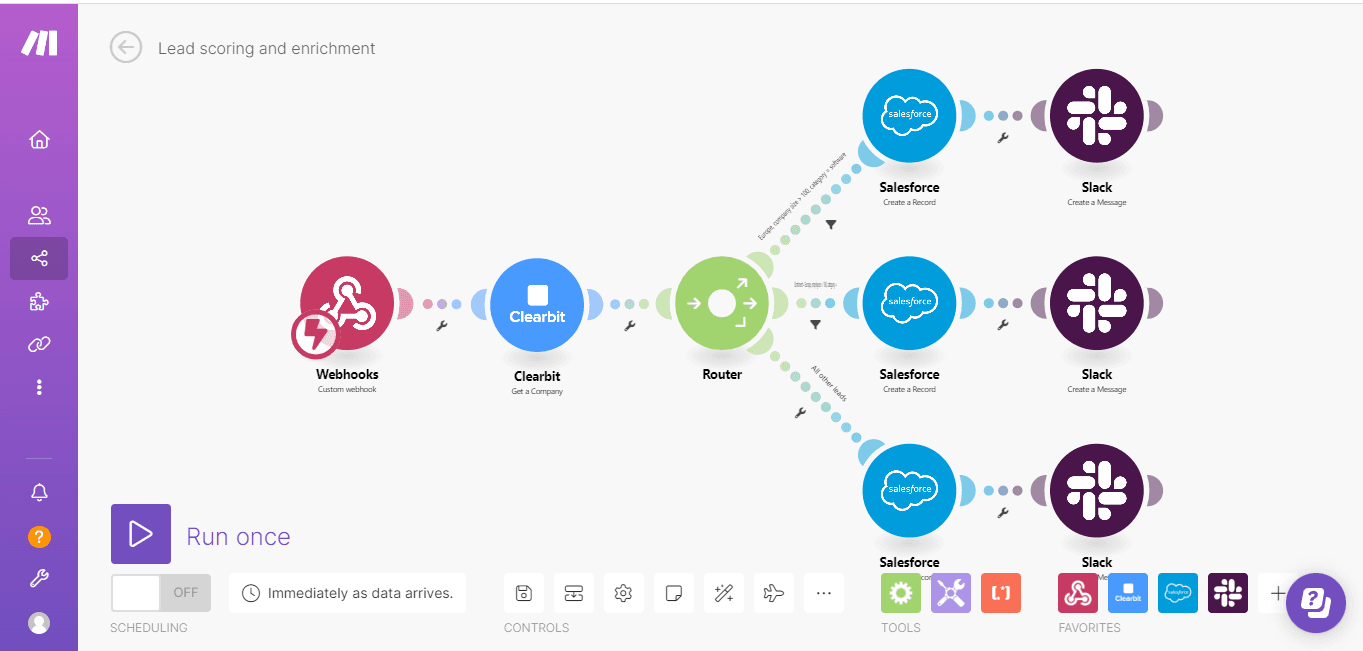
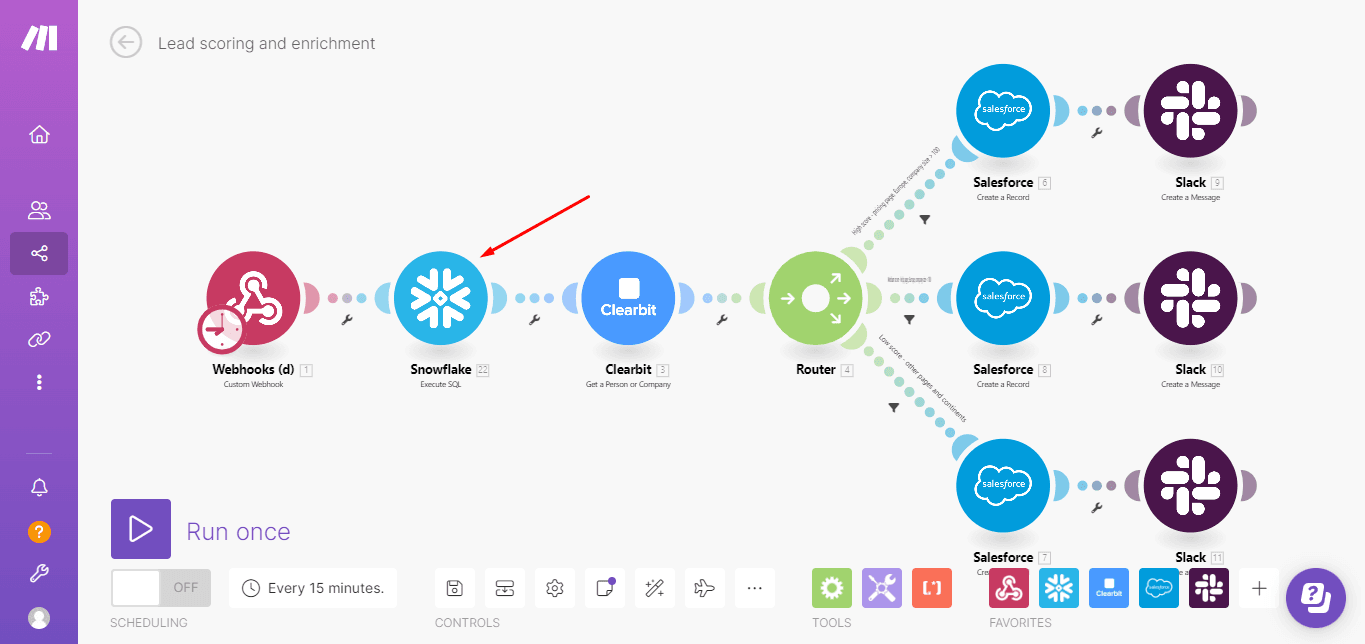
The fully configured scenario looks like this:
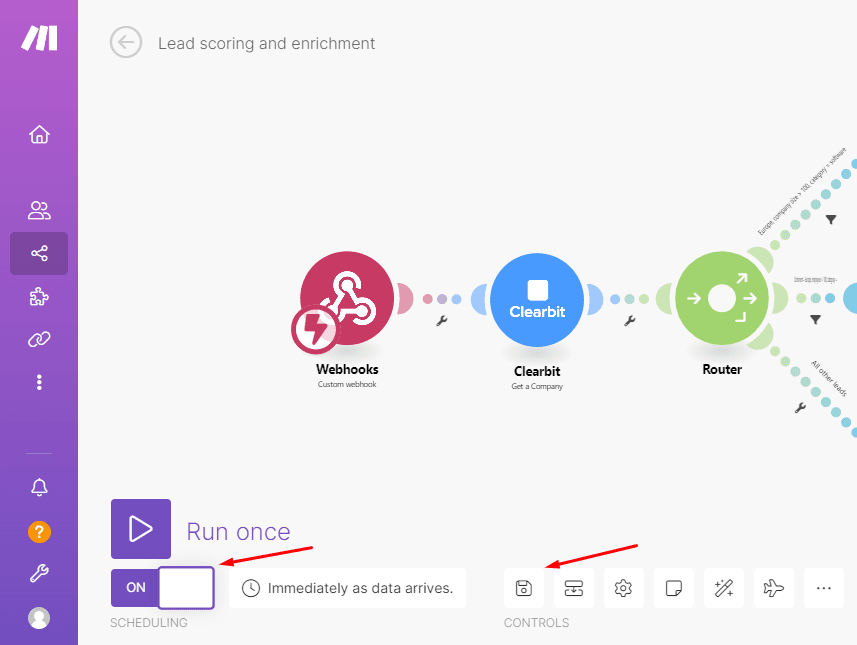
To test your scenario, hit the Run once button and submit a new lead on your website (a dummy lead, of course, as you’re the one filling out the lead generation form on the website).
If the scenario creates and distributes the leads correctly, save it and switch it on as you see below.
Conclusion: Enriching lead data like a pro
As we usually say in our tutorials, this is where the magic starts, not where it ends.
For example, you can use a tracking app like Segment to track which pages your leads visit and send them over to your database in real-time.
Once the lead submits the form, the scenario can then fetch those page views for the lead from the database by matching the details (this requires a Javascript function or custom code to send the details to the webhook).
You can then use this as additional information for your scoring criteria, resulting in even richer leads.
As usual, all it takes is a Make account, and the power of your imagination!
Ready to make the automation revolution happen?


