Jul 23, 2021 | 9 minutes
How to Easily Import Leads from Facebook to Mailchimp and Airtable
Learn how to automatically upload leads from Facebook Leads Ads to Mailchimp, while storing them in Airtable too.

Importing Facebook leads to your email marketing tool is one of those tasks most marketers seek to automate first.
The reason for doing so is quite simple: Manually uploading leads takes time, and increases campaign costs in a less than glamorous manner.
So, whether you use Mailchimp, ActiveCampaign, Brevo (ex Sendinblue), or another email marketing platform, the rationale to integrate it with Facebook Lead Ads is the same.
However, there’s a number of factors to consider before creating this integration.
The first one is what we call the “bigger picture” of integrations.
This will require you to analyze if this integration is the only one you will need down the road. If it’s not, we recommend you to check which integration tool is capable of tackling your future needs - you’ll be killing two birds with one stone.
The second factor is pricing.
Some popular integration tools are also incredibly pricey for what you get in return. Fortunately, this is not the case of Make, which is consistently praised for both its power and friendly pricing.
The third factor is related to the lead management aspect of this popular email marketing integration.
There are a few tools that let you connect Facebook Lead Ads and your email marketing platform. But what happens when you have to backup your leads outside the email marketing tool?
Some marketers do this for safety reasons, while others do it to keep a “clean” collection of leads that will be used in parallel or future marketing activities.
Truth be told, most companies in the integrations and automation space plainly ignore this need, but not Make.
Furthermore, we are here to prove it.
In this tutorial, we will show you how to automatically upload leads from Facebook Leads Ads to Mailchimp, and to store those leads in Airtable as well.
Ready to enter creator mode? Let’s go!
Sending leads from Facebook to one or more email lists
Since Make is a modular product par-excellence, it’s fairly easy to take this basic Facebook Leads Ads - Mailchimp integration to the next level.
The scenario we will create relies on the following Make modules:
Facebook Lead Ads > new lead
Airtable > Create a record
Mailchimp > Add/update a subscriber
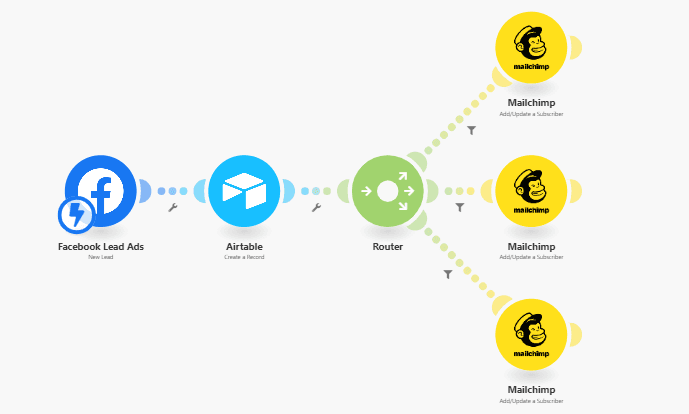
And this is what the end result will look like:
Now, let’s go over each of the steps to create this solution.
Step 1: Creating the Make scenario
The first step is to log into your Make dashboard and hit the “Create a new scenario” button on the top right corner of your screen.
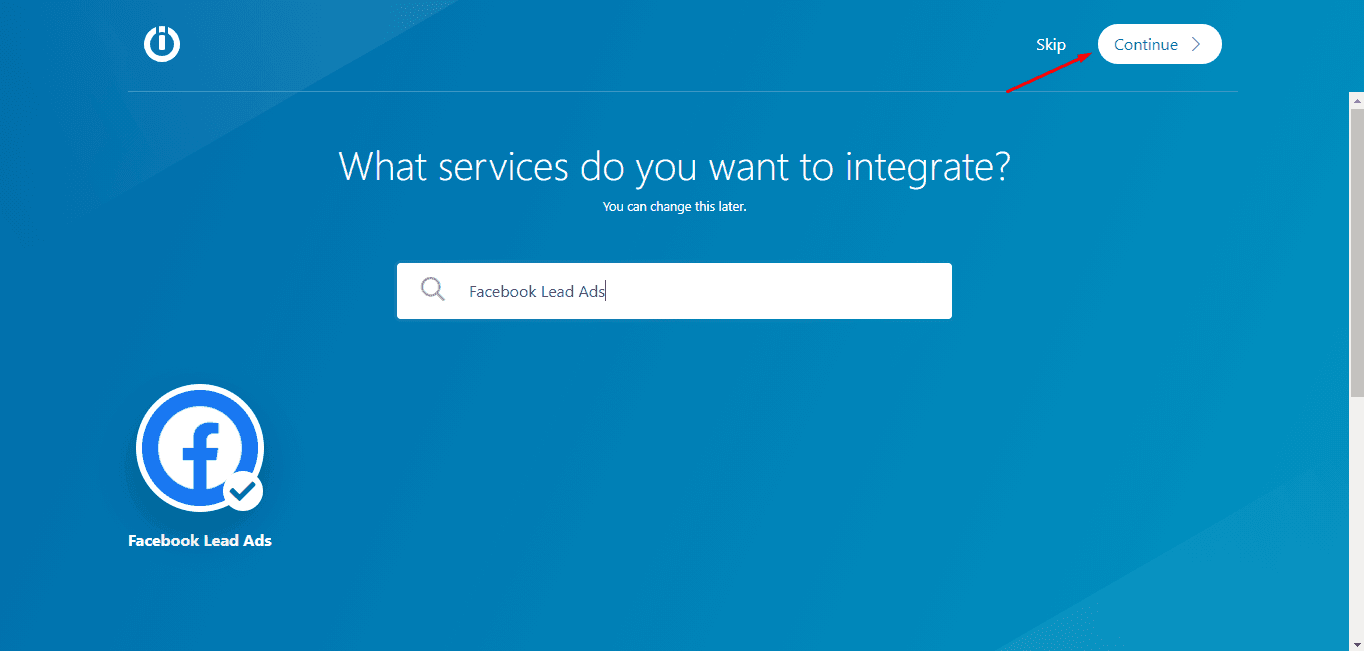
On the screen that follows, search for the Facebook Lead Ads app, and then hit the “Continue” button.
This will land you on the scenario builder, where the magic happens.
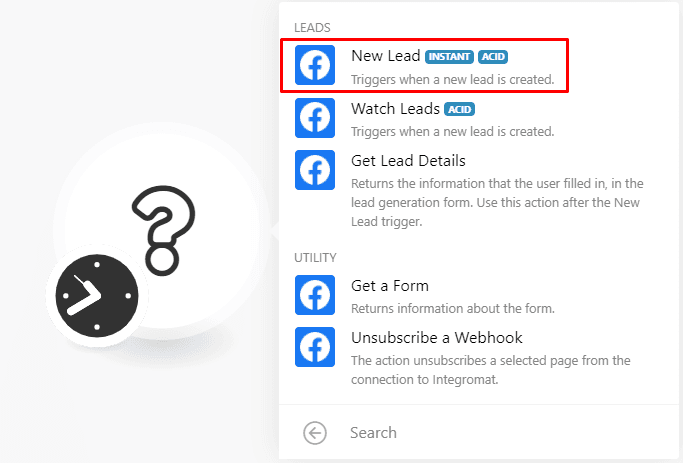
Here you will see a list of the Facebook Lead Ads modules featured by Make. Each of them performs a different type of action.
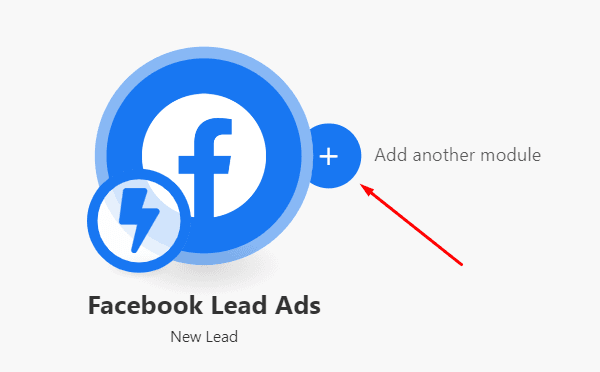
Since the goal is to capture new leads, select the “New lead” module.
This module uses a webhook to instantly receive new lead information whenever the form is submitted.
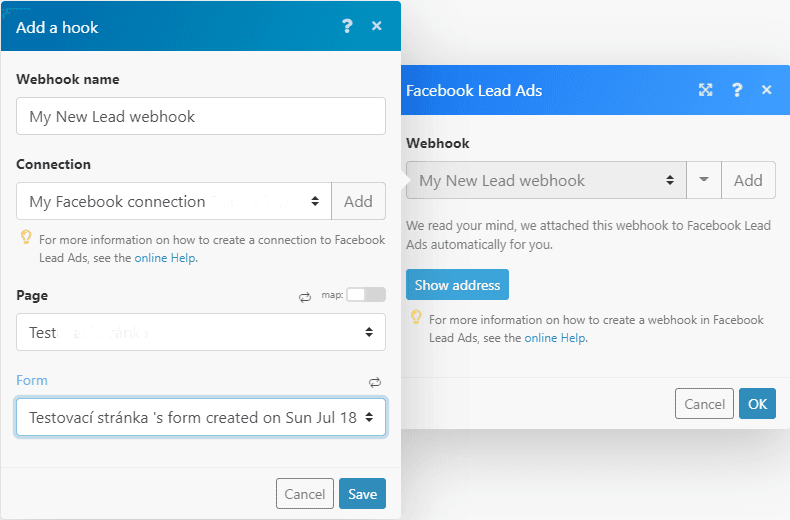
To set up the module, you need to add a webhook.
Click the “Add” button, connect your Facebook account and grant Make access. Then, select the Facebook page and the form that you want to get the leads from.
In the Facebook Lead Ad that we use in this example, there are questions/fields for Name, Email address plus a short question that asks the lead to choose a marketing service from the following options:
SEO
Social Media Marketing
Email Marketing
Our scenario will add the answers to these questions along with the lead details to an Airtable base and to a Mailchimp list.
Step 2: Adding the Airtable module
Now we will add the Airtable app to our scenario.
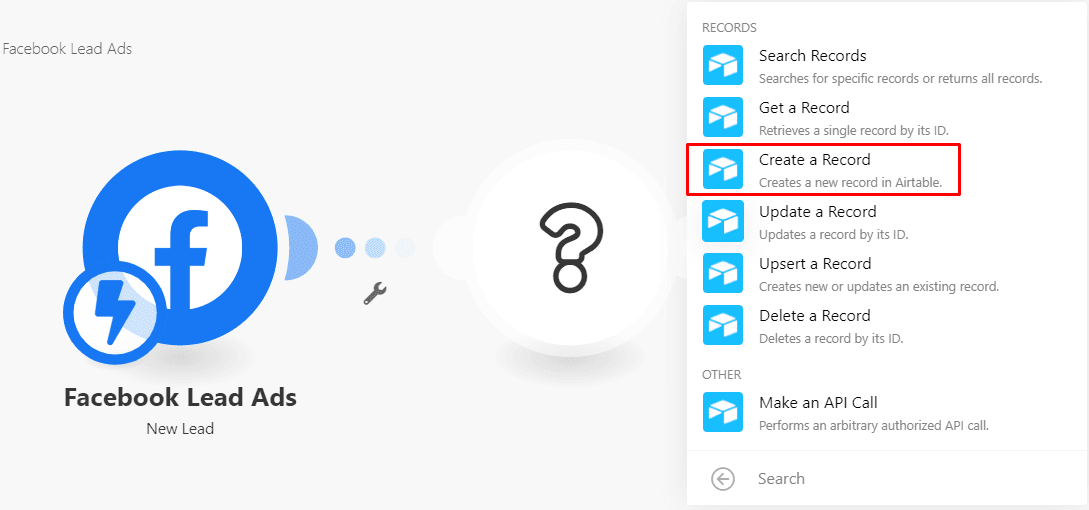
To do this, simply click the little plus sign that appears on the right of the Facebook Lead Ads module when you hover over it.
Once you do that, search for the Airtable app in the pop-up menu, and select the “Create a Record” module.
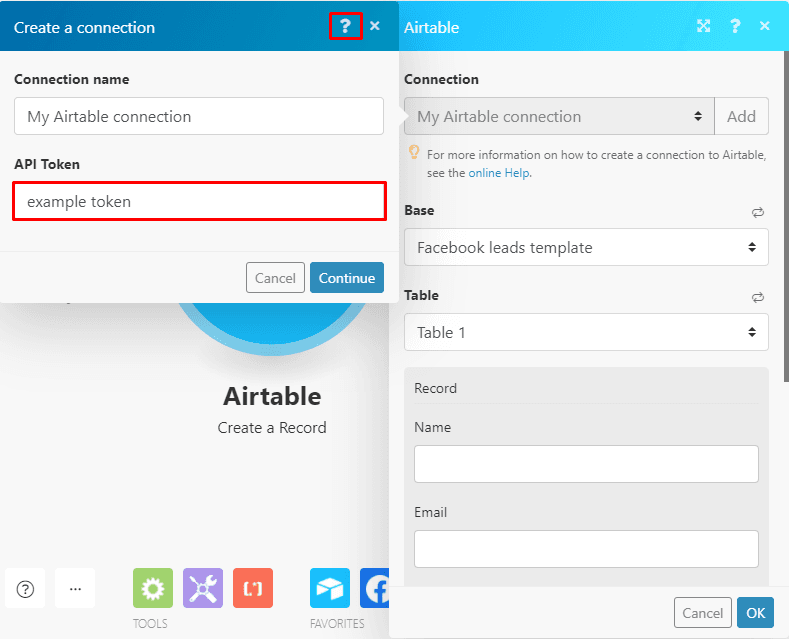
The module’s configuration box will pop up, and you’ll need to add a connection to your Airtable account by entering your API token.
In case you don’t know how to get the token, click the ‘?’ and follow the instructions.
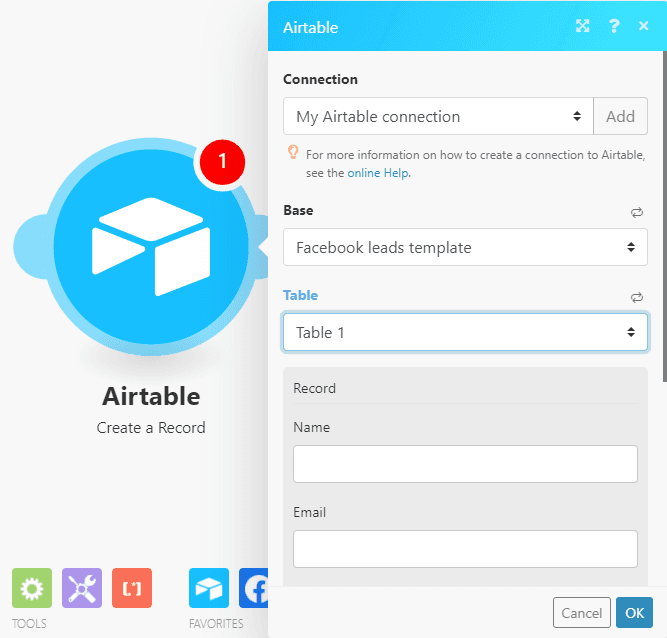
Once the connection has been established, it’ll be time to configure the rest of the module. Select the Base and the Table you want to add the data to.
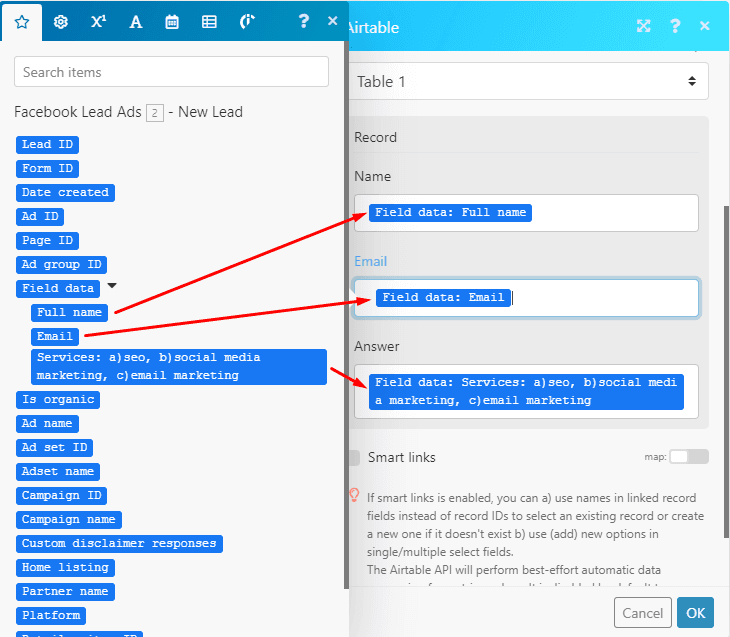
Your Airtable base has to contain columns to receive the information you will be getting from Facebook Lead Ads.
In this example, our base has fields for Name, Email address and Answer - just like our Facebook Lead Ad does.
So, the idea is to get the data from the Facebook ad over to your Airtable base.
And to do this, we need to map the data we need.
In other word, you will need to select the data elements you want from the Facebook module to the matching fields in the Airtable module and hit OK once done.
That’s all you need to configure the Airtable module.
Now let’s continue and add the last module to the scenario.
Step 3: Adding the Mailchimp module
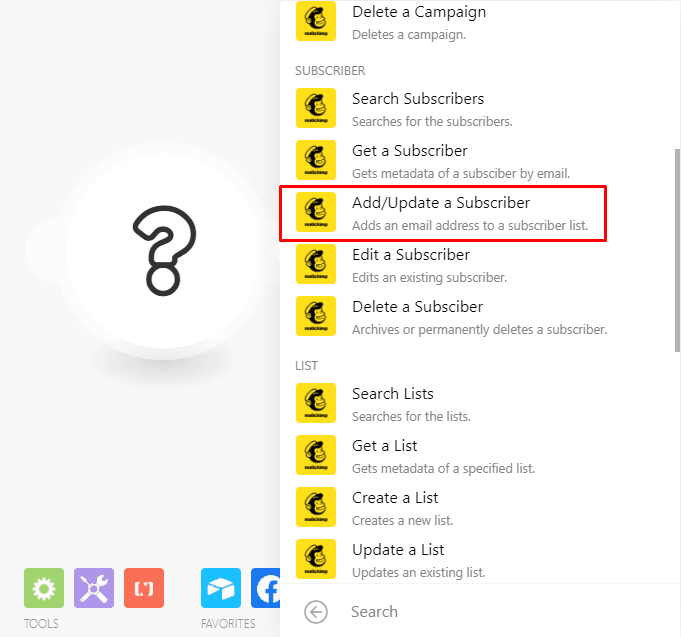
Like you did with Airtable, add a new module to your scenario (the little plus sign), search for the Mailchimp app and select the “Add/Update a subscriber” module.
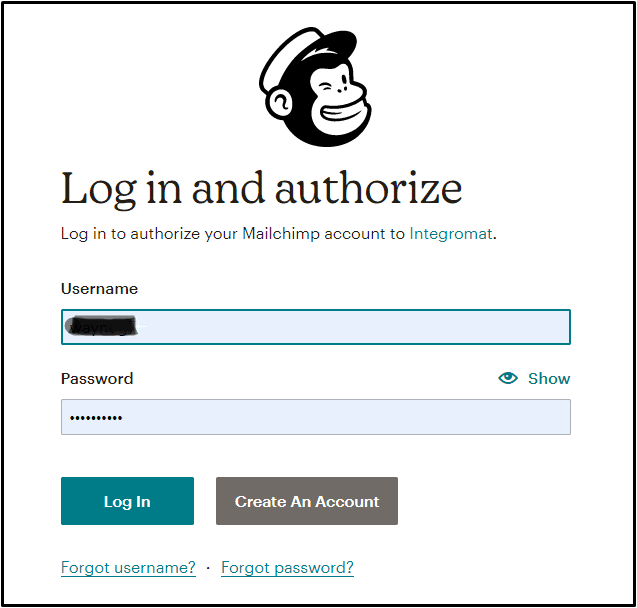
To connect your Mailchimp account to Make, hit the Add button and login. Then, allow Make to access the account.
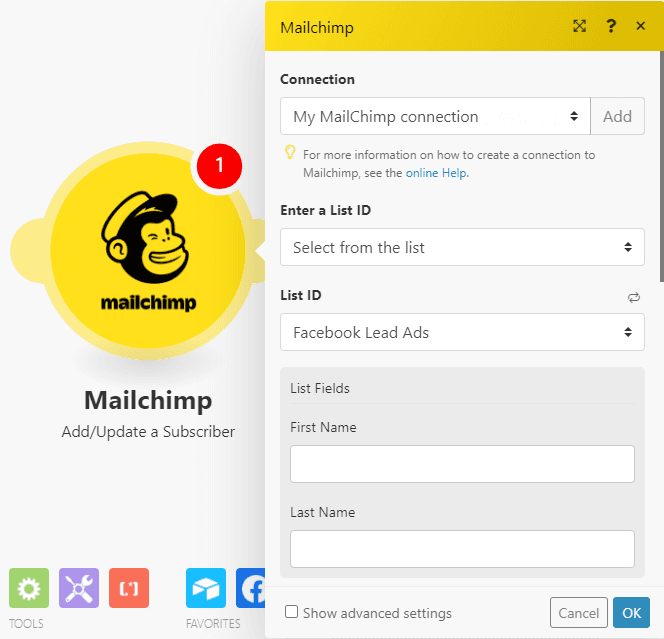
Now it’s time to configure this module.
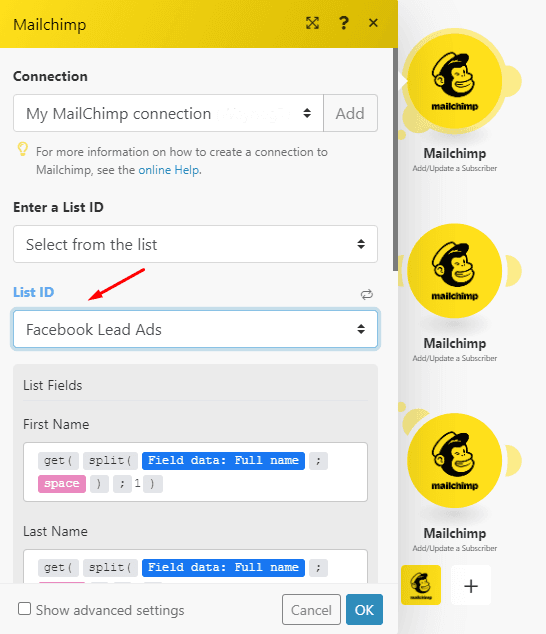
In the “Enter a List ID” field, choose the “Select from the list” option.
In the “List ID” field, select the list that you want to add the leads to.
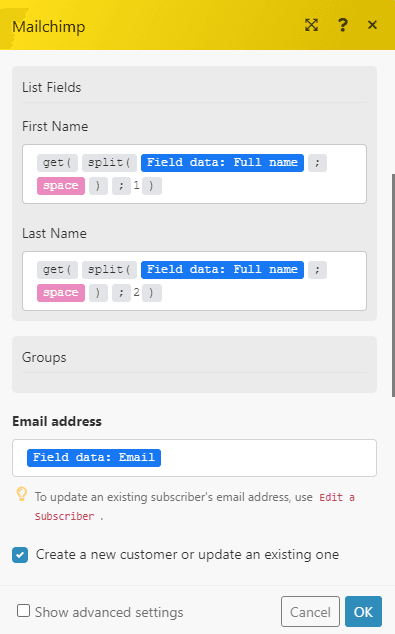
You’ll notice that there are “First Name” and “Last Name” fields in this module but the Facebook module outputs the lead’s full name only.
This means you need to split the Full Name into the First and Last Names.
This is easily done using Make’s built-in functions to manipulate data in various ways.
For this specific task, you will need to use the following functions:
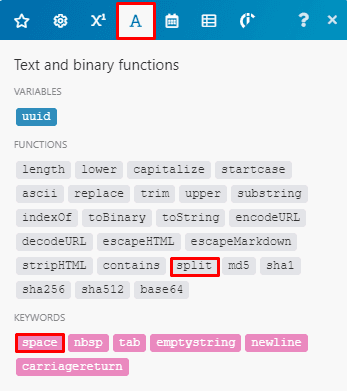
Split function. You will find it under the Text and Binary functions tab along with the Space keyword as shown below:
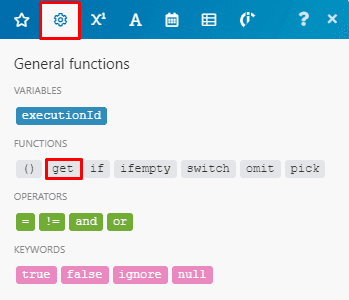
The Get function. You will find it under the General functions tab as you see here:
Combining these two functions together and mapping the Full Name data element from the Facebook module in the correct position will achieve the desired result.
See the image below for reference on how to configure this.
After you do this, finish by mapping the Email data element to the Email address field and tick the option below it (“Create a new customer or update an existing one”).
Congrats! Your scenario is fully set up and ready for the final step.
Step 4: Testing the scenario
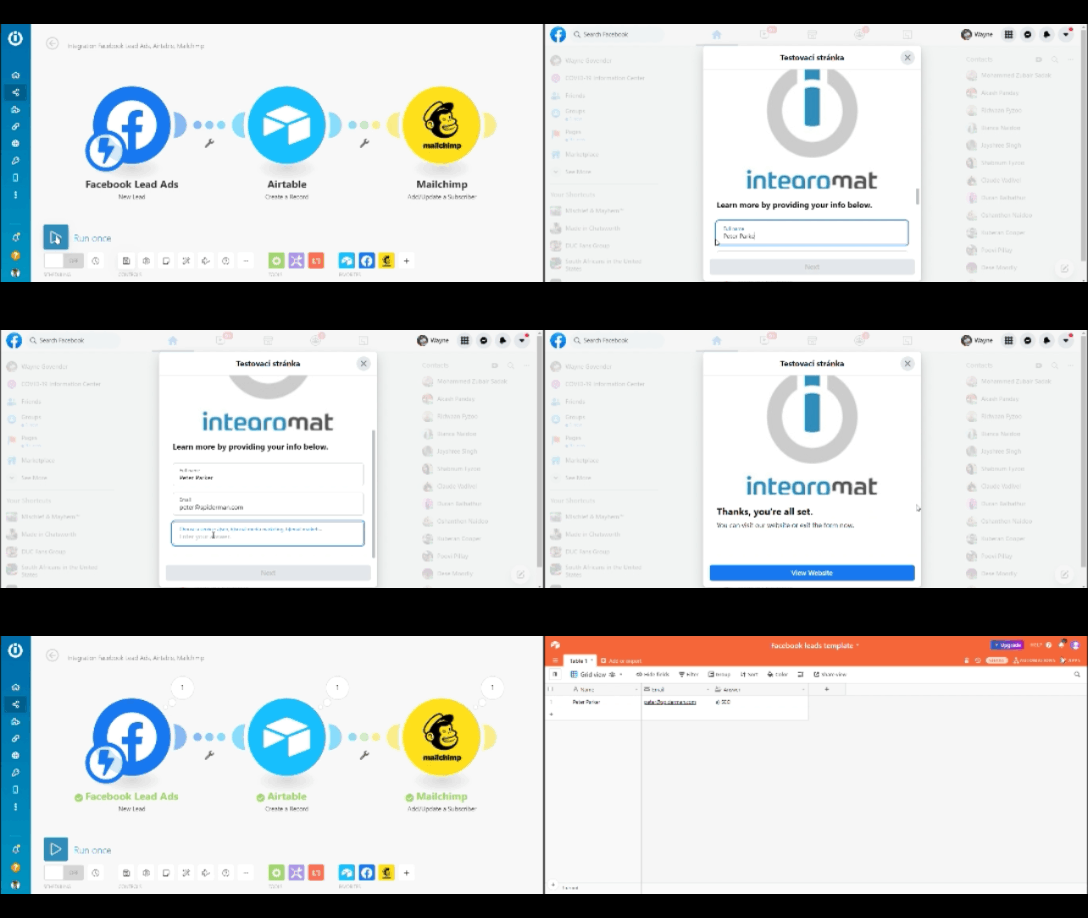
Since this is an instant trigger (meaning that the automation runs every time a form is submitted), you will need to do the following to test it.
First, hit the “Run once” button in the scenario builder.
Then, head over to Facebook and submit a lead ads form.
Once you submit the form, open the scenario again to see if the execution was successful. It should look like this:
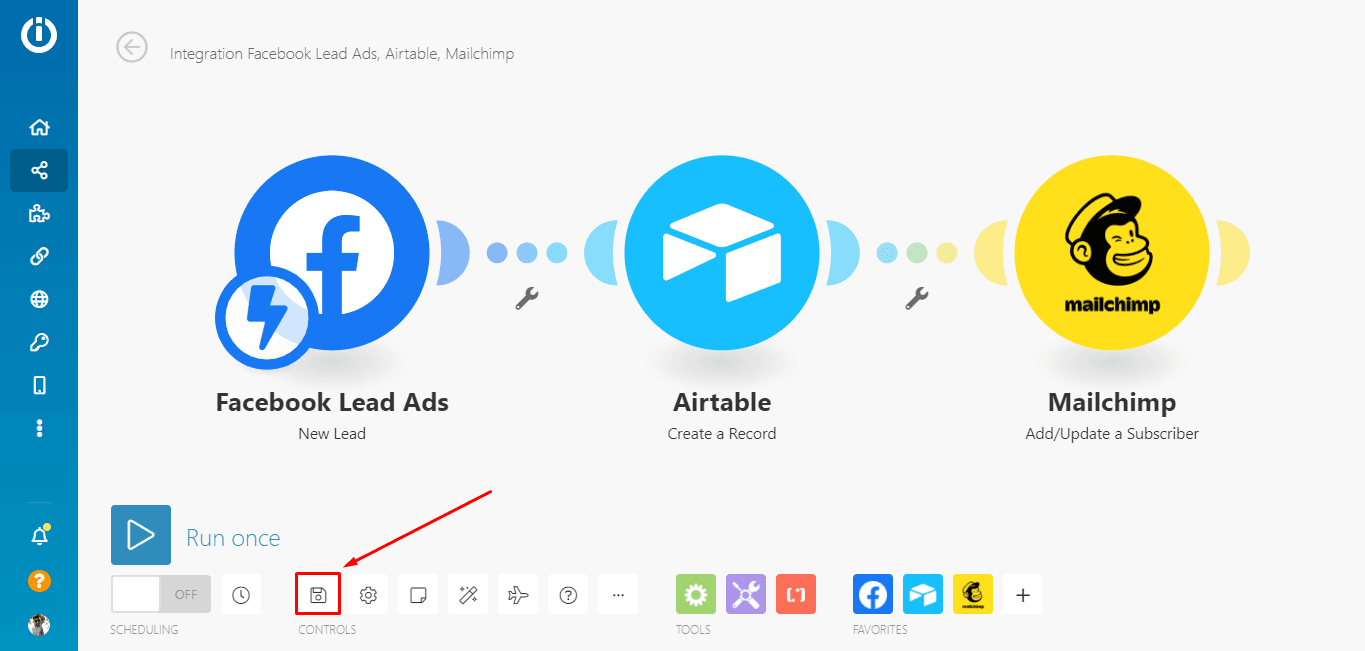
If the execution is successful, go ahead and save the scenario by clicking the “Save” button at the bottom of the scenario builder.
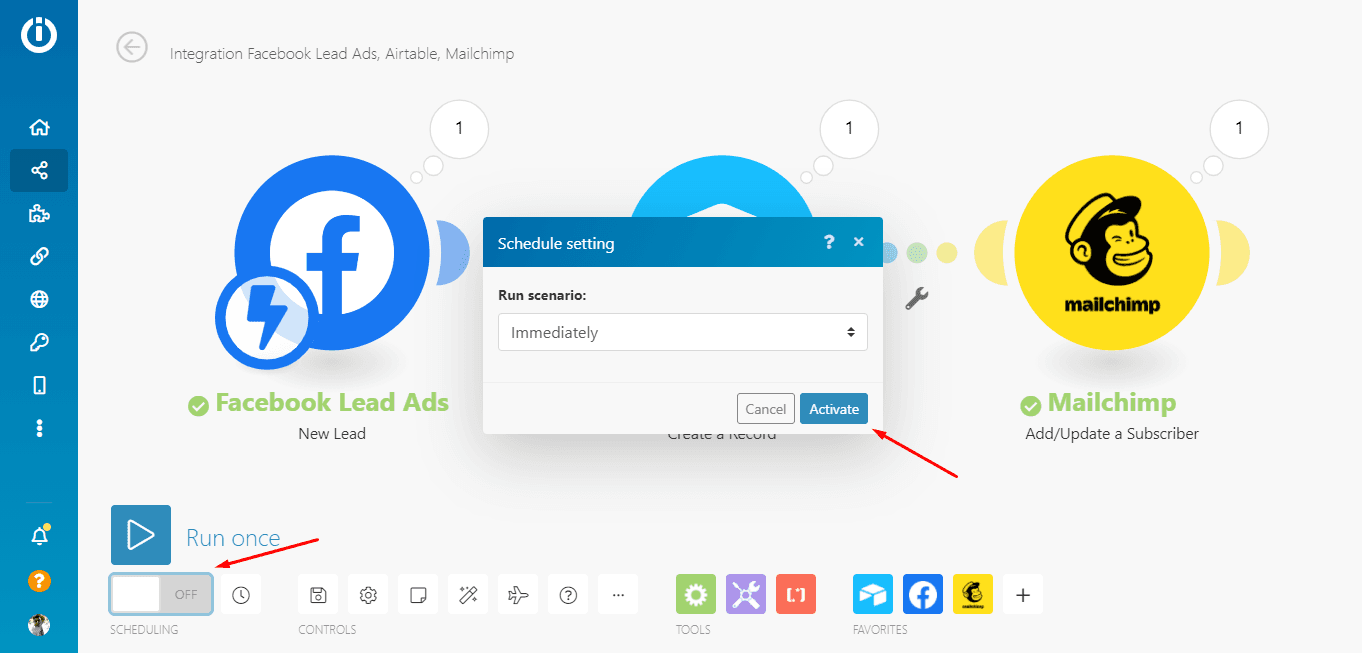
Lastly, you need to switch the scenario on.
To do this, just toggle the switch on the bottom left corner and click Activate.
This automation is now ready to do the heavy lifting for you!
But let’s make it even better.
Sometimes, you will wish to put leads on different Mailchimp lists depending on the answers they provide in a form.
We will adapt our scenario to do that automatically for you.
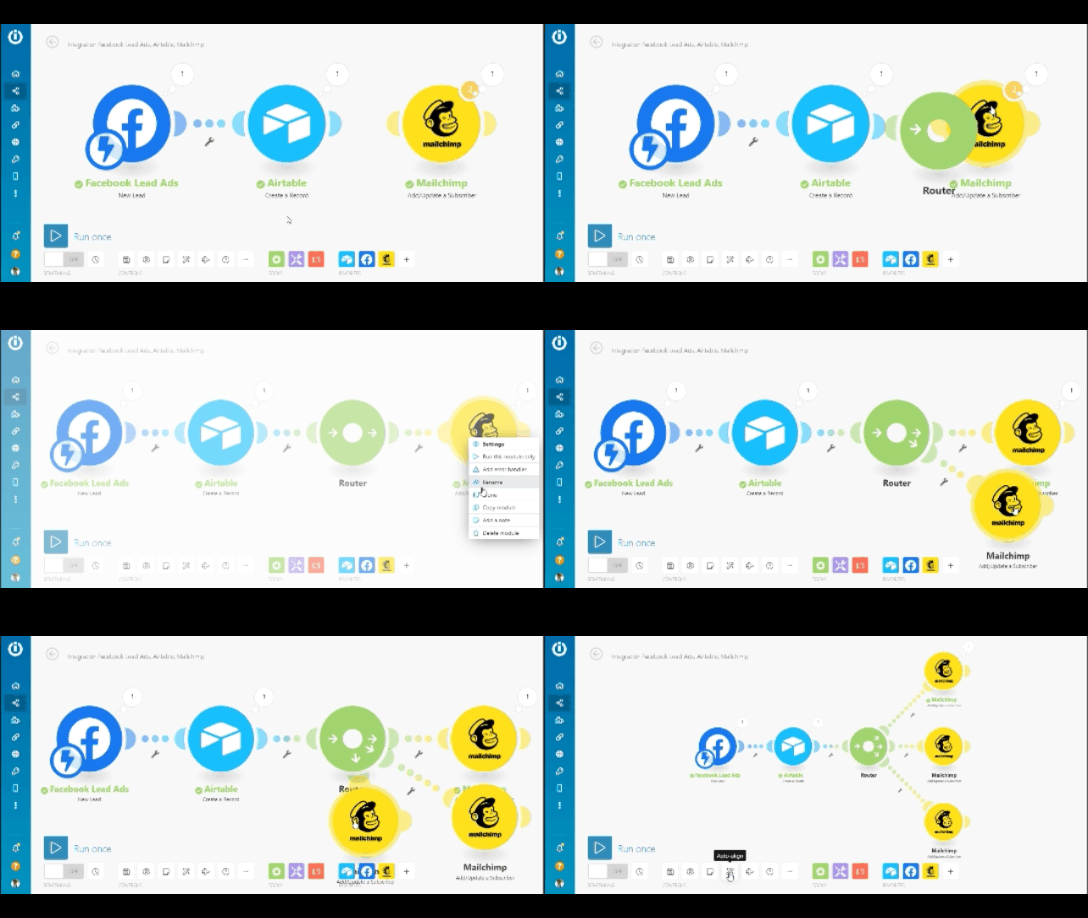
To achieve this, we will use a native Make function: the Router, which splits the scenario in multiple routes so the answer goes to the corresponding Mailchimp list each and every time.
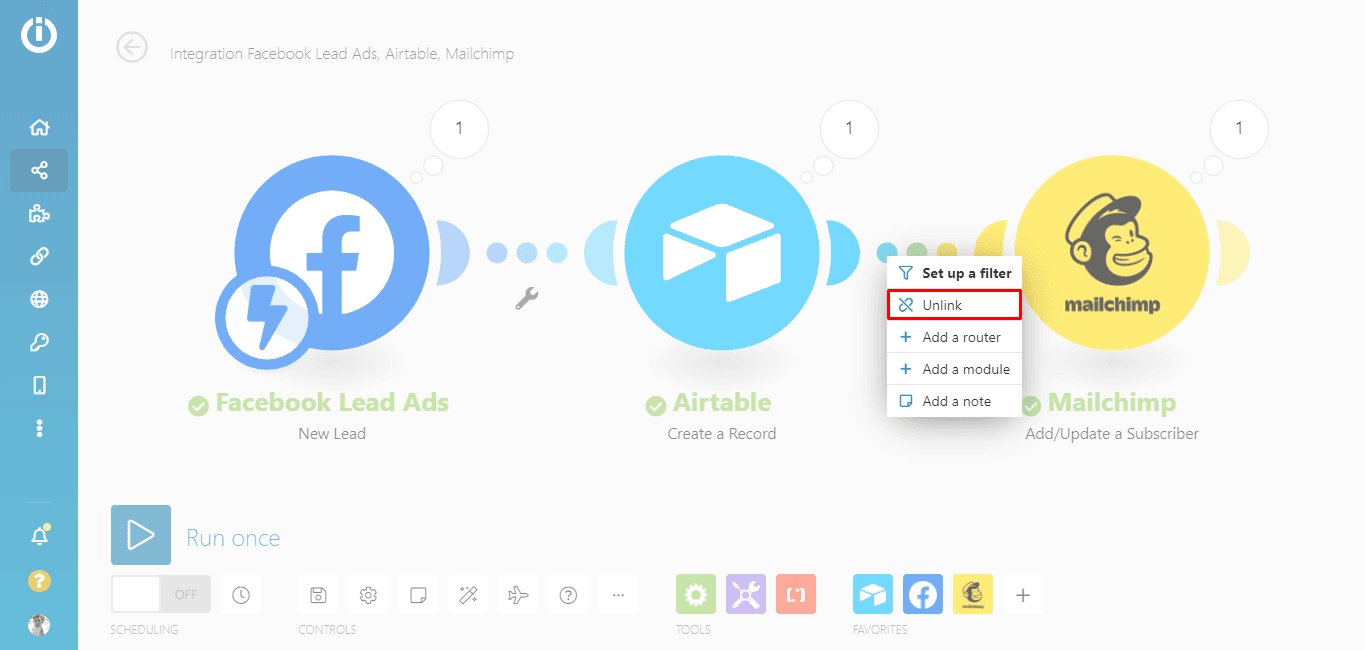
So, to add a router, we’ll unlink the Mailchimp module by clicking on the route between the Airtable and Mailchimp modules (click the “Unlink” option).
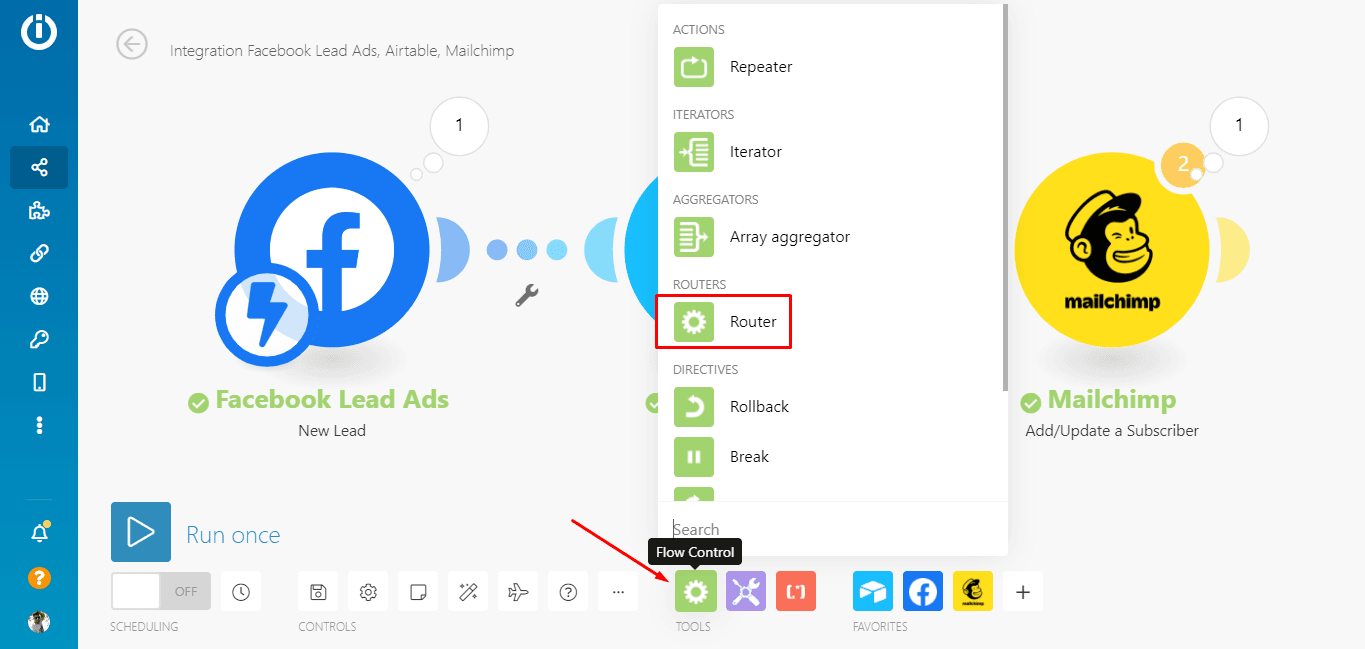
To add a Router, click the Tools menu at the bottom of the scenario builder and select “Router” from the list.
Then, attach the Router to the Airtable module, and attach the Mailchimp module to the Router by moving the module over the Router.
Next, we will clone the Mailchimp module by right clicking on it and selecting the “Clone” option.
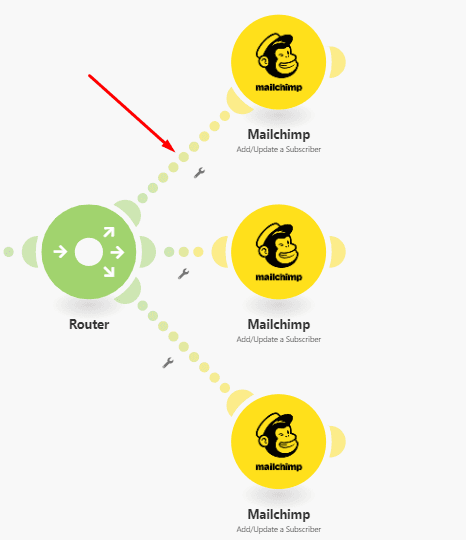
Since there are possible answers to the question in the Facebook ad, we will need three email lists, and clone the Mailchimp module twice (so there are 3 in total), and attach all to the Router like you see below.
After this, we will add filters to each of the routes.
By using Filters on routes between modules, only the data that meets a specific condition will pass through to subsequent modules. If it doesn’t, the data will be stopped at the filter.
Remember, the idea is that each of the three routes leads to a Mailchimp module with its own specific list depending on the option they chose in the ad:
SEO
Social Media Marketing
Email marketing
To prevent each lead from being added to every list, each route will need a Filter that only allows the lead to pass through to a specific Mailchimp module and list if the corresponding answer is chosen.
Example:
Answer = SEOMailchimp list = SEO Leads
To add the first Filter, click on the top route between the Router and the Mailchimp module where you see the spanner icon.
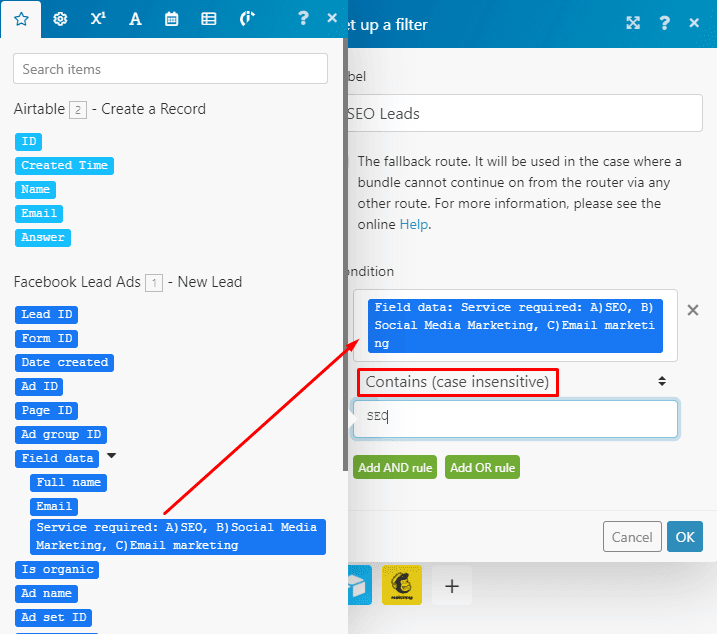
Give the Filter a name (i.e. SEO leads).
The “Condition” field is where you set the Filter’s criteria.
In this example, we’ll set the answer to match “SEO” in the first filter (Of course, all of this can be adapted to match whatever ad you run)
To set up the filter you will have to:
Map the answer data element from the Facebook module to the top field
In the drop down menu, select the Contains (Case insensitive) text operator
In the bottom field, enter the answer you want it to match (eg. SEO)
So if the answer is “SEO”, the data will meet the filter’s condition and pass through to the corresponding Mailchimp module and list through that route.
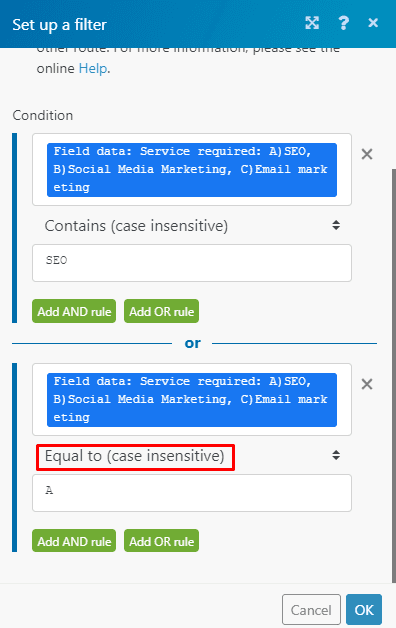
But what if the lead enters “A” or “a” only? You can add a condition for this as well.
Click the Add OR rule but use the Equals to (case insentive) operator instead.
The reason for using this operator is that the answer has to be an exact match (case irrelevant) otherwise every answer that has the letter “A” in it will meet the filter’s condition and pass through which is what you don't want to happen.
Lastly, enter “A” in the bottom field like you see here.
All you have to do now is open the Mailchimp module on the top route and select the corresponding list for the above answer (eg. SEO leads).
Simply repeat the process for the remaining answers on the other two routes and the scenario will be good to go!
Conclusion
As you can see, it’s fairly easy to import Facebook Lead Ads leads into one or more Mailchimp lists, and also into other platforms (such as Airtable).
The main takeaway, however, is the flexibility and power that Make brings to your operations.
Importing leads from Facebook into a single email list is a task that many tools can handle; but if you want something that matches real-life situations each and every time, Make will be the best option.
Last, but not least: We used Mailchimp in this example because it’s a well-known email marketing tool.
However, it’s worth noting that Make features 30+ email marketing tools that you can connect to your scenarios just like we did with Mailchimp here (and 900+ apps in total!).
Where there’s an integration need, there’s Make.
Happy automating!
Ready to make the automation revolution happen?

Wayne Govender
Solutions Architect at Make who loves all things tech with a focus on workflow automation. Also enjoys fitness and spending too much time on YouTube.

