Aug 18, 2021 | 7 minutes
How to Track Influencer Campaigns With Make
Influencer campaign tracking is causing you trouble? Learn how to track conversions from influencer campaigns using Integromat, Airtable, and Mixpanel.

Influencer campaigns have become one of the most popular methods to place products in front of huge, well-targeted audiences.
It doesn’t take a lot to see why. The combination of social network immediacy with the influencers’ massive reach is able to produce fast conversions - and who doesn’t love these?
However, here is where the main challenge of influencer marketing makes its appearance.
It’s not about finding influencers, nor about figuring out the best time to post the sponsored content.
We are talking about influencer campaign tracking.
At this point, some companies have it easier than others. For example, an ecommerce company using WordPress can create affiliate links and use a third-party app or plugin to track conversions for those links. Problem solved!
On the other hand, tracking influencer marketing isn’t that simple for businesses that don’t run everything on pre-packed solutions like WordPress (a category that includes most SaaS companies).
These companies often deal with raw data and need to track actions in their app, which renders most affiliate link tracking tools useless.
With this in mind, we will show you how a SaaS company can track influencer campaign metrics and store them directly inside an Airtable base for easy analysis.
Before we jump into the use case, please note that the following solution relies on the apps listed below:
Airtable
Segment
Mixpanel
Make
You will be able to deploy this solution without writing a single line of code by following the steps. Now, let’s get down to business.
Step 1: Setting up Airtable to track influencer campaigns
When we took on the problem of tracking influencer campaigns, our initial goal was to identify the metrics that would be useful to have inside an Airtable base.
These metrics are key, because they will help marketing managers identify on a glimpse whether a campaign is a success or failure.
So we set ourselves to track:
Registrations: The number of people who registered a new account through the influencer's link
Cost: How much the influencer was paid for a campaign
Cost Per Acquisition (CPA): Cost divided by the number of registrations
Additionally, each campaign had a unique UTM link, which was generated by the marketing department and used by the influencer in question.
When someone registers for an account using these trackable links, the action is tracked in the app's back-end and associated with the corresponding campaign that the UTM link was created for.
This UTM link was added to following Airtable as well:
Next, we had to identify which metrics had to be manually entered, and which ones could be dynamically populated with the help of automation.
For example, the Name, Campaign UTM and Cost of a campaign have to be manually entered by the marketing manager (or by the person in charge of paying and dealing with the influencer in question).
On the other hand, Registrations is a metric that needs to be obtained from the software's back-end tracking mechanisms, and updated on the Airtable base regularly.
This will also allow us to automatically calculate the CPA of each campaign.
Therefore, the next step was to create an automation to retrieve and fill out the database with these numbers on a daily basis.
Step 2: Getting access to the tracking data
The first step before automating is to gain access to the data you are working with.
In this case, we wanted access to a particular software’s tracking data, and in particular to the metrics that were associated with the influencer campaigns.
Using Segment, a data flow was created between the software's back-end and the analytics app Mixpanel. From there, we could easily access the tracking data and create reports with it.
Once the tracking data was in Mixpanel, we created some reports to filter out and retrieve the data that we were interested in.
As you can see, the Mixpanel report below retrieves all the events from the app's registration page, and then filters them out to obtain the events triggered by a UTM link.
Step 3: Using Make to update Airtable with Mixpanel data
Sending the data from the Mixpanel report to Airtable was the next step.
To achieve this, we built an Make scenario that retrieves data from Mixpanel and then adds it to the Airtable base (where all the campaign information is stored).
Here's a step by step guide on how you can replicate it.
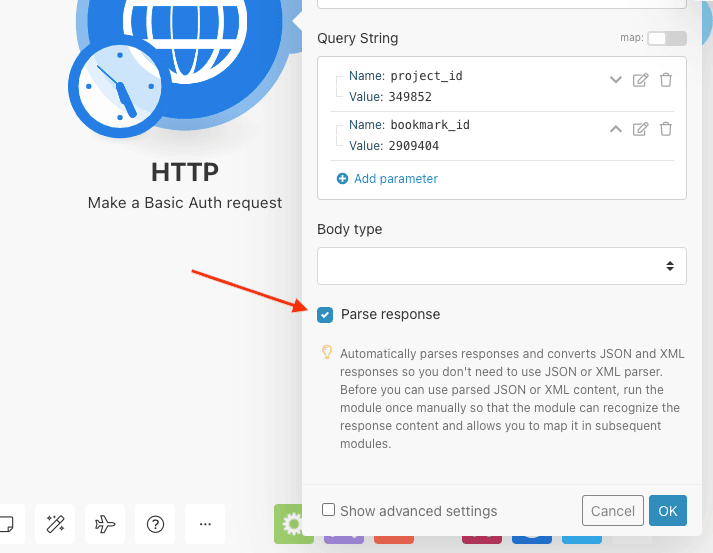
The scenario starts off with an HTTP > Make a Basic Auth request Make module, which makes an HTTP request to the Mixpanel API to get the report data.
The API endpoint we used is: https://mixpanel.com/api/2.0/insights
To effectively make the request, a Mixpanel Token and API Secret has to be generated and provided to the module. Follow this guide to learn how to generate these credentials.
Additionally, a set of query parameters has to be provided, including:
project_id (which the report is created under)
bookmark_id (which is the id of the report)
Both of these values can be obtained from the URL of your Mixpanel report.
To parse the response of the API request and convert it to data elements (so it can be easily mapped on subsequent modules), the “Parse response” option has to be checked.
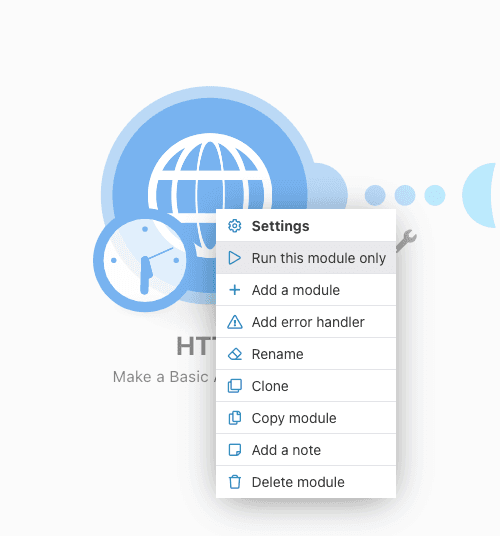
Now that the module is set up, right-click on it and choose “Run this module only”.
This will execute the module and retrieve the data from the Mixpanel report.
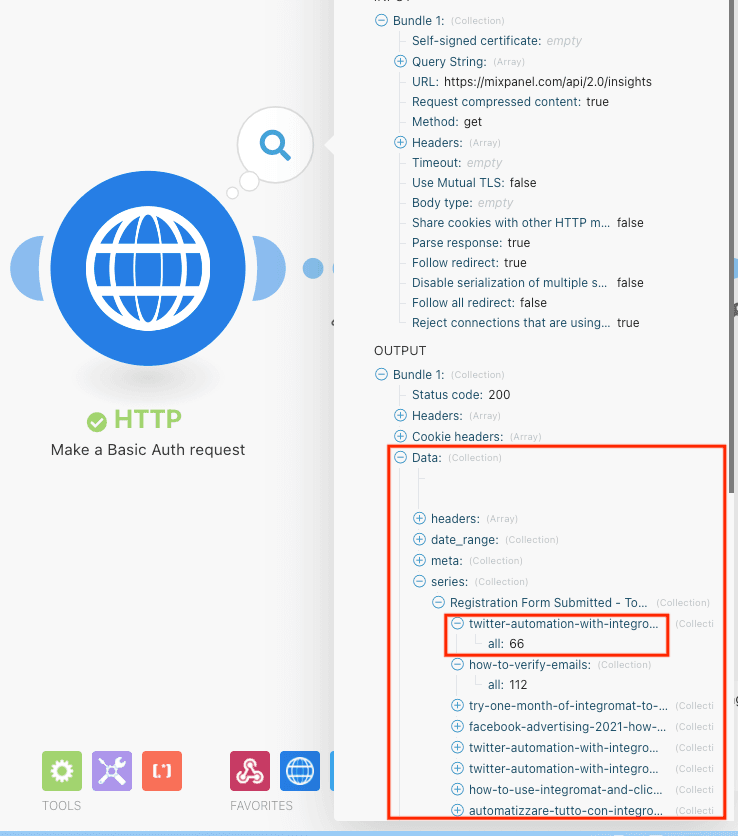
If the API call is successful, the HTTP module will output a set of data that will look like this:
The output “Data” object contains a collection called “series”, which includes all the campaigns that are tracked inside the Mixpanel report.
Each campaign is a collection that contains the number of user registrations obtained by the corresponding UTM link.
This data can now be passed on to the Airtable base.
To achieve this, we first had to use the Airtable > Search Records module, which retrieves every single record on the Airtable base with the campaign data.
For each record that is retrieved, a new bundle is created, which will in turn execute any subsequent modules in the scenario.
The goal was to update each of those records with the current number of registrations retrieved from the Mixpanel report.
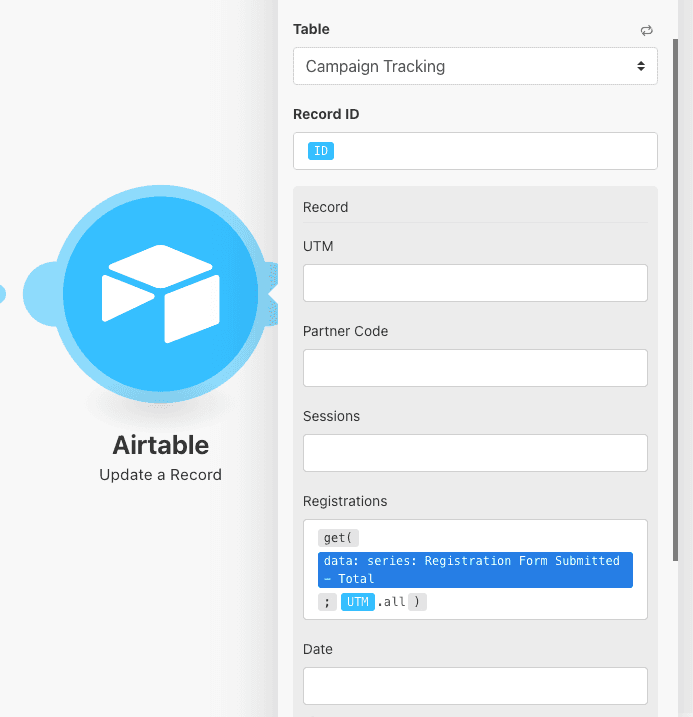
This was done with the Airtable > Update a Record module.
To set up this module we had to map the ID data element from the preceding Airtable module to the Record ID field.
In the Registrations field we had to enter the following formula:
{{get(3.data.series.Registration Form Submitted - Total; 4.UTM + ".all")}}
This formula searches the HTTP module output data and retrieves the collection of data (which has the same name as the current campaign's UTM link).
From the same data collection, it then retrieves the number of registrations.
The automation is now fully set up.
All that’s left to do is set up the scheduling, so it gets executed on regular intervals and keeps the Airtable base updated with the latest Registration numbers.
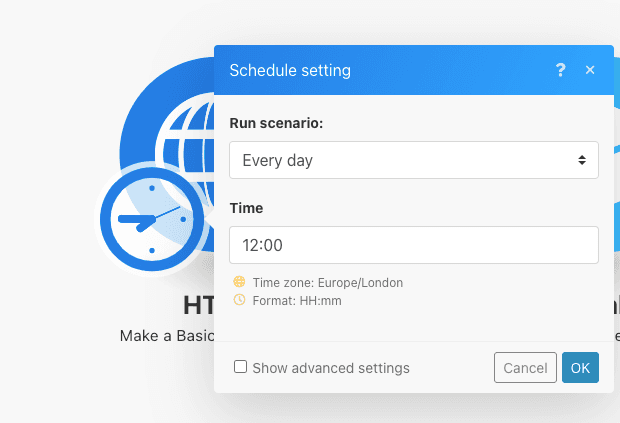
To schedule the scenario, just click on the clock icon (on the HTTP module) and set it up.
We set the scenario to be executed “Every Day” at 12:00.
Therefore the Airtable base would be updated every day at 12:00.
Step 4: Automatically calculating the Cost-per-acquisition (CPA)
At this point, our Airtable base had all the necessary data to calculate the CPA.
These calculations can be performed automatically by Airtable using the Formula field type.
Needless to say, this was the field type of the CPA field on the Airtable base of this project.
The formula takes the value of the Cost field of a record and divides it by the value in the Registrations field of the same record.
This results in the CPA being automatically calculated.
It’s worth telling that this value dynamically changes as the values in the Cost and Registration fields change.
Therefore, when the number of Registrations gets updated by the Make scenario, the CPA will be automatically recalculated to reflect the actual, updated cost per acquisition of each new registrant.
Conclusion
This workflow can be further extended or modified to support your needs. The principals will remain the same:
Build a database/spreadsheet with all the fields you would like to add data to
Identify which fields will contain static data (data you enter manually), and which ones will contain dynamic data (data that will be retrieved from the back-end)
Build an automation to retrieve the data from the software's back-end and send it to your database on a regular basis
Construct formulas to automatically calculate useful metrics in your database. If your database does not have Formula fields (like Airtable does) you can set up an Make scenario which will perform a metric calculation for you (i.e Cost/Registrations for CPA) and populate the result in a field of your choice.
We hope that this solution will help your company measure influencer marketing, turn the resulting data into a valuable asset to reach campaign goals, and drive better marketing efforts on the spot.
Better brand awareness and conversions await. Happy automating!
Ready to make the automation revolution happen?

Dimitris Kamaritis
Solutions Architect at Make. I’m passionate about helping businesses and entrepreneurs build digital solutions and automating their workflows!


