Jan 22, 2021 | 10 minutes
How to Link Bases in Airtable: A Step-by-Step Guide
Learn how to link bases in Airtable using Integromat. Streamline your projects, manage data visibility, and automatically copy records from one base to another.

Linking bases in Airtable is a true need for those who organize and share data to run business processes.
From project managers structuring projects from an Airtable base to sales directors funneling leads to their reps, people have been discussing this issue for years on Airtable’s community site.
A quick search shows that sending records from one base to another is vital to:
Streamline projects involving multiple teams and/or professionals
Share partial amounts of data with teammates, employees, and clients (manage data visibility and granularity across sectors)
Automatically categorize and funnel data from one base to another (such as contacts and leads)
Decentralize large databases into smaller, more manageable ones
It is clear that there is immense value in linking Airtable bases, and we are here to help you unlock it.
In this article, we will show you how to send records from one base to another using Make.
But before we get to that, we want to provide you with more information about this integration, as it is the first out of two solutions that we’ll be sharing to link Airtable bases.
Let’s go!
Linking bases in Airtable: Two sequences of events
After researching the problem of how to link Airtable bases, we noticed there are two sequences of events to consider.
The first sequence is also the simplest one: in it, the main requirement is to copy records from one base into a different one. This process can be summarized in two steps:
Person A creates or adds multiple records on base A
Depending on a series of conditions, certain records from base A get automatically duplicated on base B
The conditions we are making reference to are set by the person who creates the integration between the bases. These conditions determine which records get copied into other bases, and why.
For example, let’s imagine that you lead a project, and have a series of tasks listed on a main base (base A). However, you don’t want your teammates messing around with base A.
To avoid this, you need to get the records/tasks assigned to your teammates copied from your base to your teammate’s base (base B).
This can be done with Make, and it is precisely the subject that occupies us today.
Keep in mind, this is just an example of a condition that can trigger the record-copying sequence. You can set up any kind of condition to get certain records copied to one or more bases, including:
Text or keywords
Single select items
Checkbox items
Collaborator names
Email addresses
As long as it makes sense to you and your workflow, it will be fine.
The second sequence is an iteration of the first one, and requires records on the first/main base to be updated after they have been modified on the second one. In its simplest form, this sequence can be summarized as follows:
Person A creates records on base A
If certain conditions are met, certain records on base A get copied to base B
Person B modifies or updates records on base B
Base A updates the original records after they have been modified on base B
This calls for a more complex solution, but you don’t need to worry about it right now, as it will be the topic of our second post in this series.
In this article, we will focus on the first sequence, as it is the easiest way to link Airtable bases.
Before we start, please note that you will need an Make account to create the integration. If you don’t have one yet, please register for free.
Using a real-life example to link bases in Airtable
To show you how to link between bases, we are going to use a real-life example, consisting of two bases:
Base 1: Social Media Content Calendar base
Base 2: Designer’s base
This is a fitting example, as countless companies use social media calendars to bring their content efforts forward.
What’s most, these content calendars often pose a challenge: since creating content for social media requires the participation of several team members (managers, writers, designers), using one base involving everything and everyone is a recipe for chaos.
To avoid this, the answer is having multiple Airtable bases instead of one:
A main base, which will be run/organized by the manager / team lead
Secondary bases for each team member (i.e. Writer’s base, Designer’s base, and so on)
With this setup, the team lead will be in charge of the main base, which will be used to create tasks.
But most importantly, we will link the main base to a secondary one, and show you how you can use Make to automatically copy the records/tasks assigned to a team member into a secondary base.
So, whenever a record/task requiring design gets added to the Social Media Content Calendar base, that exact record/task will be copied into the Designer’s base, automatically.
Note: our use case features two bases for simplicity, but you can connect as many as you want to the main base.
Step 1: Airtable bases
We start by setting up our two bases, which we named:
Social Media Content Calendar (aka Base 1)
Designer’s Base (aka Base 2)
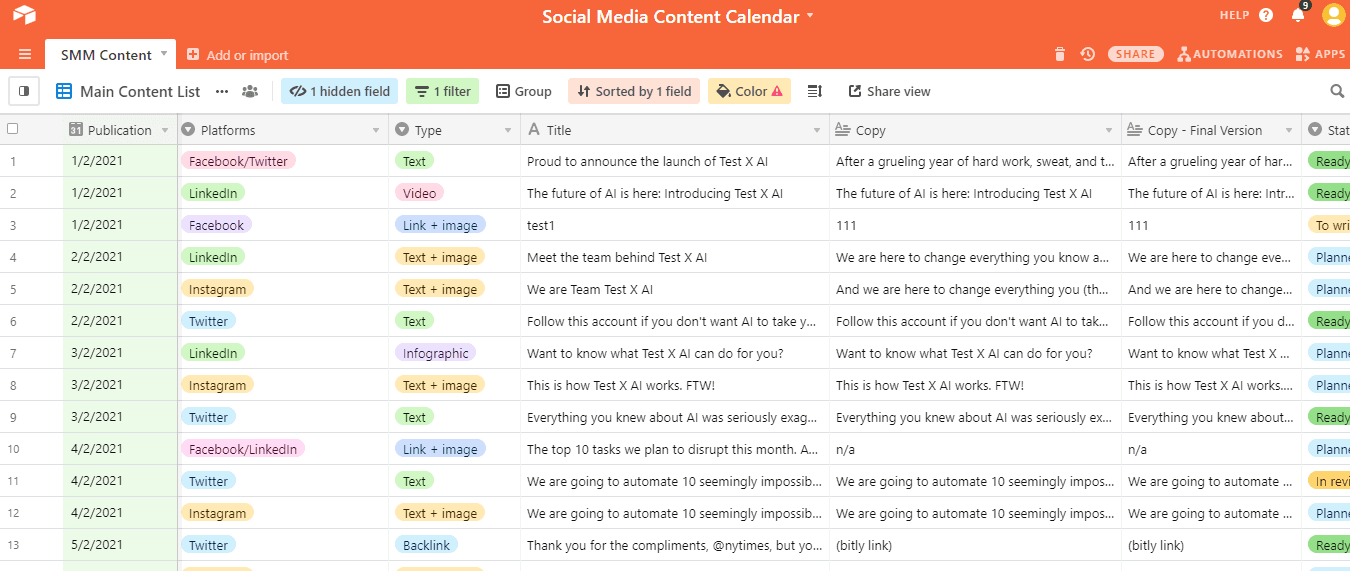
Base 1 is pretty standard, and will be used by the team lead to create tasks and follow up on content creation efforts. This is what it looks like:
As you can see, it’s a simple content calendar, featuring columns for:
Publication date
Platforms (i.e. Facebook, Twitter, Instagram, and so on)
Type of content (i.e. Text, Text + image, Link + Image, and so on)
Title of the post
Copy
Final version of copy
Status
Created time
Last modified time
Attachments / Image
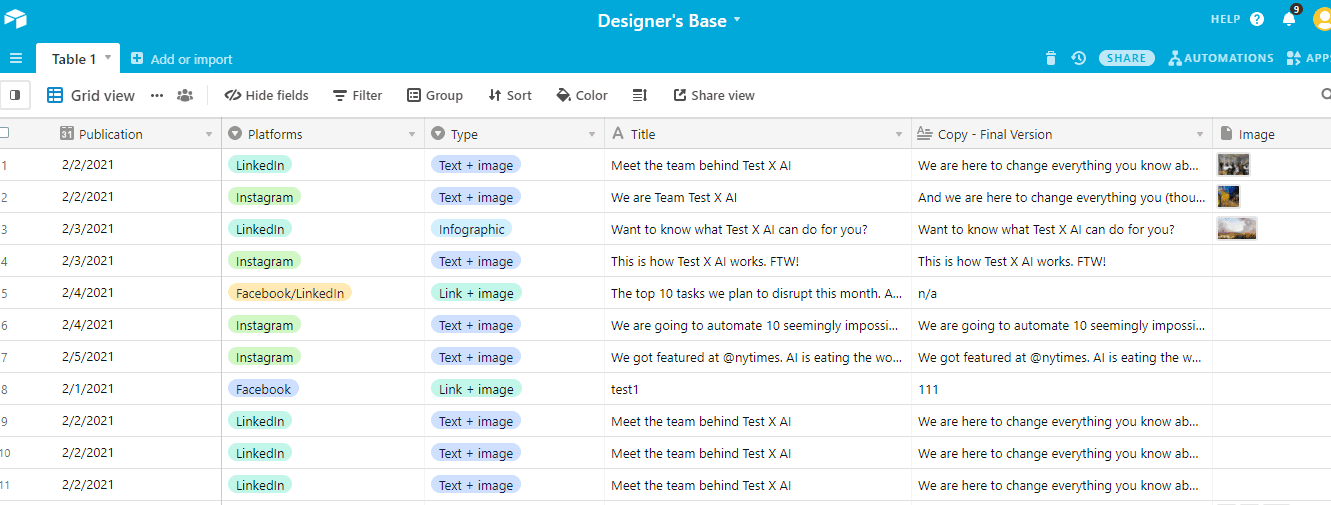
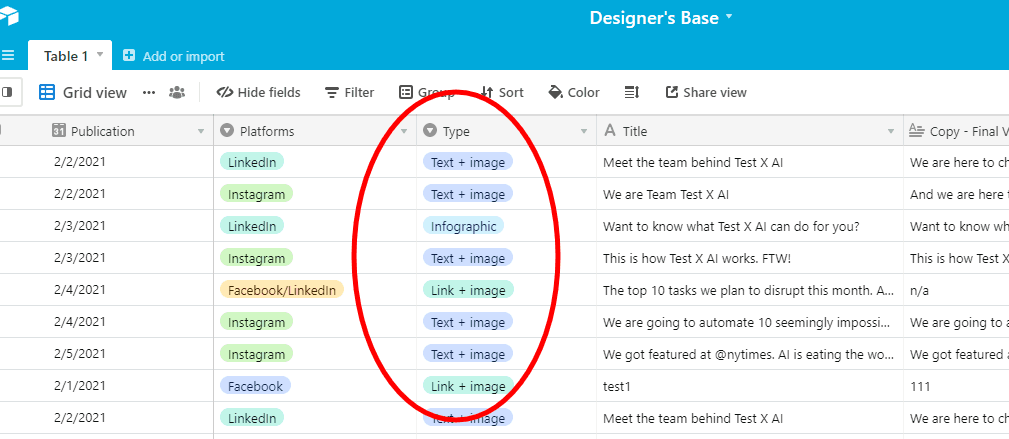
Base 2, on the other hand, is an even simpler version of Base 1: it only features the columns that are relevant to the designer that has to complete tasks involving him/her.
Since Base 2 is for the designer, it features the following columns:
Publication date
Platform (as different platforms demand different design specifications)
Type of post
Title of post
Final version of copy
Attachments / Image
Last modified time
After the bases have been created, we are going to set up the Make scenario that will allow us to link both bases.
Step 2: Creating the Make scenario
Now that you have an Make account, it’s time to put it to good use.
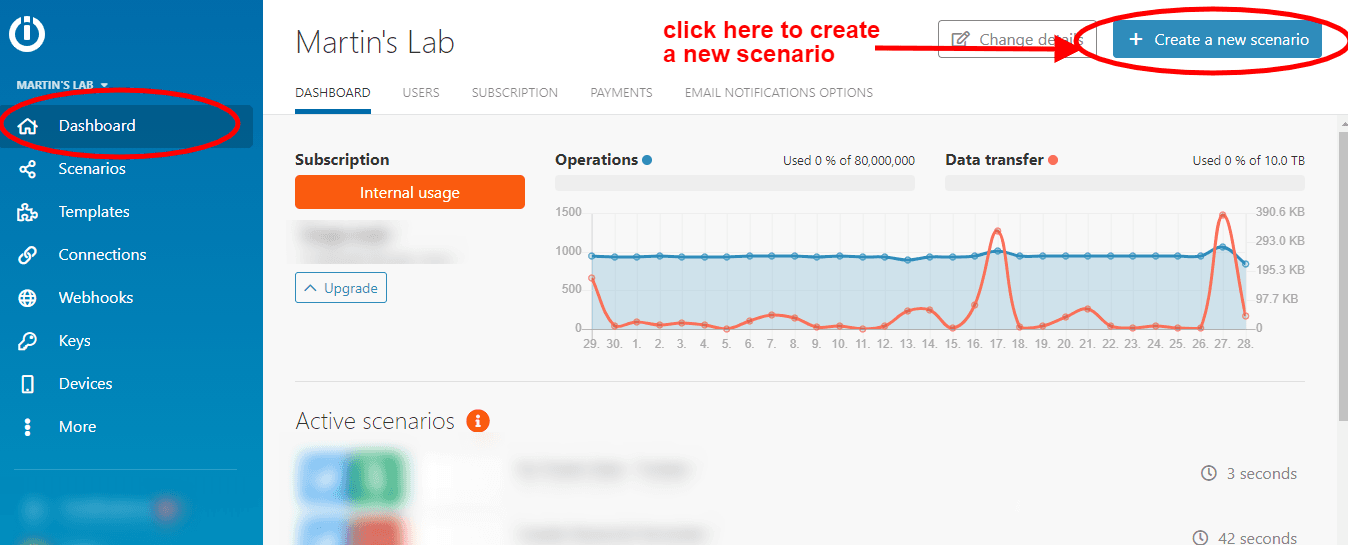
From your dashboard, you will begin by creating a new scenario from scratch:
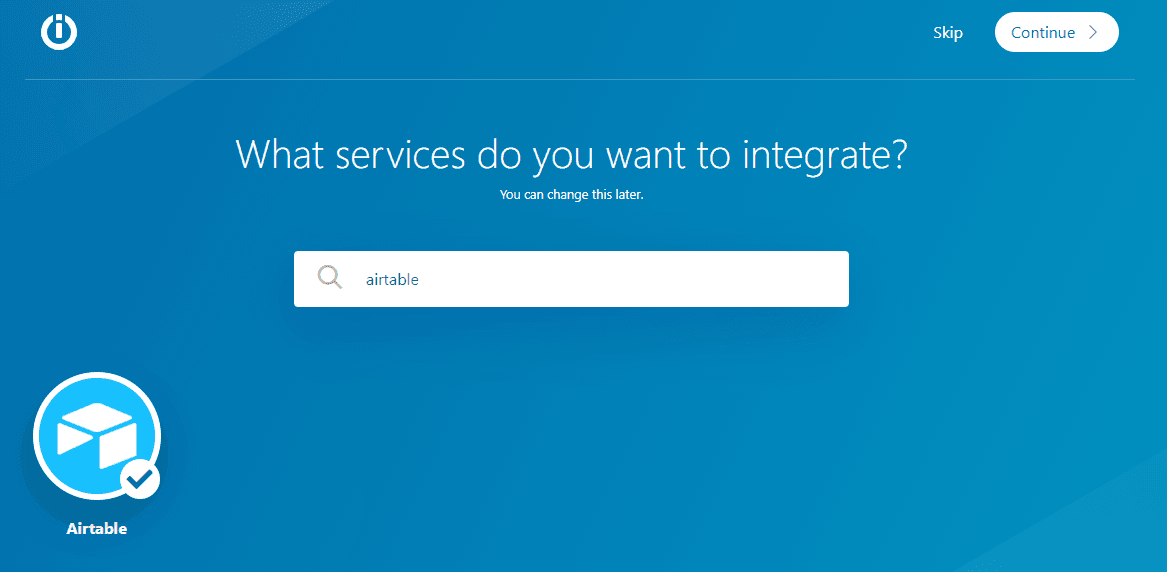
After you do this, please pick the app module that will trigger your scenario: the Airtable app. Then, click the “Continue” button on the upper right side of the screen.
Note: app modules define the way an app responds to a request. For more information about basic Make terms, please refer to this page.
This will land you on the scenario builder (aka visual canvas) which is what you will use to link two (or more) Airtable bases.
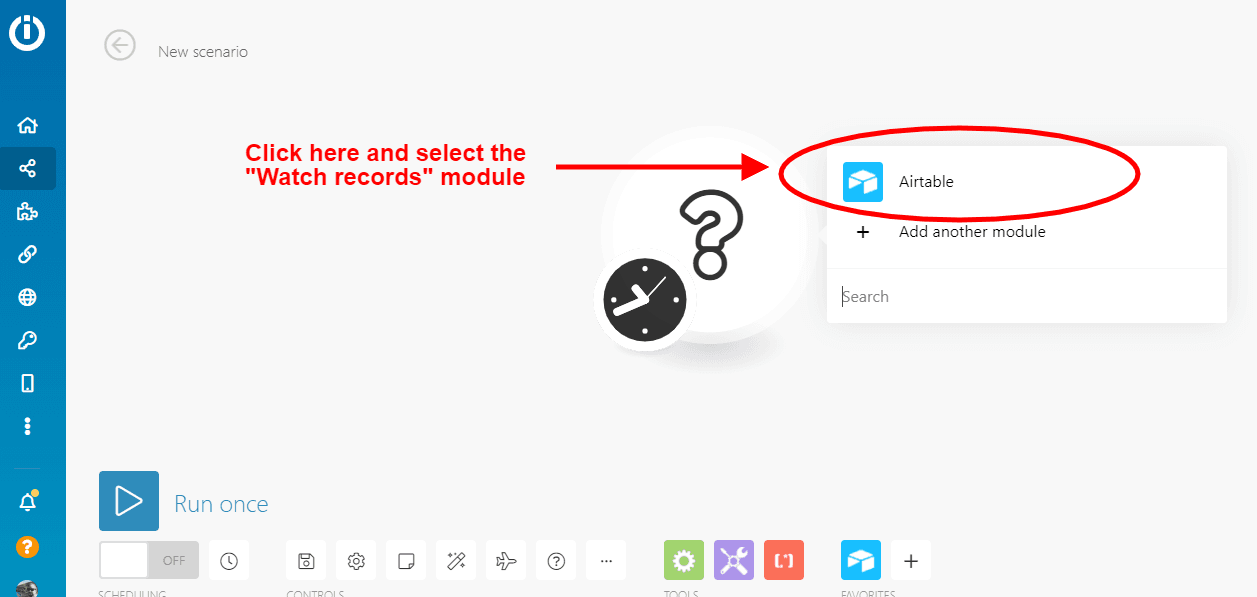
In the visual canvas, you will see that the Airtable app has been pre-loaded as your first option. Click on it, and select the “Watch records” module from your options.
After you do this, it’s time to configure your first Make module.
Step 3: Configuring the “Watch records” Airtable module
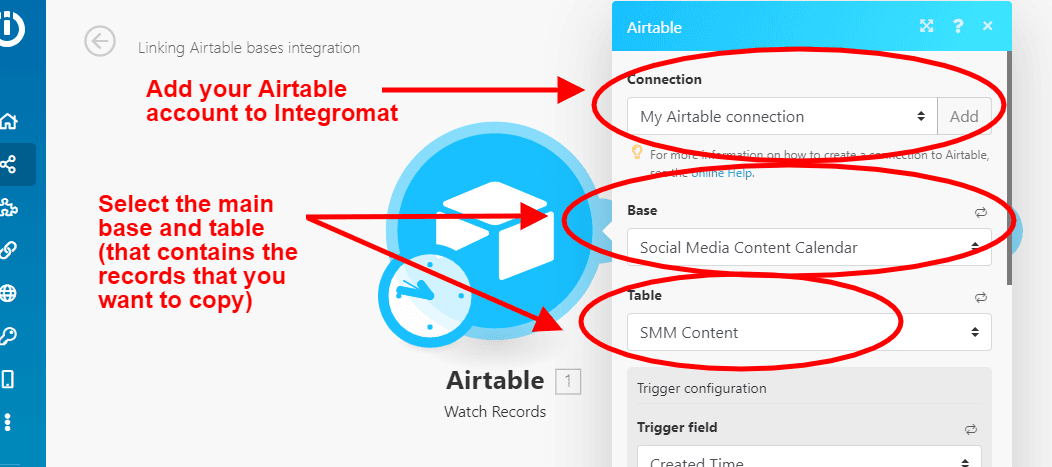
This module will watch the records in Base 1 (the Social Media Content Calendar), on a regular basis (this is called “scheduling”; more on it, below).
We’ll break up the configuration of the module into two parts to make it easier. First, you will need to:
Click on “Add” to connect your Airtable account to Make
Select the main base (“Social Media Content Calendar”)
Select the table containing such records (“SMM Content”)
Once you do this, you will have to configure the trigger field.
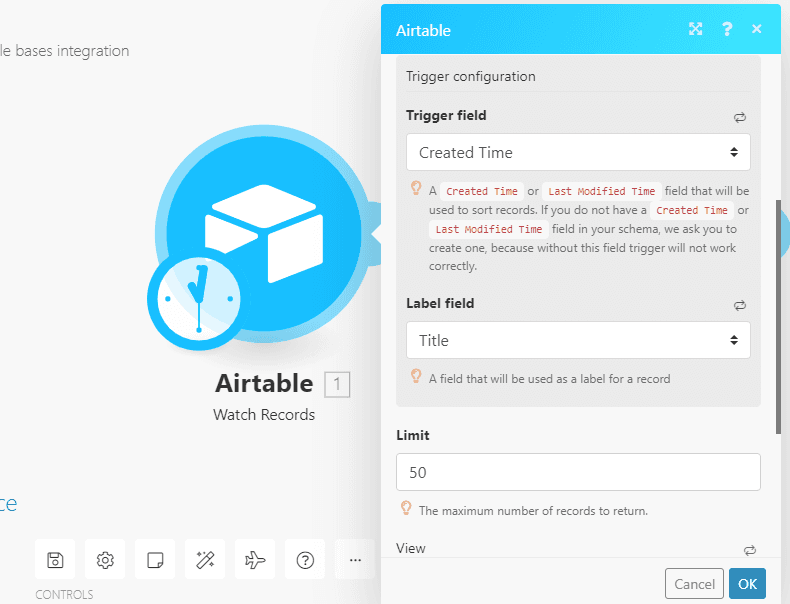
Since we need Make to watch every record in disregard of the contents within, the best way to ensure this happens is by selecting “Created time” as the trigger to watch the records within this table.
Note: if your bases do not feature “Created time” and “Last modified time” columns, make sure they do! It will make things easier to create Airtable integrations.
Now, please select “Title” as the label field, and set the limit to 50. This means that you are telling Make to watch up to 50 new records during each “watch records” cycle.
Of course, you can change this number to suit your needs; if you add 200 records a day on average, you might as well set that limit to 220 or 250 to ensure Make picks all the new records without missing anything.
You can leave the “View” and “Formula” fields blank, as they don’t matter here.
In case you are wondering how this scenario will pick up the records that need to be sent to the Designer’s base, please be patient.
We will get there, but first we need to schedule our scenario.
So, after you finish this, click “OK”.
Step 4: Scheduling your scenario
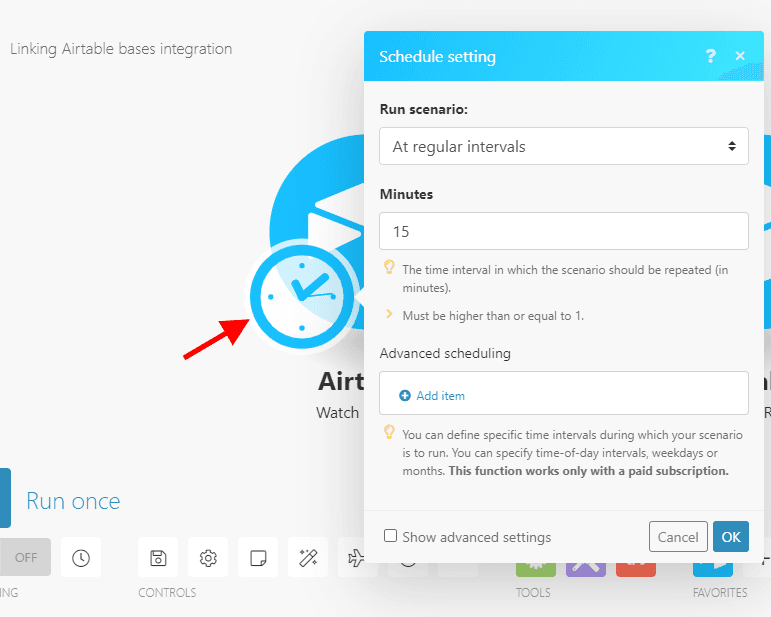
Once you click “OK”, the scheduling module should appear before your eyes.
In case it doesn’t, please click on the little clock attached to the first module of your scenario.
The scheduling feature defines how often the scenario will run.
In this case, we are telling it to watch for new records every 15 minutes, but you can change this to suit your specific needs.
Note: you can pick up records retroactively as well. If you need to do that, please select “Show advanced settings”, and select the date when you want Make to start watching the records.
Step 5: Configuring the second Airtable module
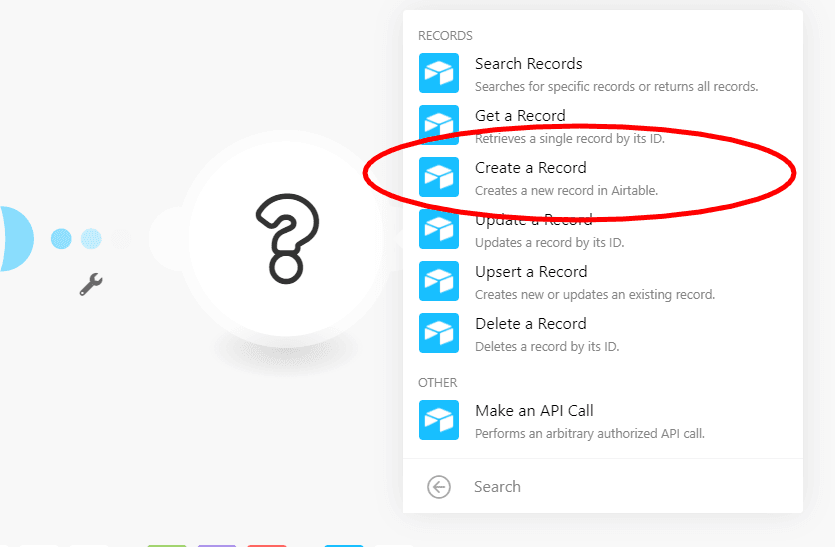
Now that you have set up the first module, it’s time to configure the second (and last) module of this scenario: the “Create a record” Airtable module.
To do this, please click on the “plus” sign next to the first module.
You should now see Airtable as your predefined app choice: click on it, and then select the “Create a record” module.
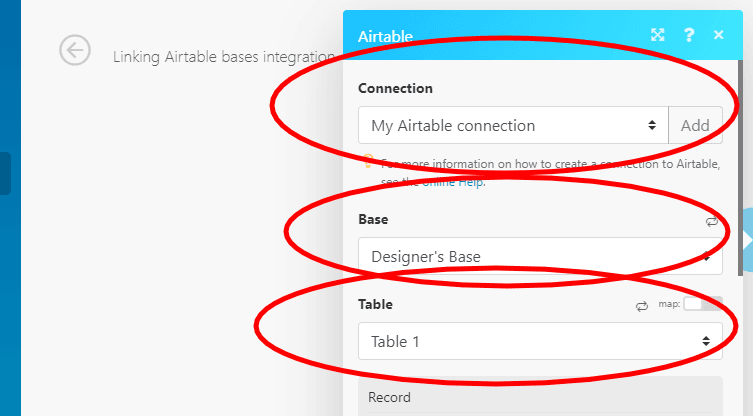
As you did in the first module, you will have to:
Select the Airtable connection (should already be there)
Select the secondary base (“Designer’s base”)
Select the table within the Designer’s base (in our case, that’s “Table 1”)
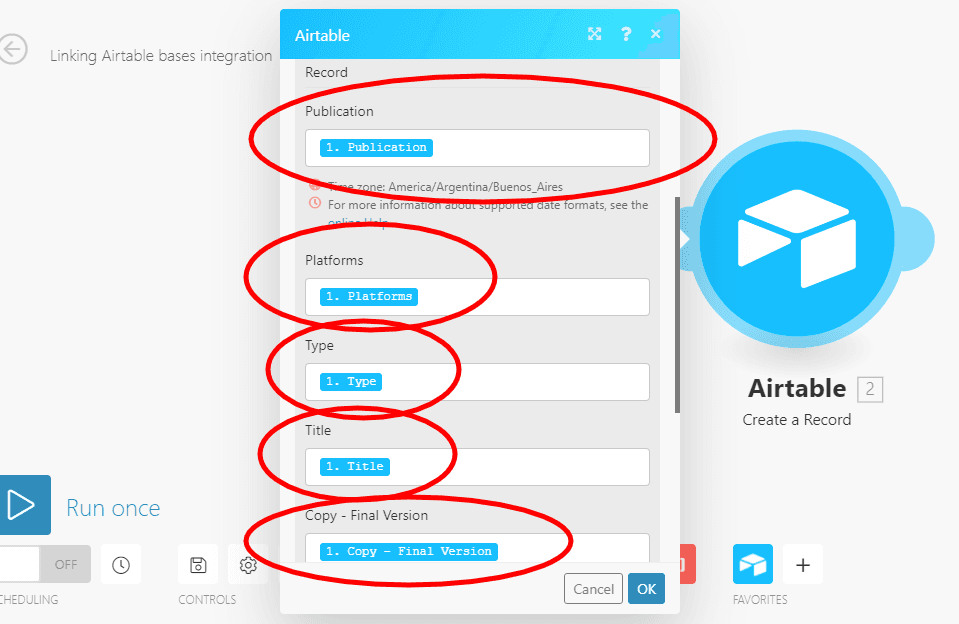
To complete the setup of this module, you will need to select the record data that you want to copy from Base 1 to Base 2.
Since our scenario will copy records/tasks for a designer, we are sending data that is relevant for the designer to complete design-related tasks, namely:
Publication date
Platforms
Type of task (i.e. Link + image, Text + image)
Title
Final copy version
To do this, please click on each field, and select the corresponding option from the list you’ll see on screen.
Now comes the interesting part: how does the scenario recognize which records need to be copied into the designer’s base?
In the end, we only want to copy the records/tasks that need to be completed by the designer, and not other records/tasks. To achieve this, we will use a filter.
Step 6: Configuring the filter
In a rather self-explanatory manner, the filter will prevent the scenario from copying every record into another base.
In other words, it is a condition (or a series of conditions) that will allow the scenario to pick and copy only the records we want.
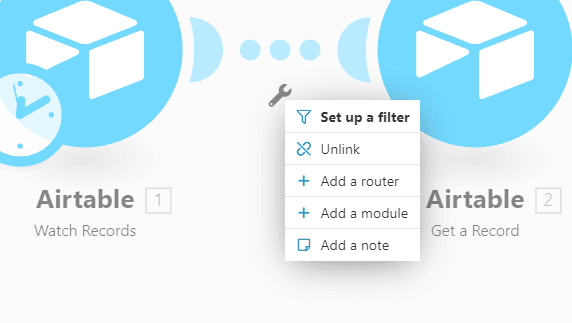
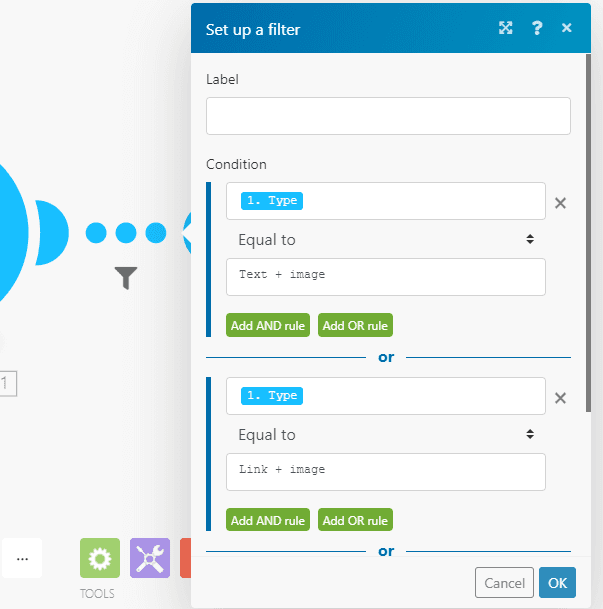
To set it up, you will have to click on the little wrench icon that lies in between the modules, and select the “Set up a new filter” option.
Here, you will define the conditions a record has to meet in order to be copied into another base.
Since we want our scenario to only copy tasks that are meant for the designer to complete, we set our filter to pick up the following type of tasks:
Text + image
Link + image
Infographic
By doing this, the scenario will only copy the records in which the “Type” column features the text above (“Text + image”, or “Link + image”, or “Infographic).
Note: When typing the text in the “Equal to” field, make sure it’s the exact same text featured on your “Type” record options. If, for example, you add a space after the last character, the filter will not recognize the condition.
Step 7: Run the scenario
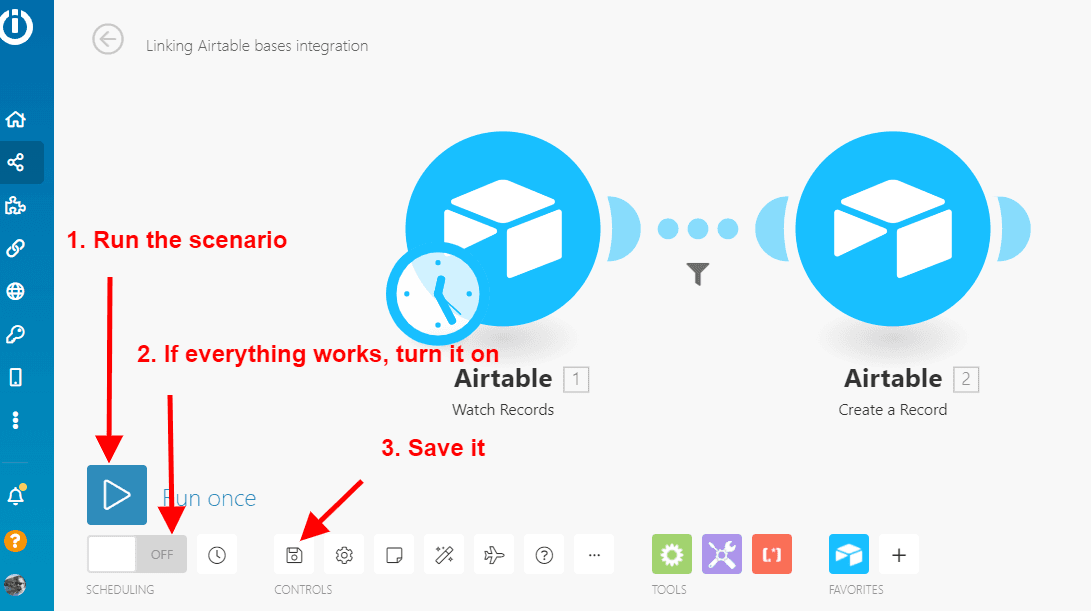
After you finish with the filter, it’s time to see how your scenario works. To do this, you will have to:
Run the scenario
If it works fine, turn it on
Save the scenario
And that’s it!
Now, the Make scenario will:
Watch new records on Base 1
Filter the records by “Type” (those that require design, in our case)
Send the records that require design to Base 2
And this way, our designer gets tasks assigned on a separate Airtable base, automatically. Pretty neat, huh?
Conclusion
Linking bases in Airtable will provide your organization with greater efficiency and order, allowing you to:
Organize tasks and workflows that involve several teams and professionals
Avoid copying and pasting data on a recurring basis
Manage data visibility
Categorize and copy data from one base to another
Decentralize large databases / avoid data siloing
As you can see, there’s a lot you can do by connecting Airtable bases, and it will be up to you to decide how to put this integration to its best use.
More automation ideas
Improve your work and business with Make. For more automation ideas, please read our curated selection of use cases and app hacks articles.
You can also create custom Airtable integrations, or check out the full list of project management integrations.
Happy automating!
Ready to make the automation revolution happen?


