Jul 19, 2023
How to Automatically Notify Customers About Unpaid Invoices
In this tutorial, we’ll show you how you can transform the frustrating tasks of detecting unpaid invoices and reminding your customers about them with the help of automation.
Keeping track of unpaid invoices often becomes a challenge. On top of requiring persistent follow-ups, payments can easily slip through the cracks, leading to cash flow hiccups and lost revenue.
Dedicating precious hours to this task can detract from your core business focus, but there's an elegant solution at your fingertips: Automation.
By harnessing the powerful combination of Stripe and Make, we can automate the tasks of detecting unpaid invoices and notifying customers about their missing payments.
In this tutorial, we’ll show you how you can transform this frustrating task into a smooth, automated process once and for all.
The resulting solution is also available as a pre-built template, but if you want to learn how everything works under the hood, we recommend you follow the entire tutorial.
Before we jump into the tutorial, here's what this automated solution will do for you:
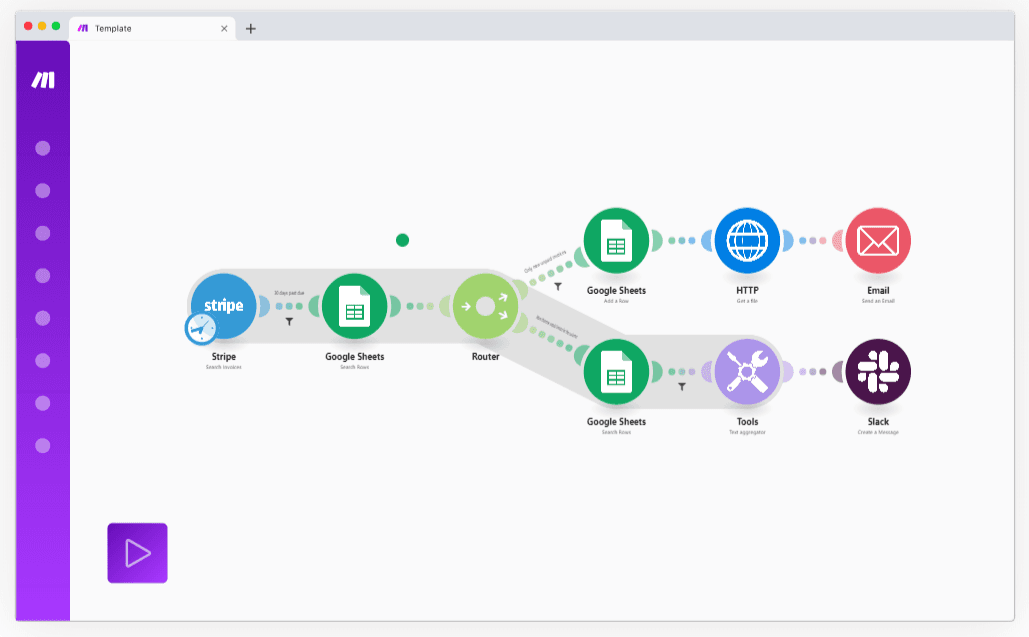
Detect unpaid Stripe invoices.
If there's only one unpaid invoice, notify the customer via email.
If there's more than one unpaid invoice, notify management about the situation.
Music to your ears? Then it's time to build!
Step 1: Create a Google Sheets spreadsheet and a new Make scenario
The first thing we’ll do is create a Google Sheets spreadsheet that has the following columns:
Name
Created date
Due date
Amount due
Customer email
Plan
PDF link
Invoice ID
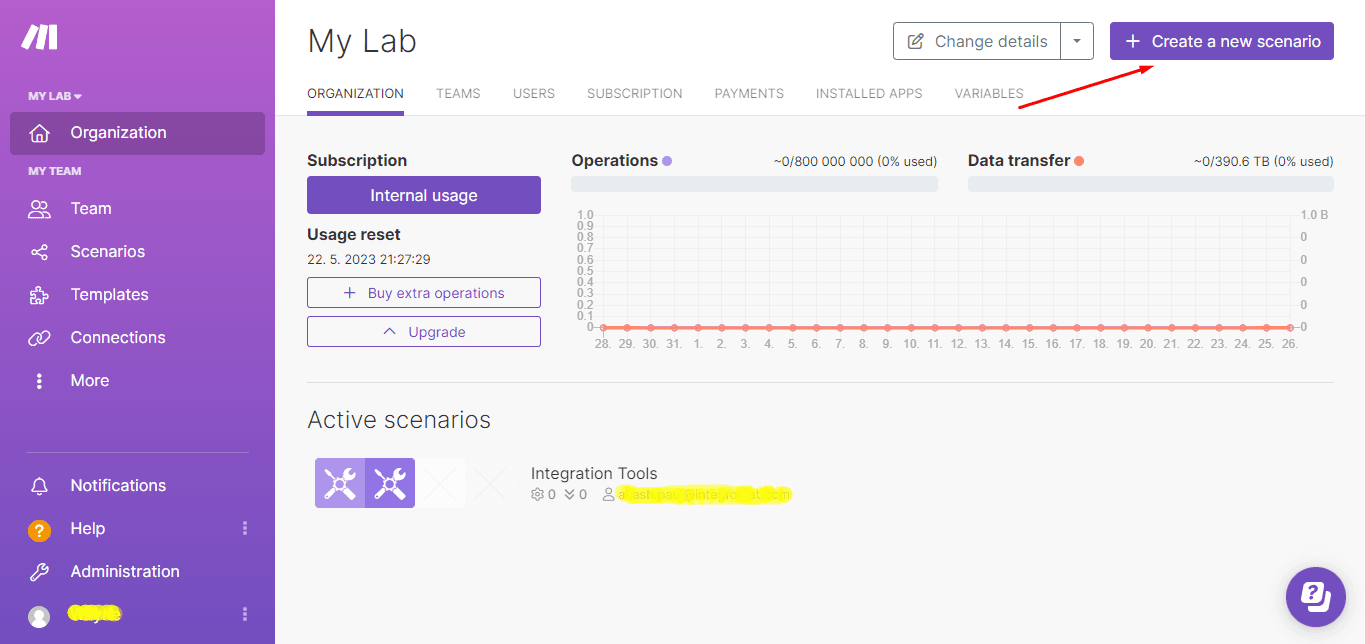
After creating your spreadsheet, log into your Make account and create a new scenario from the dashboard.
Within the scenario builder, search for the Stripe app and select the Search Customers module. This is the first step towards collecting unpaid invoices.
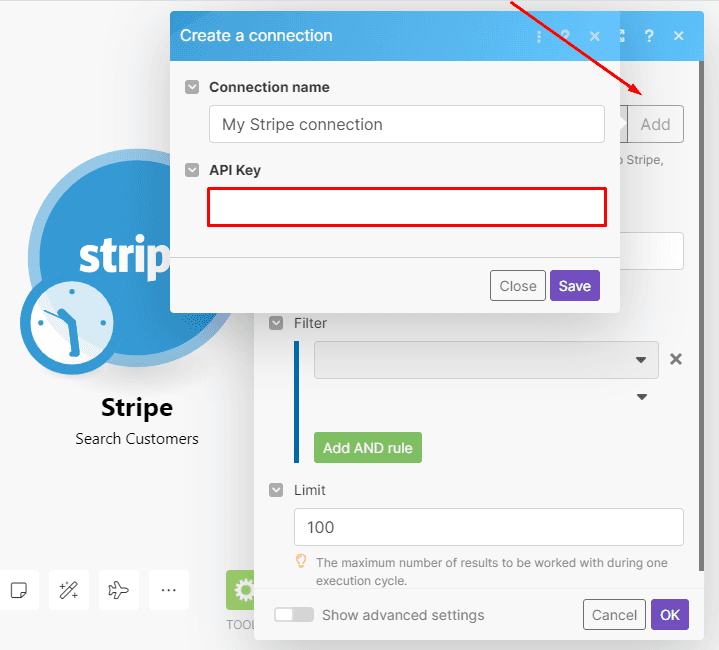
If you don’t have your Stripe account connected to Make yet, you’re required to do so in the module’s configuration box.
Just click the Add button, name the connection if you like, and paste your Stripe API key.
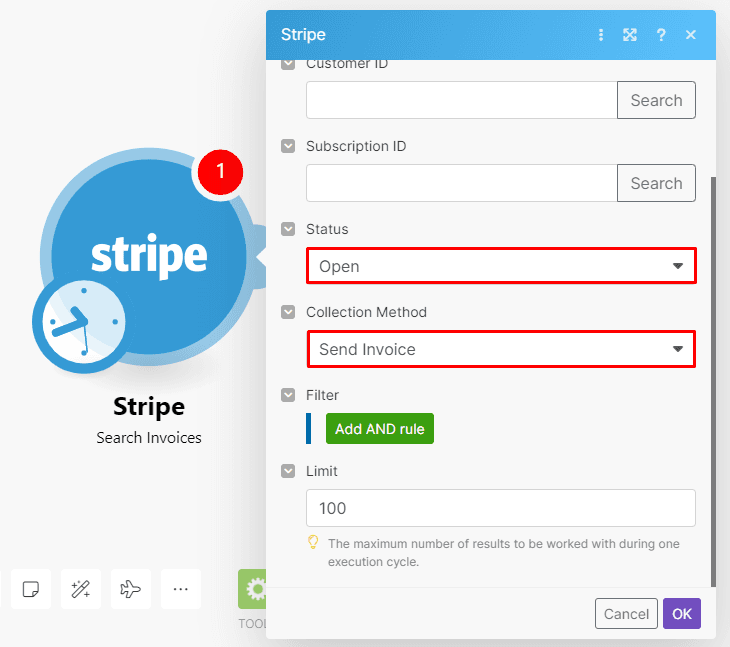
Since you’ll want to fetch all the unpaid invoices there are, select “Open” in the Status field and “Send Invoice” in the Collection Method field.
Once done, click OK to finish configuring the first module in this scenario.
Step 2: Add the Google Sheets app to your scenario
Let’s add the second app, Google Sheets.
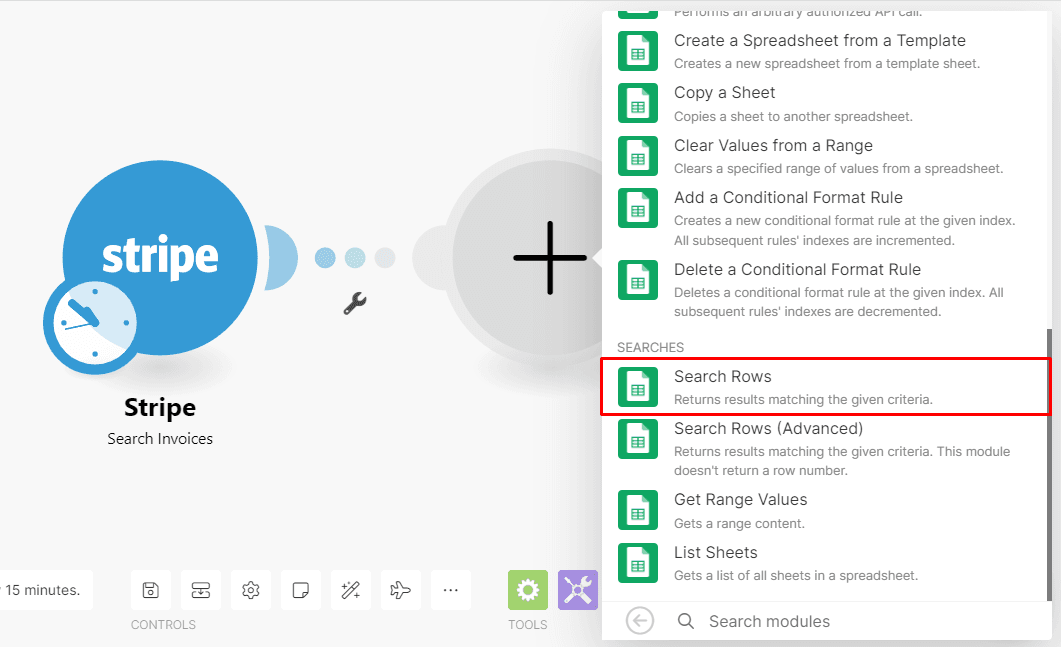
Click on the plus sign that appears on the right side of the Stripe module to add another module. Then, search and select the Google Sheets - Search Rows module.
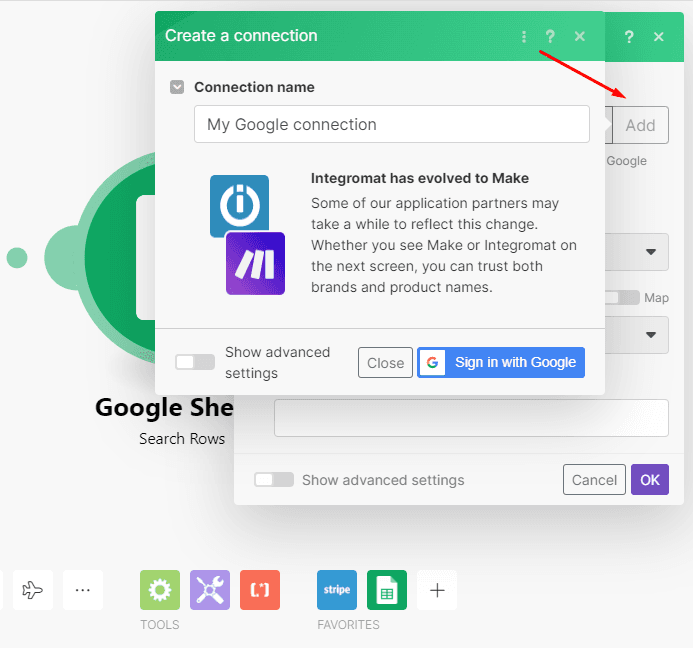
As you did with the Stripe module, you need to connect your Google account to Make to access the module’s configuration settings.
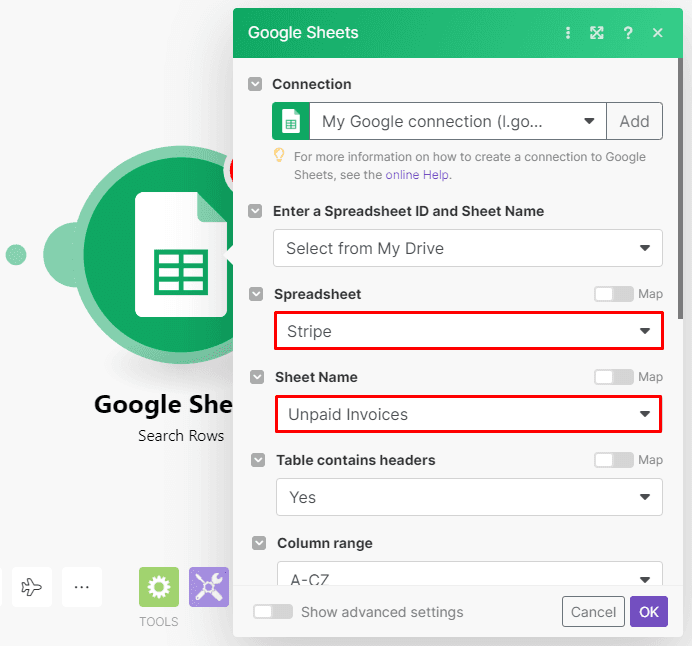
After connecting your Google account to Make, select the spreadsheet that you want to add the information to, and then select the sheet.
Next, scroll down to the filter.
Here you need to search the sheet to verify if the invoices are already there or not.
If they are, you don’t want to duplicate them - we will show you how to prevent that in a bit.
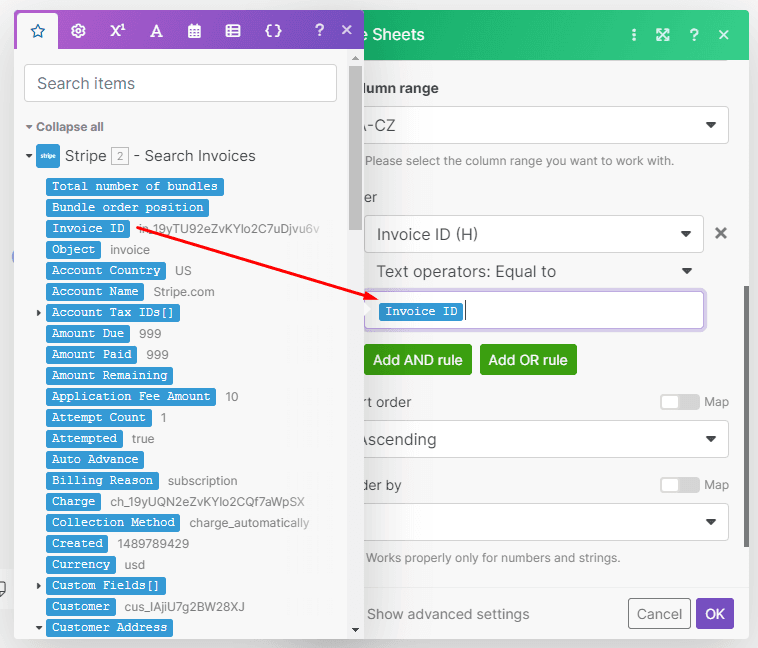
Now, select the Invoice ID column and map the Invoice ID data item from the Stripe module as shown below.
Click OK to finish configuring the module once ready.
Step 3: Add a filter
In this example, we only want to retrieve invoices that are 10 days past the due date.
Another filter is required, but we’ll rely on a native Make filter rather than the one available in the Google Sheets module.
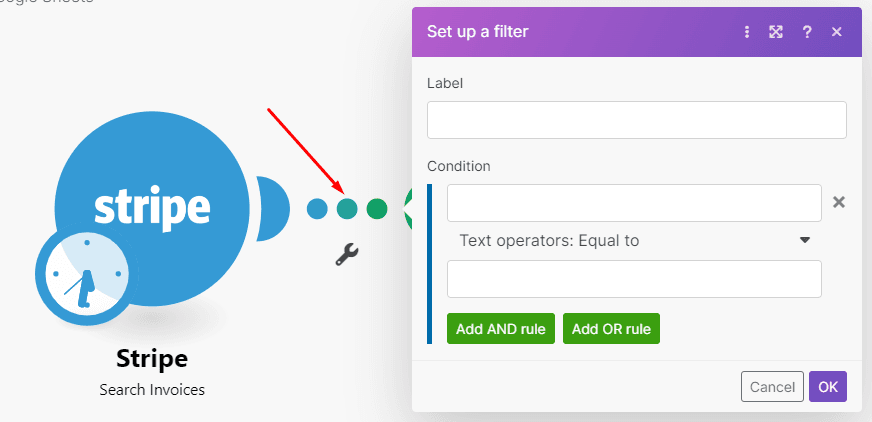
Between the two modules in your scenario you’ll notice a link: Click it to open the filter menu.
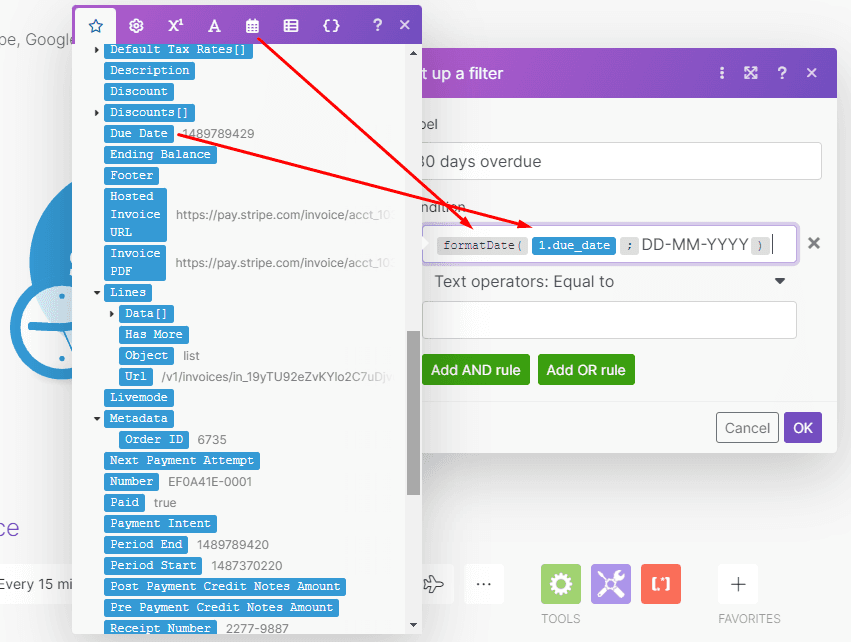
The date in Stripe and the date in Make are in different formats, and we need to standardize them so we can compare them in the filter.
Let’s use the format DD-MM-YYYY.
In the Date and time functions tab, you’ll find the formatDate function - please select it.
In the top field, simply map the due date data item within the parentheses and enter the date format. See the image below for reference.
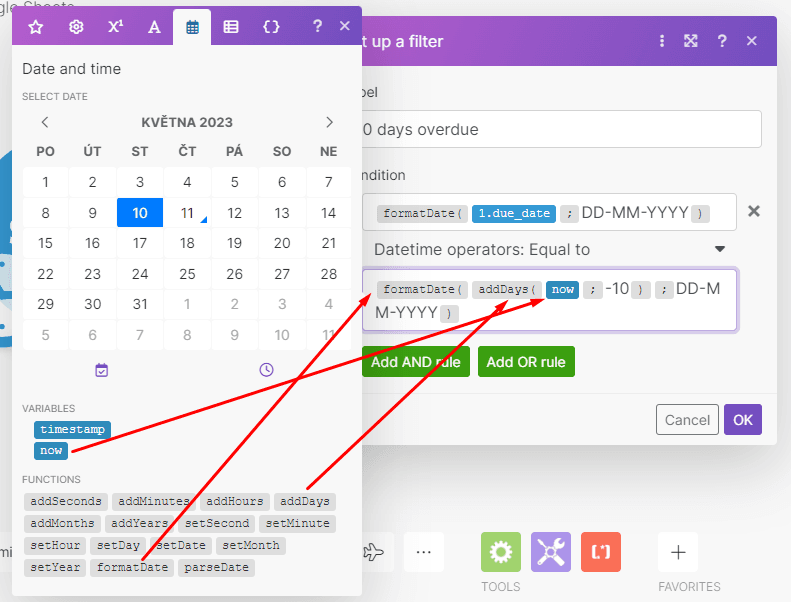
Next, select the Datetime operator: Equal to.
Make’s now variable gets the current date and time, and we need to subtract 10 days from it so that the filter only lets unpaid invoices that were due 10 days prior to pass through.
To do this, use the addDays function, map the now variable, and enter -10.
Lastly, enclose the addDays function with the formatDate function to format it as you did with the Stripe due date. You can check how to do this in the image below.
To conclude, you can name the filter if you want; it’s a good practice documentation-wise, but not a mandatory one.
Step 4: Add a router
As we mentioned above, when the module doesn't find an invoice ID on the sheet, the invoice information must be added there.
On the other hand, the invoices that are found on the sheet should be ignored to prevent duplication.
We will use a filter to achieve this, but first, the scenario needs to be split into two routes. This first route will add new unpaid invoices to the sheet.
The second route will check if a customer has more than one unpaid invoice on the sheet; if that’s the case, the scenario will automatically escalate to management.
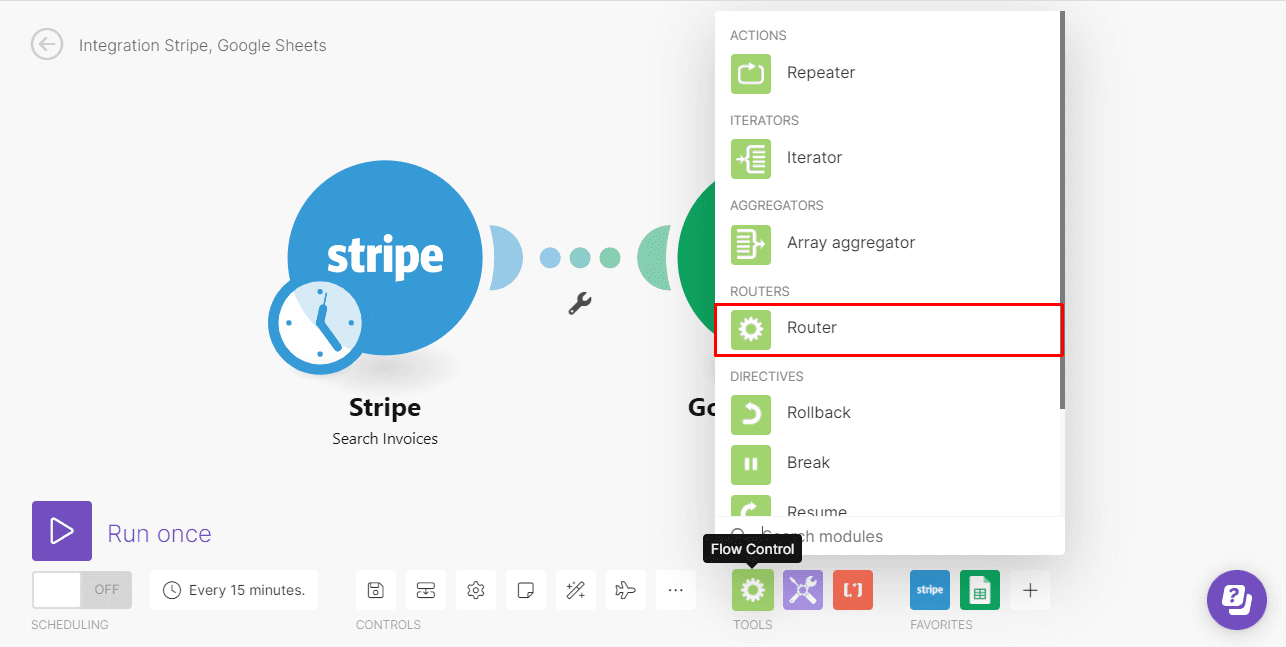
To create the two routes, you will need to add a Router to your scenario. You’ll find it at the bottom of the scenario builder under the Tools menu.
Select the router, drag it onto the right side of the Google Sheets module, and click on it once to open two links.
Pro tip: Hit the auto-align button to align the scenario and keep everything organized.
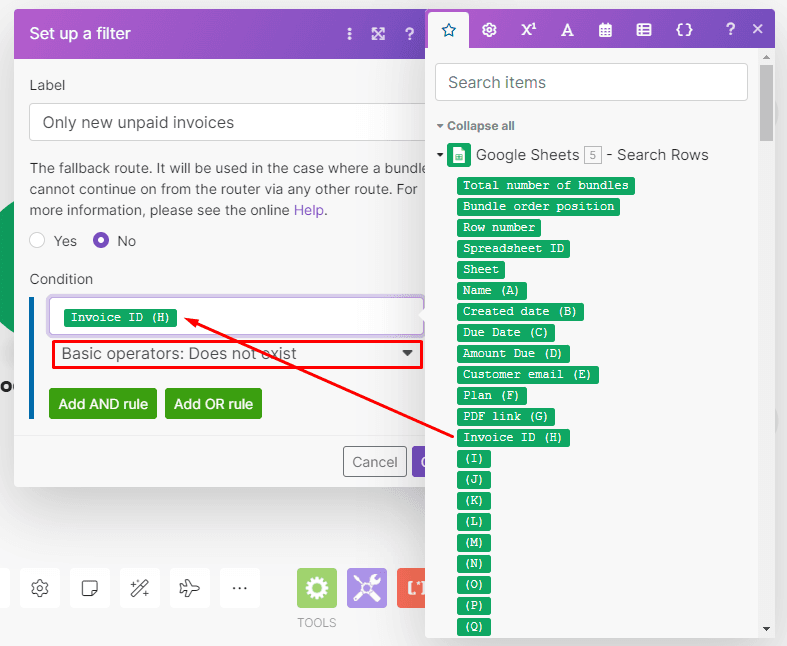
Next, click the link on the top route to open the filter menu.
Map the Invoice ID item from the Google Sheets > Search rows module to the top field and then select Does not exist as the basic operator.
Once done, click OK and proceed to the next step.
Step 5: Add an HTTP module in the top route
Now that the Google Sheets module is configured and the invoice information will be added to it, let’s download the unpaid invoice in PDF format and email it to the customer.
To download the PDF, add the HTTP > Get a file module after the Add a row module.
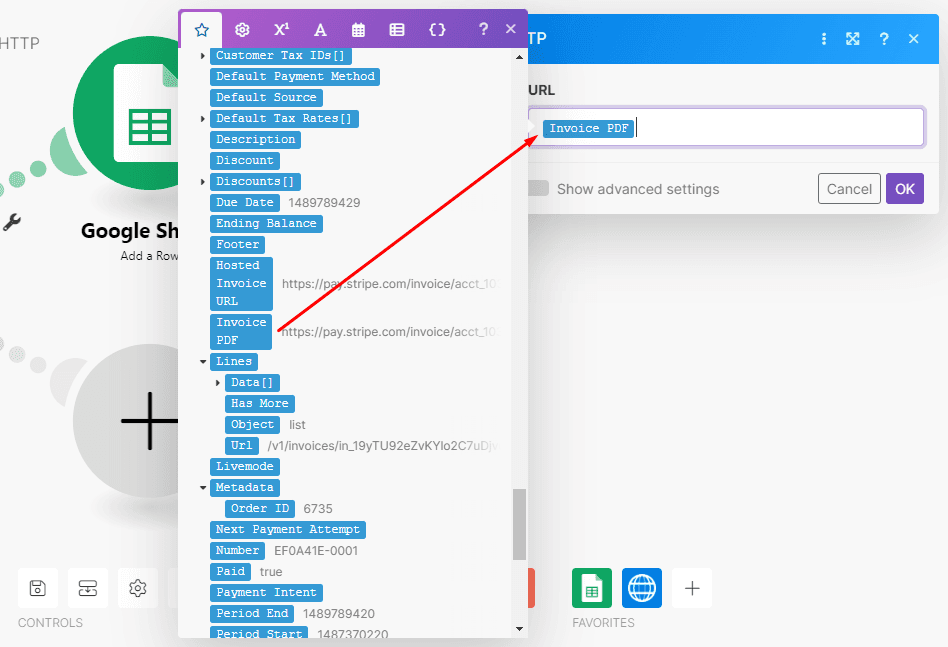
To configure it, simply map the Invoice ID data item to the URL field. Once ready, click OK to finish configuring the HTTP module.
Step 6: Add an email module
With the invoice in PDF format, Make will now email it to the corresponding customer, reminding them of their debt.
To achieve this, add the Email > Send an email module to the top route, after the HTTP module.
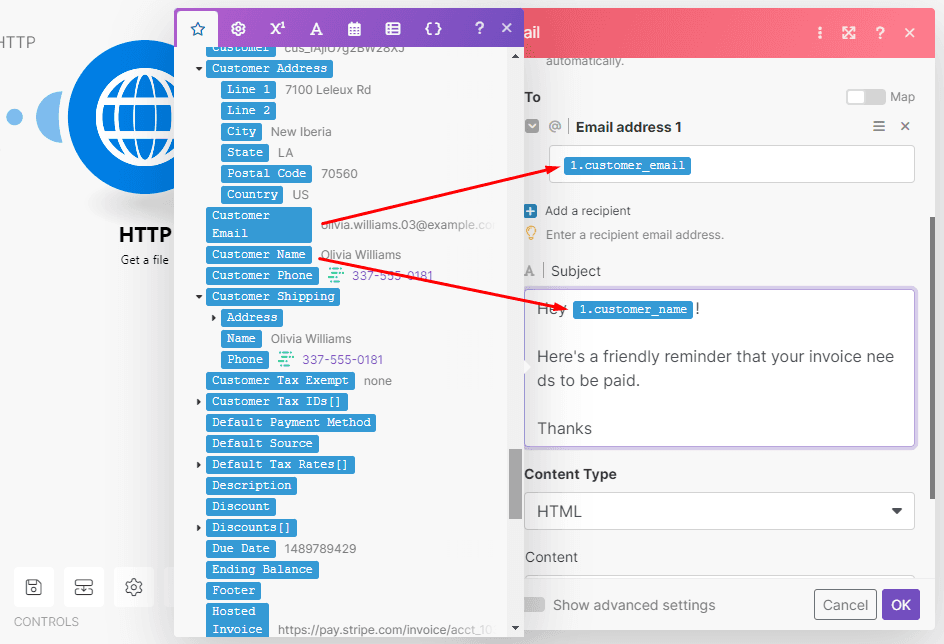
Once you connect your email client to Make, map the Customer Email item from the Stripe module. You can then add the email content you want as you see below.
The last thing to do is to scroll down and click Add an attachment.
You’ll see that the document from the HTTP module will automatically be selected for you. Hit OK.
Step 7: Add the second Google Sheets module
The bottom route will be used to check if a customer has more than one unpaid invoice (based on your spreadsheet data), and notify management about the situation.
First, we need to grab the name of the customer from the sheet. To do this, add the Google Sheets > Search records module to the bottom route of your scenario.
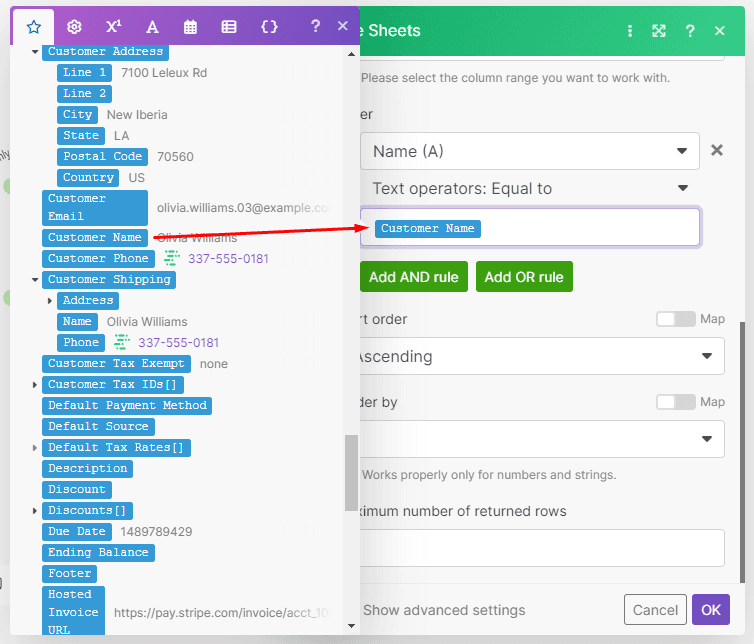
Start configuring the module by selecting the Name option and map the Customer Name item in the filter.
You could also search with the email address if you want - the decision is yours.
Once finished, click OK and move on to the next step.
Step 8: Add a text aggregator
When there’s more than one unpaid invoice for the customer, we need to aggregate the data we have so that it can be sent in a single notification.
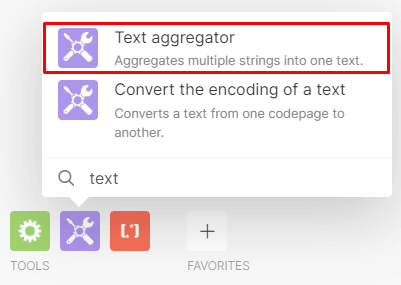
Make has a Text aggregator module that will take care of this for you.
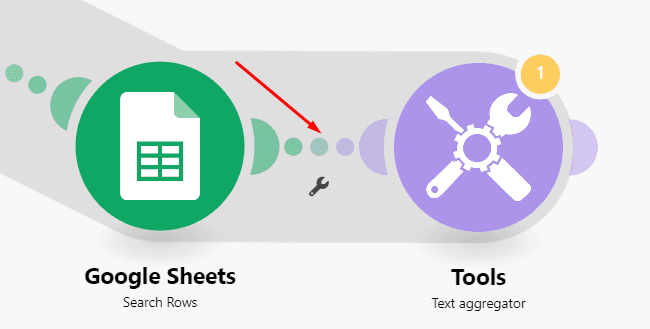
You’ll find it in the Tools menu - just attach it to the Google Sheets module in the bottom route of the scenario.
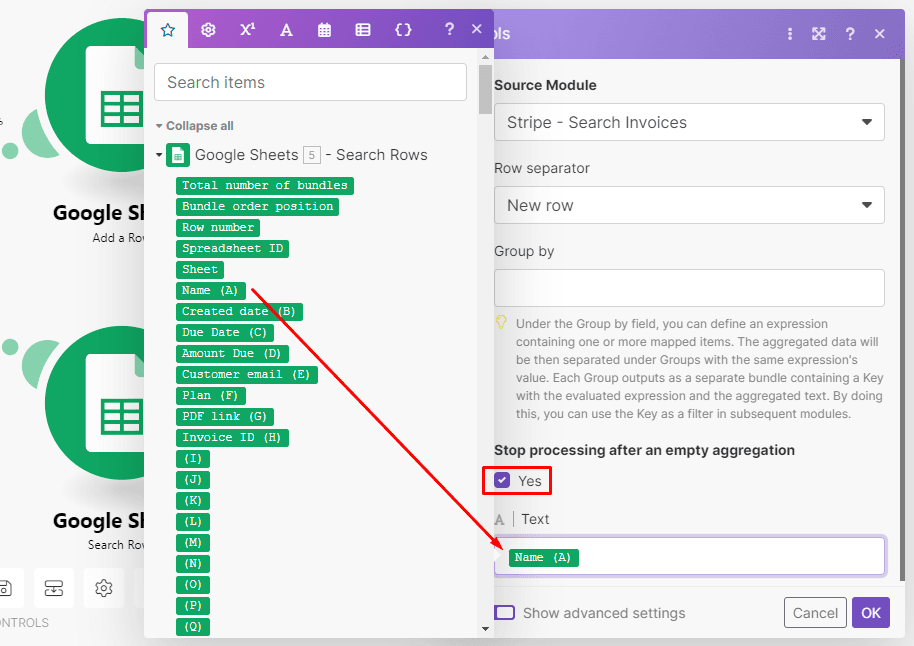
To configure the Text Aggregator, first hit the Advanced setting switch to open extra fields.
Next, select the Stripe module as the Source module, and New Row as the separator.
Tick the Stop processing after an empty aggregation so that when there’s no data it won’t trigger subsequent modules.
Lastly, map the Name item from the prior Google Sheets > Search records module before moving on to the next step.
Step 9: Add a filter to the bottom route
Let’s add a filter to the link between the Google Sheets and Text Aggregator modules.
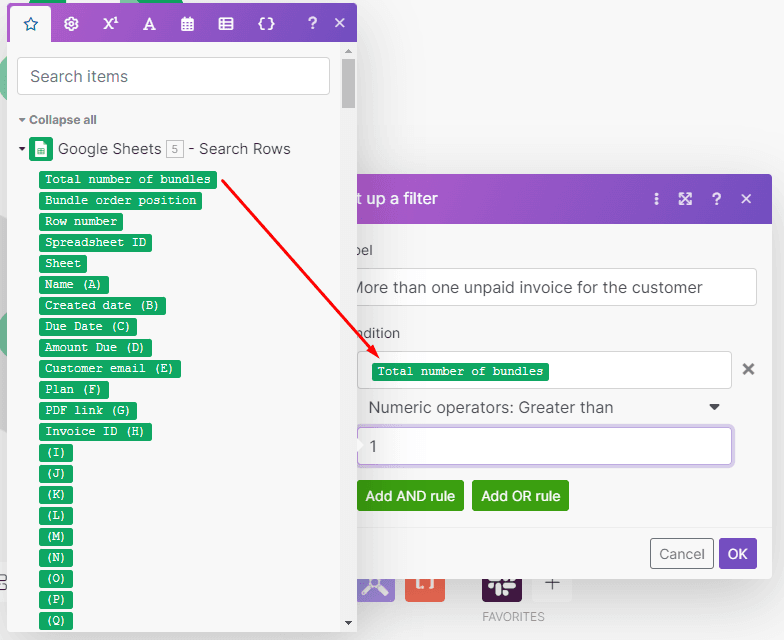
The purpose of this filter is to verify if the customer has more than one unpaid invoice. If so, the bundle of data will pass through to the Text Aggregator.
If not, the bundle will not be processed any further.
Here’s how to set it up: Start by mapping the Total number of bundles (n° of invoices) to the top field, and then select the Greater than numeric operator.
Just enter ‘1’ in the bottom field. If the customer has only one unpaid invoice, the data won’t pass the filter as intended.
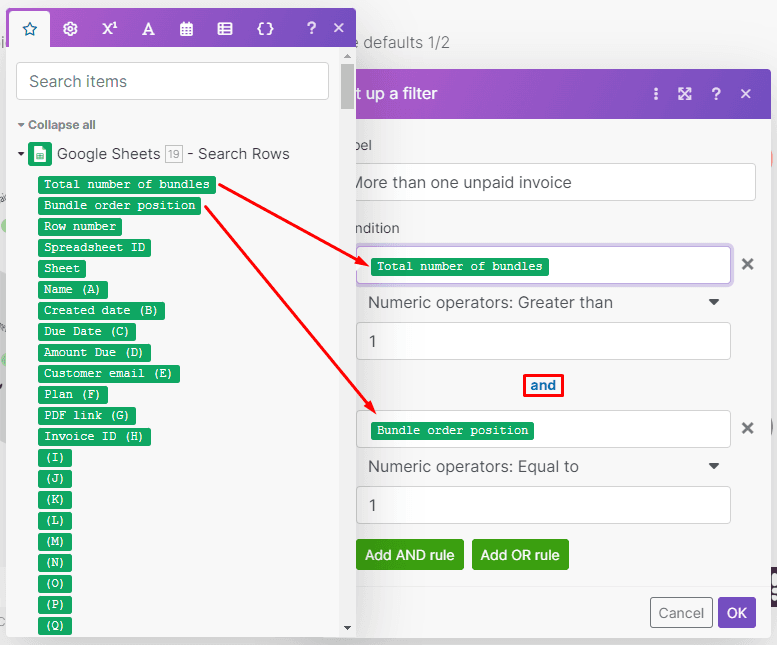
We also don’t want the Text Aggregator to aggregate the same name multiple times, as that will end up in the notification sent to management.
To prevent this from happening, we will just use the first bundle of data that passes through.
Click the Add AND rule and configure it as shown in the screenshot below. Once done, click OK to finish configuring the module.
Step 10: Add the final module to your scenario
Finally, we have reached the last module. This is where you'll escalate the names of the customers with multiple unpaid invoices to management using Slack.
Start by adding the Slack > Create a message module to the bottom route of your scenario.
After connecting your Slack account, choose the Select from the list option. Then, select the Channel type and Channel/User.
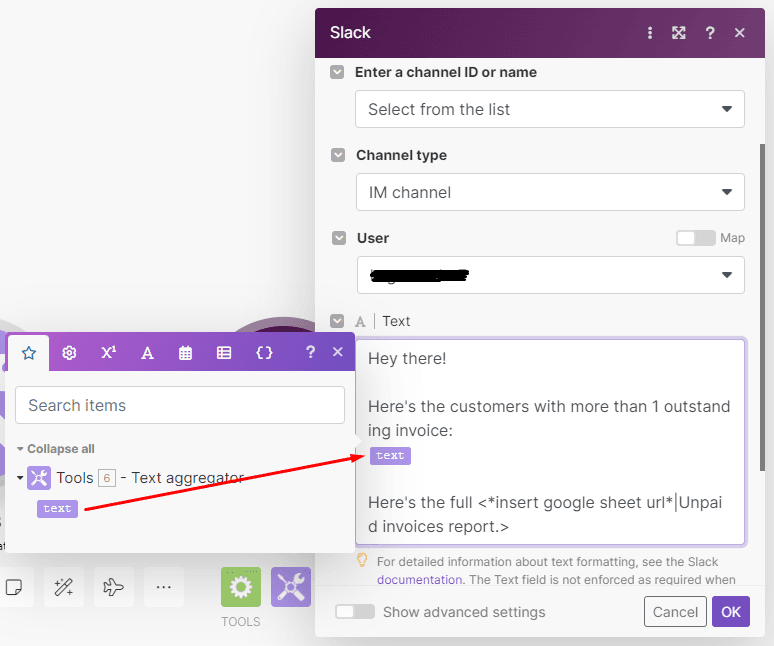
The text item contains the names of the customers, which should be mapped within the content of your notification.
And that’s it!
Click OK to finish configuring the module, and then save and activate the scenario.
From now on, Make will automatically detect unpaid Stripe invoices, and send the corresponding reminders to the customers for you.
Bonus: A scenario that updates customer status as they pay their due invoices
Now that you have all the unpaid invoices on the sheet, and multiple defaulters brought up to management’s attention, it’s important to remove them once they have paid.
To do this, we’ve created a template that you can use in parallel to the scenario we just built:
What does it do? Simple - it removes paid invoices from your sheet.
Final words: Fortifying your revenue stream
In conclusion, navigating the labyrinth of unpaid invoices doesn't have to be a draining or time-consuming process.
By integrating your apps with Make, we've unlocked a solution that brings order to chaos, automating reminders for unpaid invoices with unprecedented efficiency.
Implementing this solution not only reclaims your valuable time but also fortifies your revenue stream by reducing overlooked payments.
It's time to take control, embrace automation, and propel your business operations to new heights of efficiency. As usual, it all starts with a Make account. Get yours, and get going!

