Nov 12, 2021 | 7 minutes
The Easy Guide to GitLab Webhooks
Ready to learn about GitLab webhooks? In this guide, you will find definitions, examples, use cases, and methods to create GitLab webhooks from scratch.

Welcome to our new webhooks guide!
In case you haven’t heard, we are on a mission to make the topic of webhooks accessible to anyone. And for that to happen, we are releasing app-specific guides, where you will find definitions, examples, and use cases of webhooks for popular apps.
After publishing our introductory guide to webhooks, it’s time to move on to the dedicated webhook guides, starting with GitLab.
This git repository, issue-tracking, and DevOps lifecycle app plays a central role in how development teams work on projects and interact with each other.
As you can expect, notifications, alerts, and updates are the order of the day in GitLab environments, and webhooks represent an easy method to automate these, as well as other tasks that involve pushing information when something happens.
In this guide, we will show you how to create GitLab webhooks, and share a couple of use cases where you can employ them.
But let’s not get ahead of ourselves: Before we get to that, it’s important to understand the basic aspects of GitLab webhooks, such as definitions, examples, and characteristics.
What are GitLab webhooks?
GitLab webhooks are user-defined HTTP callbacks triggered by events happening in GitLab. After an event takes place, the webhook gets instantly triggered, allowing the user to define one or more actions in response to that event.
Let’s illustrate how this works with an example.
Imagine that a dev team is releasing the beta version of a program. To do that, the team will create the release in GitLab, after which it will ask a number of external stakeholders to review the release.
Here’s where webhooks come into play.
Instead of manually notifying the external stakeholders one by one, the team can create a webhook, and automatically notify the stakeholders once the release is created on GitLab.
How so? Simple.
First, a release is an event that is supported by GitLab to be used in webhooks. This means that the team can create a webhook that will be triggered by new releases happening in GitLab.
Then, that webhook can be attached to an instant messaging app (like Slack, or Microsoft Teams) to automatically notify the stakeholders once the event takes place.
So, with the webhook in place, the stakeholders will be notified via Slack the minute the beta version gets released by the team.
In case you are wondering which GitLab events are supported to be used with webhooks, these are:
Push events
Tag events
Issue events
Comment events
Merge request events
Wiki page events
Pipeline events
Job events
Deployment events
Group member events
Subgroup events
Feature flag events
Release events
You can find more details about particular events in the GitLabs webhooks documentation.
How can you use GitLab webhooks?
Given the number of GitLab events that are supported to be used along with webhooks, the potential uses are quite interesting.
Sending instant notifications about events to other people is perhaps the most obvious use case for GitLab webhooks, but there are hundreds, if not thousands of potential applications for them.
Off the top of our heads, here are a few use case examples for GitLab webhooks:
Automate the creation of issue backlogs for new GitLab projects
Create (and auto-populate) documents detailing the review history of GitLab wiki pages
Assign tasks to employees (inside or outside of your team) when the status of a GitLab job changes
Measure employee productivity based on issue resolution metrics
In order to understand how webhooks can assist your particular needs, please consider the following questions:
Which GitLab events can be connected to a webhook?
Which apps can I further connect to the webhooks for those events?
For what purpose?
The answers to these questions will help you define what webhooks you may need, and for what.
How to create a GitLab webhook?
GitLab webhooks can be created natively (using GitLab alone), and also with Make.
The process of creating a webhook is equally easy in both cases, although we believe the key difference resides in what happens after the webhook is created - that is when you need to determine an action in response to the webhook being triggered (such as sending a notification to someone over Slack).
Let’s start with the native option. To configure a webhook from GitLab, you need to follow the steps below:
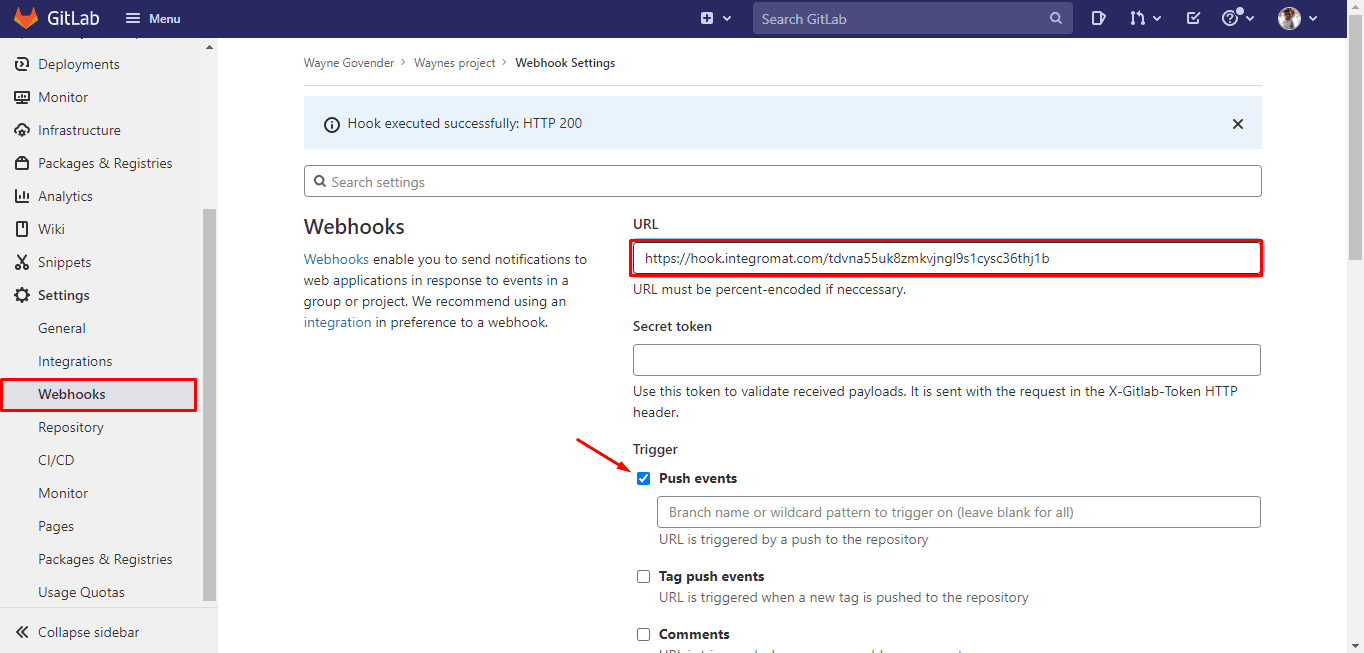
Select Settings > Webhooks on the left sidebar of your project or group
Enter the URL of the webhook endpoint in the URL field
Enter the secret token to validate payloads in the corresponding field
Select the events to trigger the webhook from the available options in the “Trigger” section
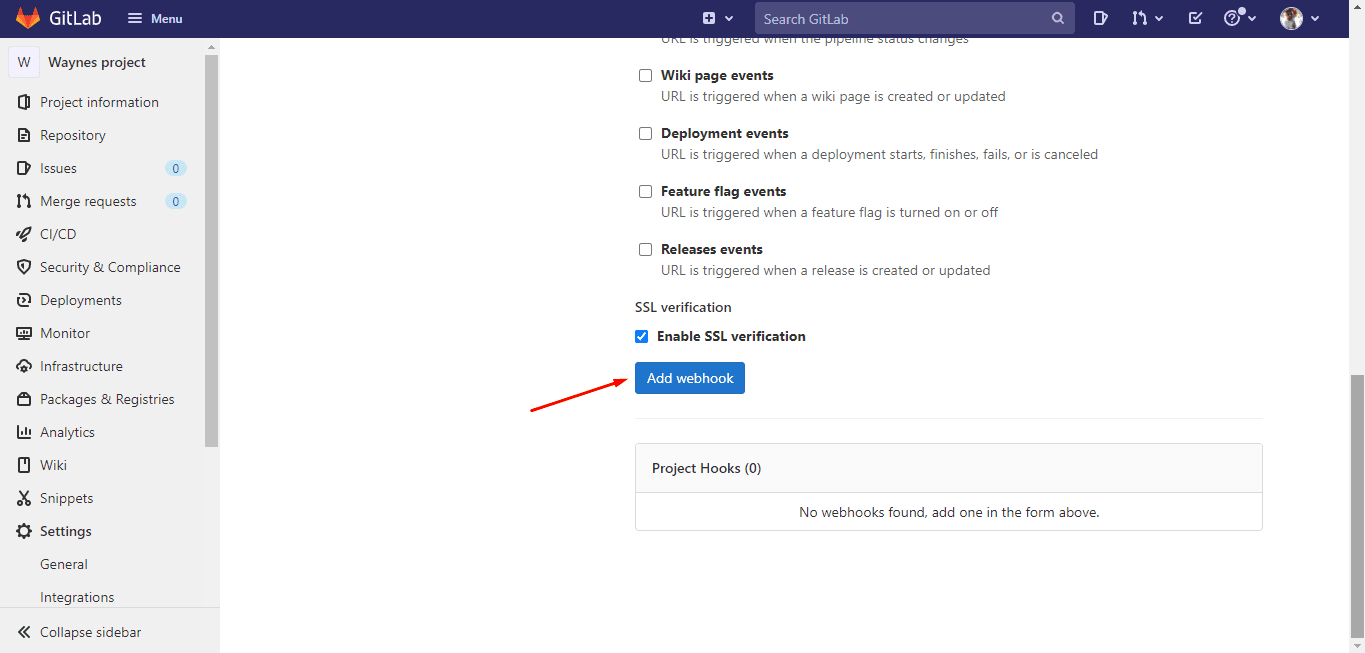
Select “Add webhook”
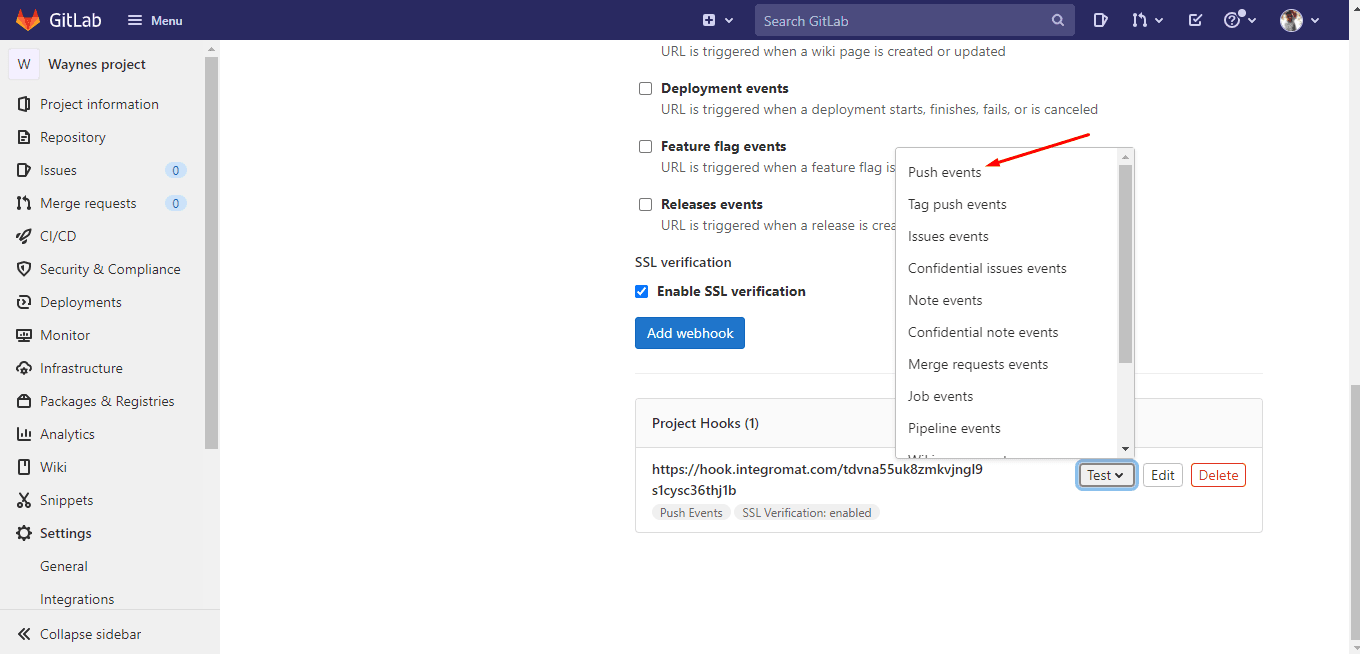
To make sure the webhook works the way it’s supposed to, you can make use of the test feature (available in the webhooks section as well).
From here on, a little bit of code will be needed in order to determine the action that will take place after the webhook receives data from an event. You can find more information about this on GitLab’s documentation pages.
Sending webhook data to other apps can be demanding if you’re not comfortable around code or APIs, and this is the reason why we will show you how to create and manage GitLab webhooks with Make.
How to create GitLab webhooks with Make
Manipulating and posting webhook data to other apps is not only possible but also extremely easy to do with Make.
First, you won’t need to use a single line of code. Second, you’ll be able to connect your GitLab webhooks to 1,000+ apps in minutes.
Let us show you how to do it.
Note: If you don’t have a Make account, create one for free here.
Now, let’s get down to business.
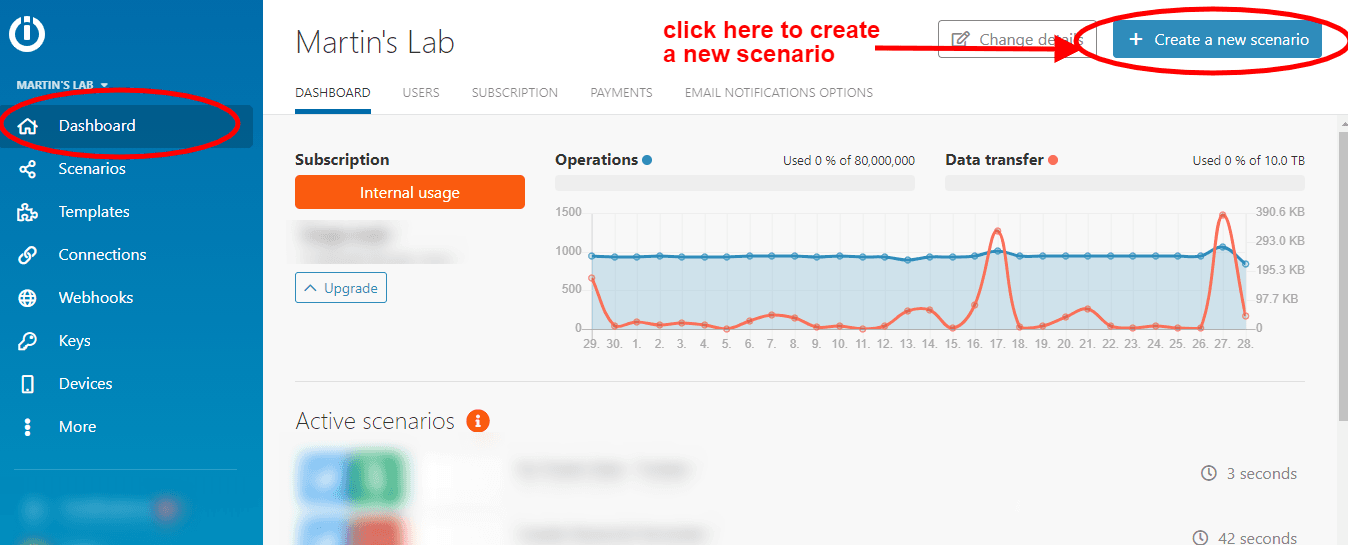
From your Make dashboard, hit the “Create a new scenario” button.
You will land on the scenario builder. Here, click the circle at the center of your screen and look for the “Webhooks” app.
After you find it, click it and select the “Custom webhook” module.
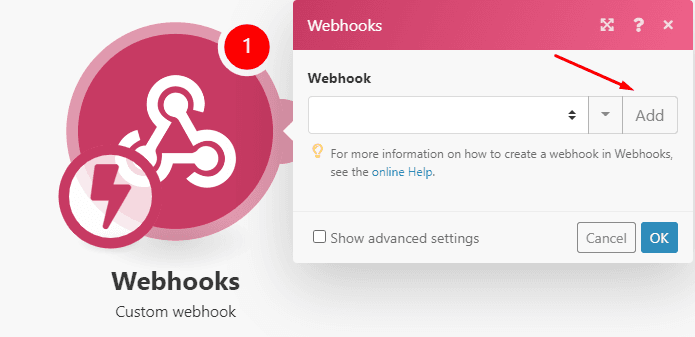
The configuration box will appear in front of you. Here, just click the “Add” button.
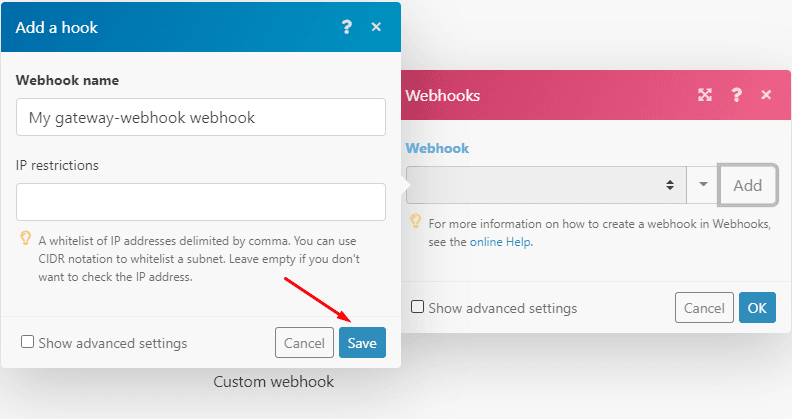
Another configuration box will appear. Here, just give your webhook a name (it can be anything) and then click “Save”.
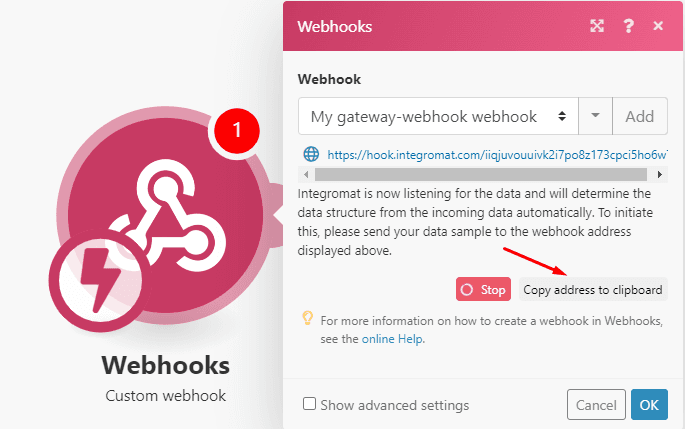
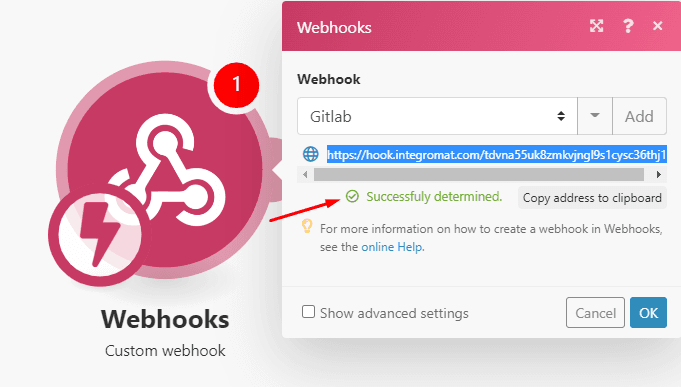
If you look closely, you’ll notice that there is a URL available in the configuration module of your webhook.
This is your new custom webhook URL, and here comes the first benefit.
By using this URL, you won’t need to manually determine the URL structure needed for your webhook (something that is required when creating webhooks natively in GitLab).
The next step is to copy this URL and head over to Settings > Webhooks GitLab, and enter the URL you just copied in the URL field there.
Next, select the event you want to attach to the webhook from the list of available options on your GitLab screen.
Once you do this, click the “Add webhook” button at the bottom.
Since Make needs to determine the structure of the webhook’s data payload, the last step is to test the webhook.
In other apps, you need to create a test event for this to happen, but GitLab is a step ahead of the game in this aspect thanks to its webhook-testing feature.
So, in the “Project Hooks” box that lies below the “Add webhook” button, click on the “Test” dropdown, and in the list of options, click on the event that you attached to this webhook (in this case, that is “Push events”).
After you do this, wait for a couple of seconds until Make determines the data structure of the webhook. Then, head over to Make to check that this process has been completed - if so, the module will state that the data structure has been successfully determined.
And that’s it!
Your GitLab webhook will now be active and receive data the moment push events to take place.
For a summarized version of this process, please check the video below:
At this point, you can attach whatever app you want to your webhook.
For example, you can add a “Create a message” Slack module, and automatically notify someone (or yourself!) whenever there’s a new push on GitLab.
GitLab webhooks: Learning resources
In case you want to take a deeper dive into GitLab webhooks, here’s a list of resources that we believe will be of your interest:
The takeaway: An easy, efficient method to automatically post data
Webhooks allow you to automate tasks that consume time and resources. Moreover, they are more efficient than API calls, which require constant polling and thus consume more data down the road.
As we mentioned before, the key to making the most out of webhooks is to take a look at your app stack and evaluate the potential app combinations that will allow you to automate simple and complex tasks once and for all.
After you start creating your own integrations, you’ll be able to do more in less time and spend your time on tasks that actually need your input and expertise.
Happy automating!
Ready to make the automation revolution happen?


