Nov 2, 2021 | 7 minutes
The Easy Guide to Jira Webhooks
Learn all about Jira webhooks, including definitions, examples, use cases, and how to create them.

In an effort to make the topic of webhooks accessible to anyone, we are releasing a series of articles covering definitions, use cases, and examples of webhooks.
After publishing an introductory piece that explains what webhooks are, we are now focusing on popular apps that support webhooks, such as Discord.
Today is the turn of Jira, and we’ll take this opportunity to examine Jira webhooks, share examples of how they can be used, and show you how to create them (both natively, and using Make).
Let’s start with the basics: Definitions, scope, and examples.
What are Jira webhooks?
Like all webhooks, Jira webhooks are user-defined HTTP callbacks that push a data payload about an event to an URL configured for the webhook.
In simple words, Jira webhooks are a method to let other apps know that an event has happened on Jira.
For example, let’s say that you wish to keep a backlog of Jira issues on an Excel spreadsheet, but don’t have the time to keep track of all the new issues that appear on your Jira space and then copy them to Excel.
To solve this problem, you can rely on a webhook to export Jira issues to Excel automatically.
Every new issue that is created in Jira counts as an event, and thus the webhook will pick it up and send the corresponding data (such as issue ID, a summary of the issue, and assignee) to Excel.
It’s worth mentioning that webhooks are supported by both Jira Cloud and Jira Server, so you can rely on them in disregard of the Jira version you’re using.
What are Jira webhooks used for?
Jira has a list of events that can be sent to a webhook. The events are related to:
Issues
Issue properties
Worklogs
Comments
Attachments
Projects
Users
System configuration
Sprints
These represent different categories of data payloads that you can send to a Jira webhook. You can check the full list of events available for Jira webhooks in the corresponding Atlassian Developers page.
From here on, it will be up to you to determine how to use that data to your benefit. The possibilities are vast!
For example, let’s imagine that you are in charge of reporting on a project that is set to advance on multiple parallel development sprints.
Instead of waiting for team leads to tell you whenever they finish a sprint, you could implement webhooks for each sprint. The webhooks will pick up the events that interest you (in this case, those would be “closed sprints”).
So, when a sprint status is set as “closed” by any of the team leads, the corresponding webhook will send that status data to the predetermined webhook URL.
Furthermore, you can connect each of the webhooks to say your email app, and receive an email each time a sprint status is set to “closed” by the team leads.
This is a very basic example of what you can do with Jira webhooks, but as mentioned above, the possibilities are interesting.
For example, a more advanced use case could rely on webhooks to monitor closed issues and determine employee productivity with the resulting data (assuming the given subset of employees is assigned with tasks of similar difficulty).
As with all webhooks (and not just Jira’s), the key to understanding the possibilities will require you to consider the following questions:
Which events need to be monitored in real-time?
Does the app I’m using support webhooks to monitor these events?
Which apps can I connect to the webhooks monitoring those events?
For what?
Answering these will open up a world of possibilities to achieve your work goals, automate zillions of menial tasks, and make the most of getting useful information in real-time.
How to create a Jira webhook?
Creating Jira webhooks is relatively simple, and we will show you two different ways to do it:
Natively, using Jira
With Make
Let’s start with the first one. You can create webhooks straight from your Jira space, as long as you are an admin or have “global permission” from the administrator. In addition, some coding skills are required in order to make the most of them later down the line.
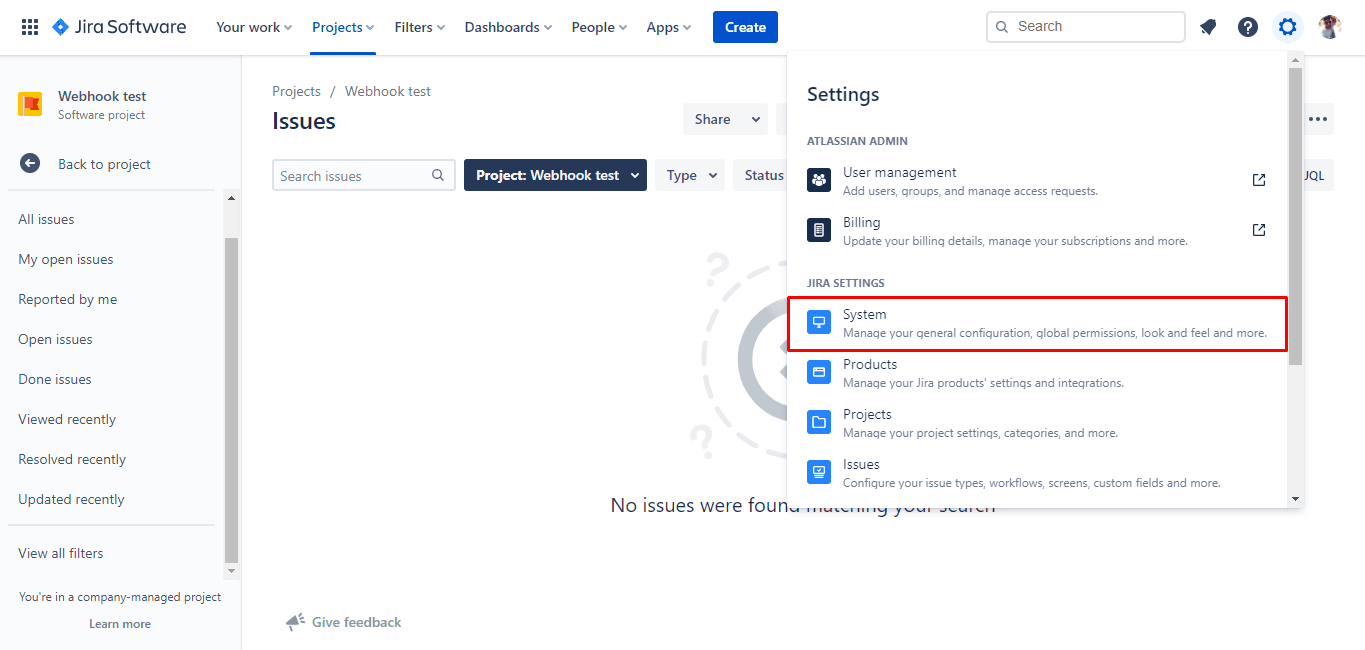
To create a webhook in Jira, click on the little settings icon at the top right of your screen, and then select the “System” option from the dropdown.
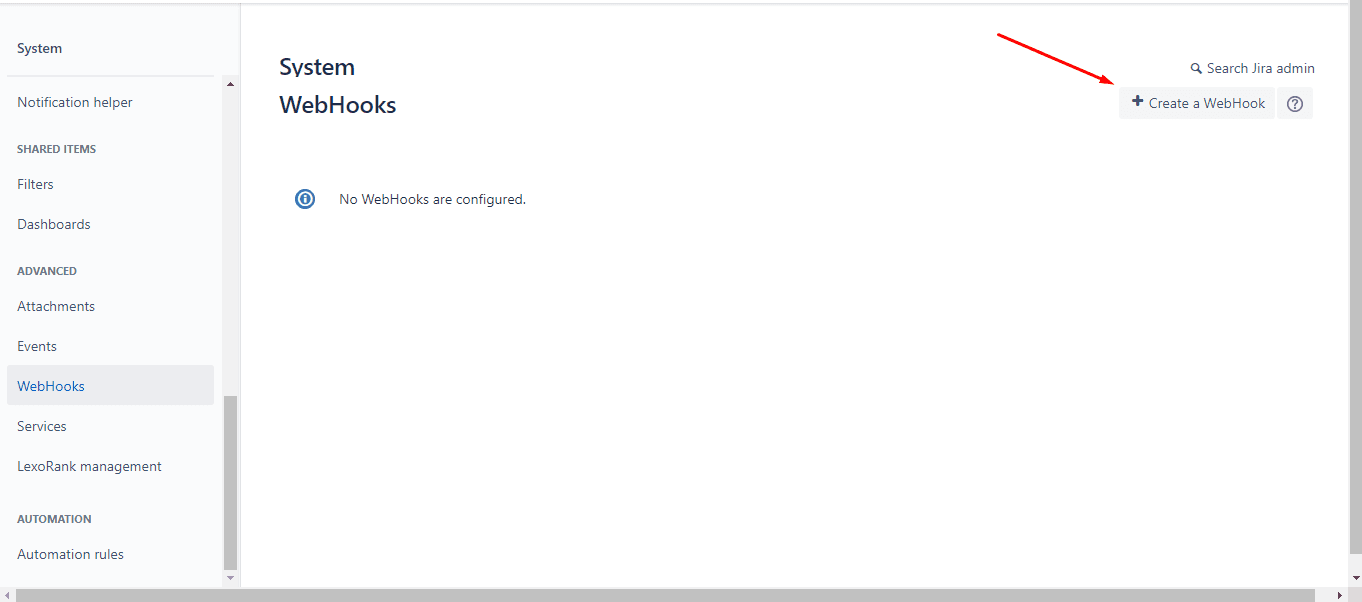
You will land on your System dashboard. Once there, click on the “Webhooks” option in the column at the left of your screen. Then, click the “Create a Webhook” button that’s on the top right of your screen.
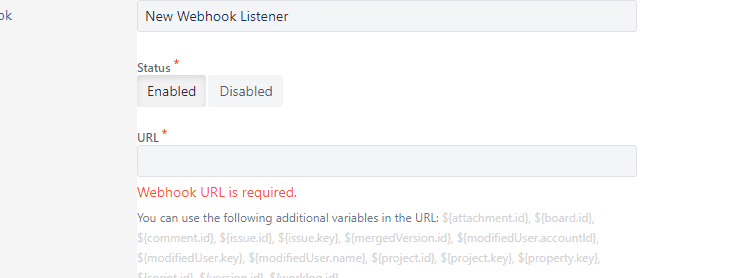
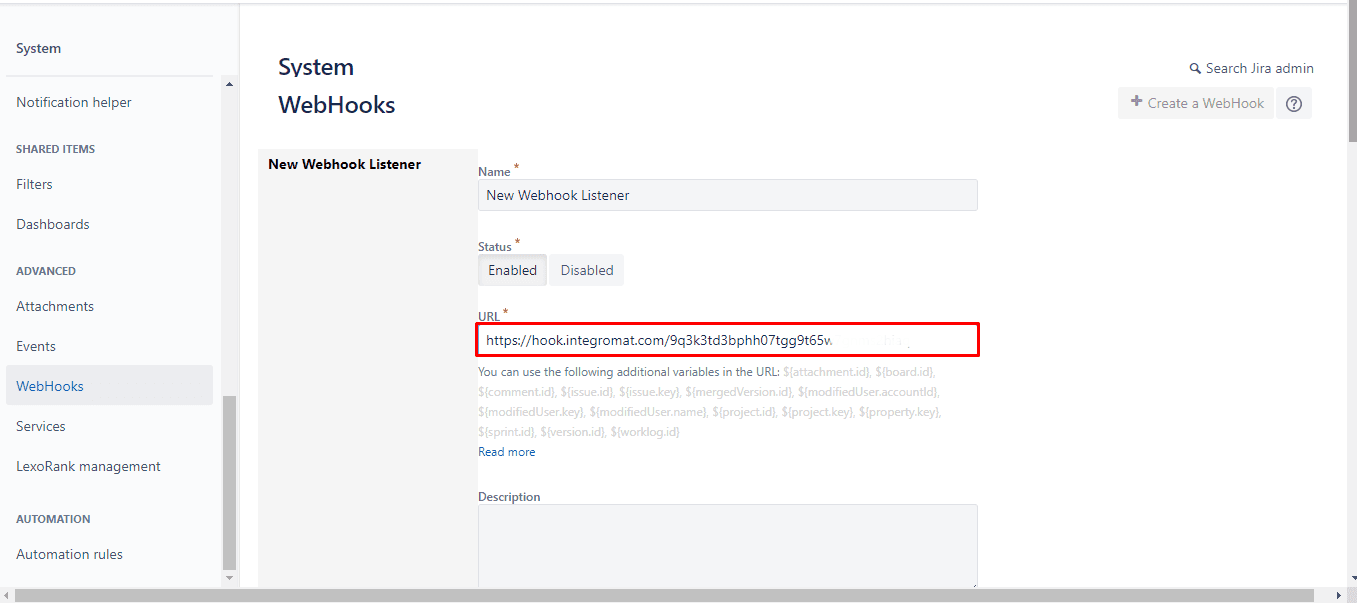
Next, you will have to name your webhook, determine the URL (following Jira’s parameters for webhook URLs), place it in the corresponding field and set the webhook status to “Enabled”.
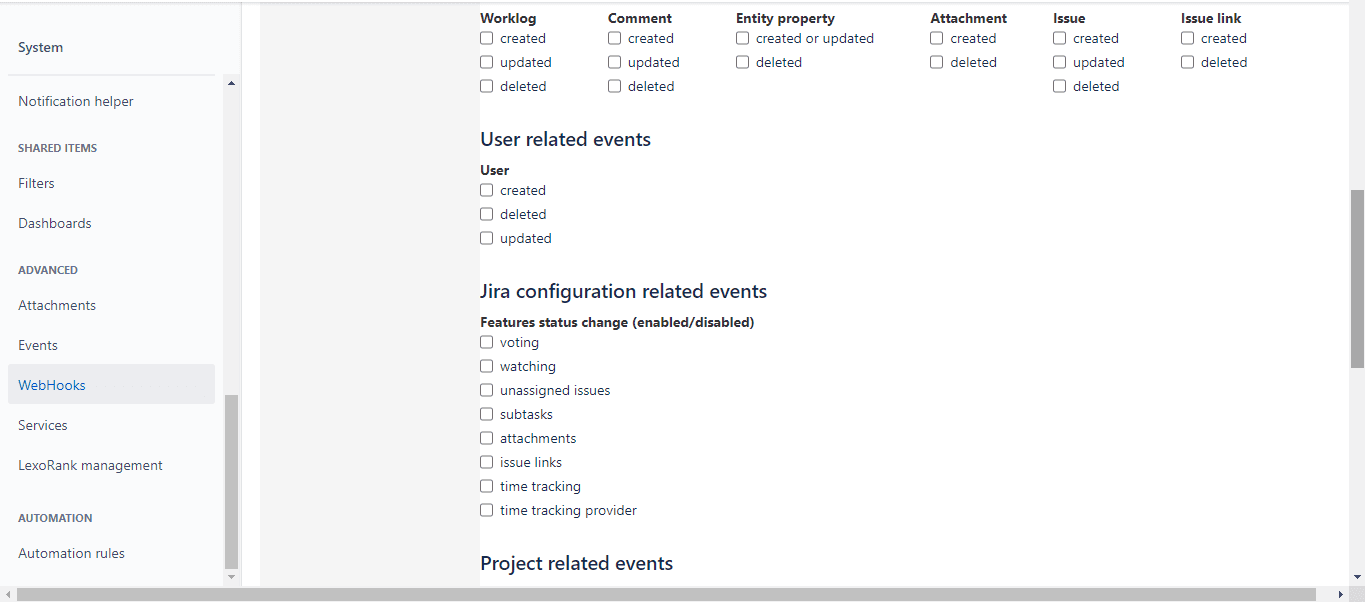
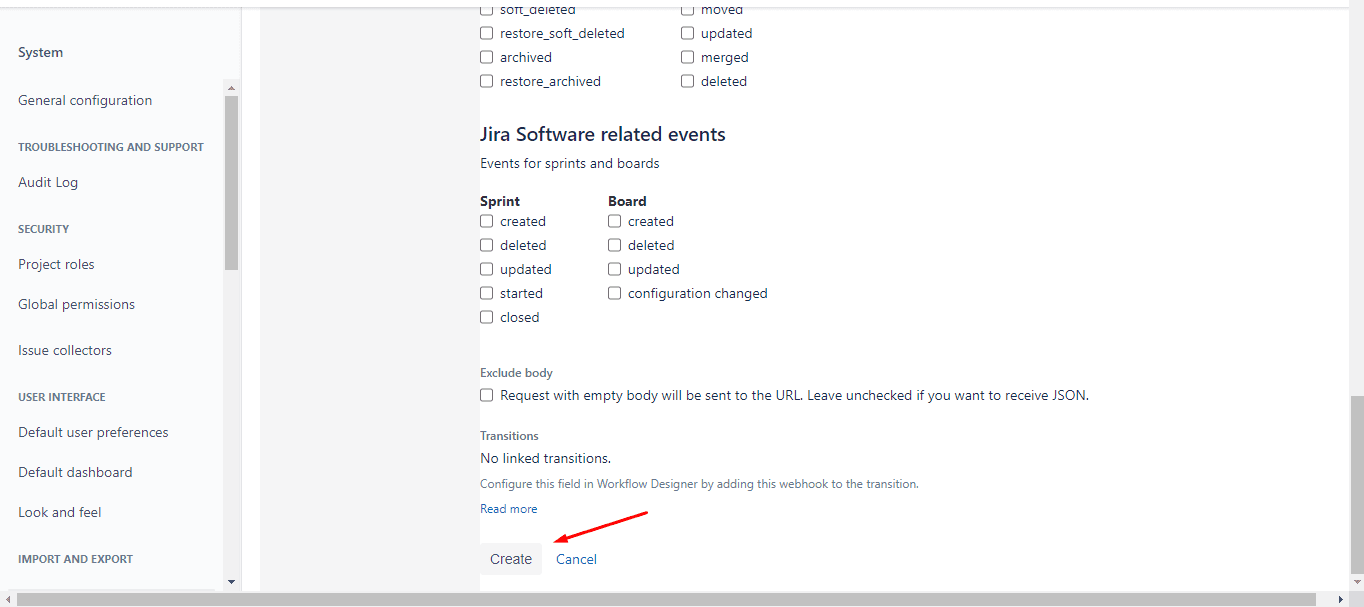
After you do this, scroll down the page to see the available events you can send to your webhook URL.
Here you can select the event that you wish to attach to your webhook. Once you do this, click the “Create” button at the bottom of your screen.
And that’s it!
Now your webhook is ready. You can add it to workflow post functions in Jira (to post the data received by the webhook somewhere else), or code through the Jira API to get the resulting data payloads in a way that is convenient for you.
Sending the resulting data payloads to other apps can be a tad demanding if you’re not familiar with code or APIs, and this is the reason why it is important to also show you how to create and manage Jira webhooks with Make.
How to create and manage Jira webhooks with Make
Creating Jira webhooks with Make is just as easy as doing it with Jira.
The key difference resides in what happens next - that is, manipulating and posting webhook data to one or more apps.
In Jira, this will require you to interact with code. With Make, you won’t have to.
In addition, you’ll be able to connect your Jira webhooks to virtually any app in a couple of minutes.
Remember the example of getting email notifications whenever a sprint is closed by a team lead? That’s a simple integration between a Jira webhook and an email app, and exactly what we are referring to here.
Now, let’s see how to create and manage webhooks with Make.
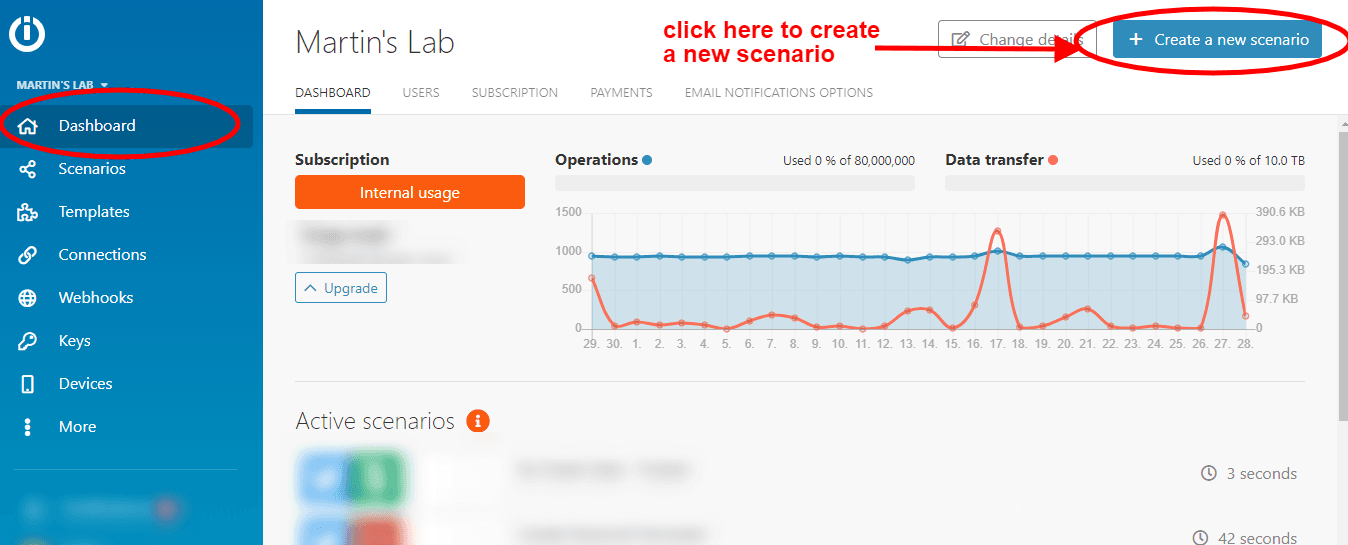
From your Make dashboard, you need to hit the “Create a new scenario” button.
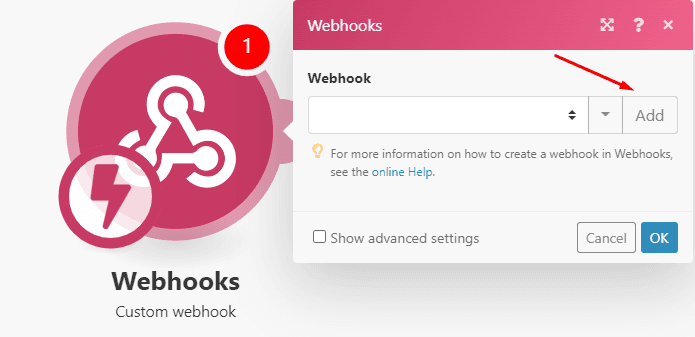
On the screen that follows, click on the circle at the center and look for the “Webhooks” app. Once you find it, click it and select the “Custom webhook” module.
A configuration box will appear in front of you. Here, click the “Add” button.
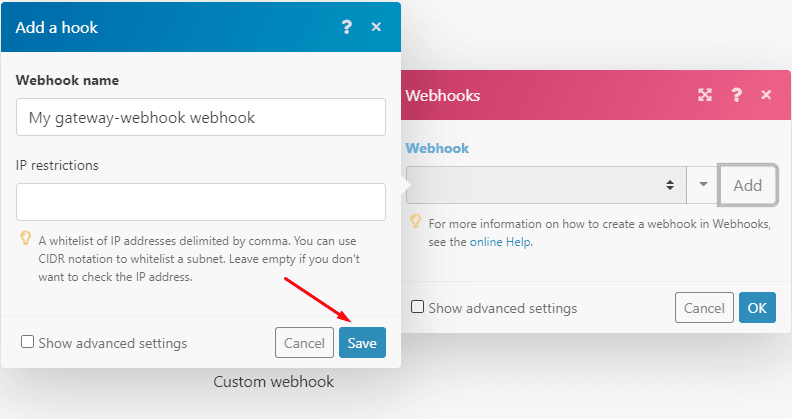
Another configuration box will appear. The only thing you need to do here gives a name to your webhook. So, just add your webhook name (it can be anything) to the “Webhook name” field, and then click “Save”.
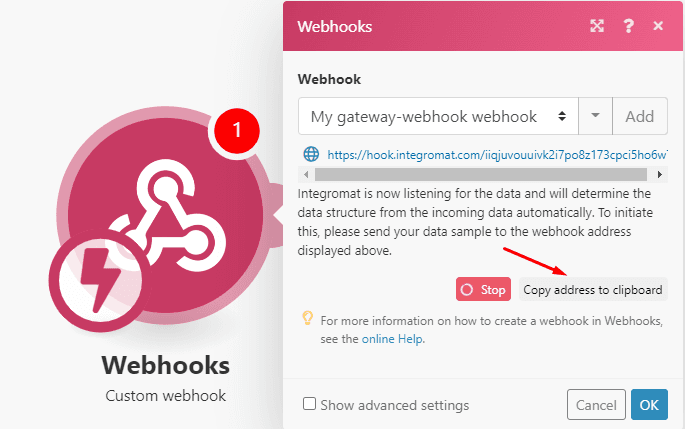
You will find yourself once again in the original configuration box for the module. If you look closely, you’ll notice that there is a URL available - that is your new custom webhook URL.
This will spare you from having to determine the URL structure, which is an unavoidable requirement when creating Jira webhooks natively.
The webhook is now “listening” for data to determine the data structure.
So now we need to copy this URL and go over to Jira.
Once there, follow the same steps as when creating a native Jira webhook:
Click the “System” icon at the top right of your Jira dashboard
Click “System” in the list of options
In the system dashboard, click “Webhooks” (at the right of your screen)
Tick the event that you wish to monitor
And then, paste your copied webhook URL (the one you copied from the Make module) in the URL field in Jira.
Since Make needs a data sample to determine the webhook data structure, there’s only one last thing to do: create an event for the webhook to pick it up.
For example, if you selected the “created issue” event, go ahead and create a new issue in your Jira space.
The webhook will receive that data, and Make will be able to determine the right structure for it.
For a summarized version, please check the video below, which shows the whole process of creating a Jira webhook with Make:
And that’s it!
Now, you can add whatever app you want to the Make scenario that contains that specific webhook. For example, you can add a “Create a message” Slack module, and automatically notify someone (or yourself!) whenever a new issue is created in Jira.
Pretty neat, huh? And not a single line of code was needed. 😉
Jira webhooks: Learning resources
Now that we have covered definitions, examples, use cases, and the necessary steps to create Jira webhooks, it’s time to share more resources about them.
We trust you will find these useful in case you are willing to go deeper into the topic. So, here’s our list of extra Jira webhooks resources:
Conclusion: Using webhooks for better management of Jira projects
We hope this article will help you get started with Jira webhooks.
As we mentioned above, webhooks allow you to automate tasks that drain time and resources, such as reporting, notifications, and backlog management.
At the end of the day, we believe that it’s important to focus on what matters the most, and leave the menial stuff in the hands of automation.
Before we call it a day, make sure you check the available Make plans! Our free offering will allow you to experiment with webhooks for as long as you want to. Also, our platform will be extra useful in case you don’t want to get your hands dirty with code or complicated (and endless!) API docs.
Happy automating!
Ready to make the automation revolution happen?


