Apr 14, 2025 | 10 minutes
How to build AI agents with Make
A simple guide to building Make AI Agents from scratch. We’ll walk through setting up an agent, giving it tools, connecting it to inputs, and returning structured responses.
Imagine if your automation could figure out the steps to reach a goal without you defining every action in advance. That’s what Make AI Agents enable.
In this guide, you’ll learn how to build an agent from scratch. We’ll walk through setting up the agent, adding scenarios as tools, connecting inputs like Slack or forms, and returning structured responses. Our example agent manages inventory by checking stock levels and placing new orders – but the same approach works for support agents, HR bots, Sales assistants, and more.
Agents in Make are flexible and modular. You can trigger them from any interface – Slack, Telegram, Tally, and more – and monitor or scale their behavior using the MCP server and Make Grid. Let’s build your first agent.
What are AI agents in Make?
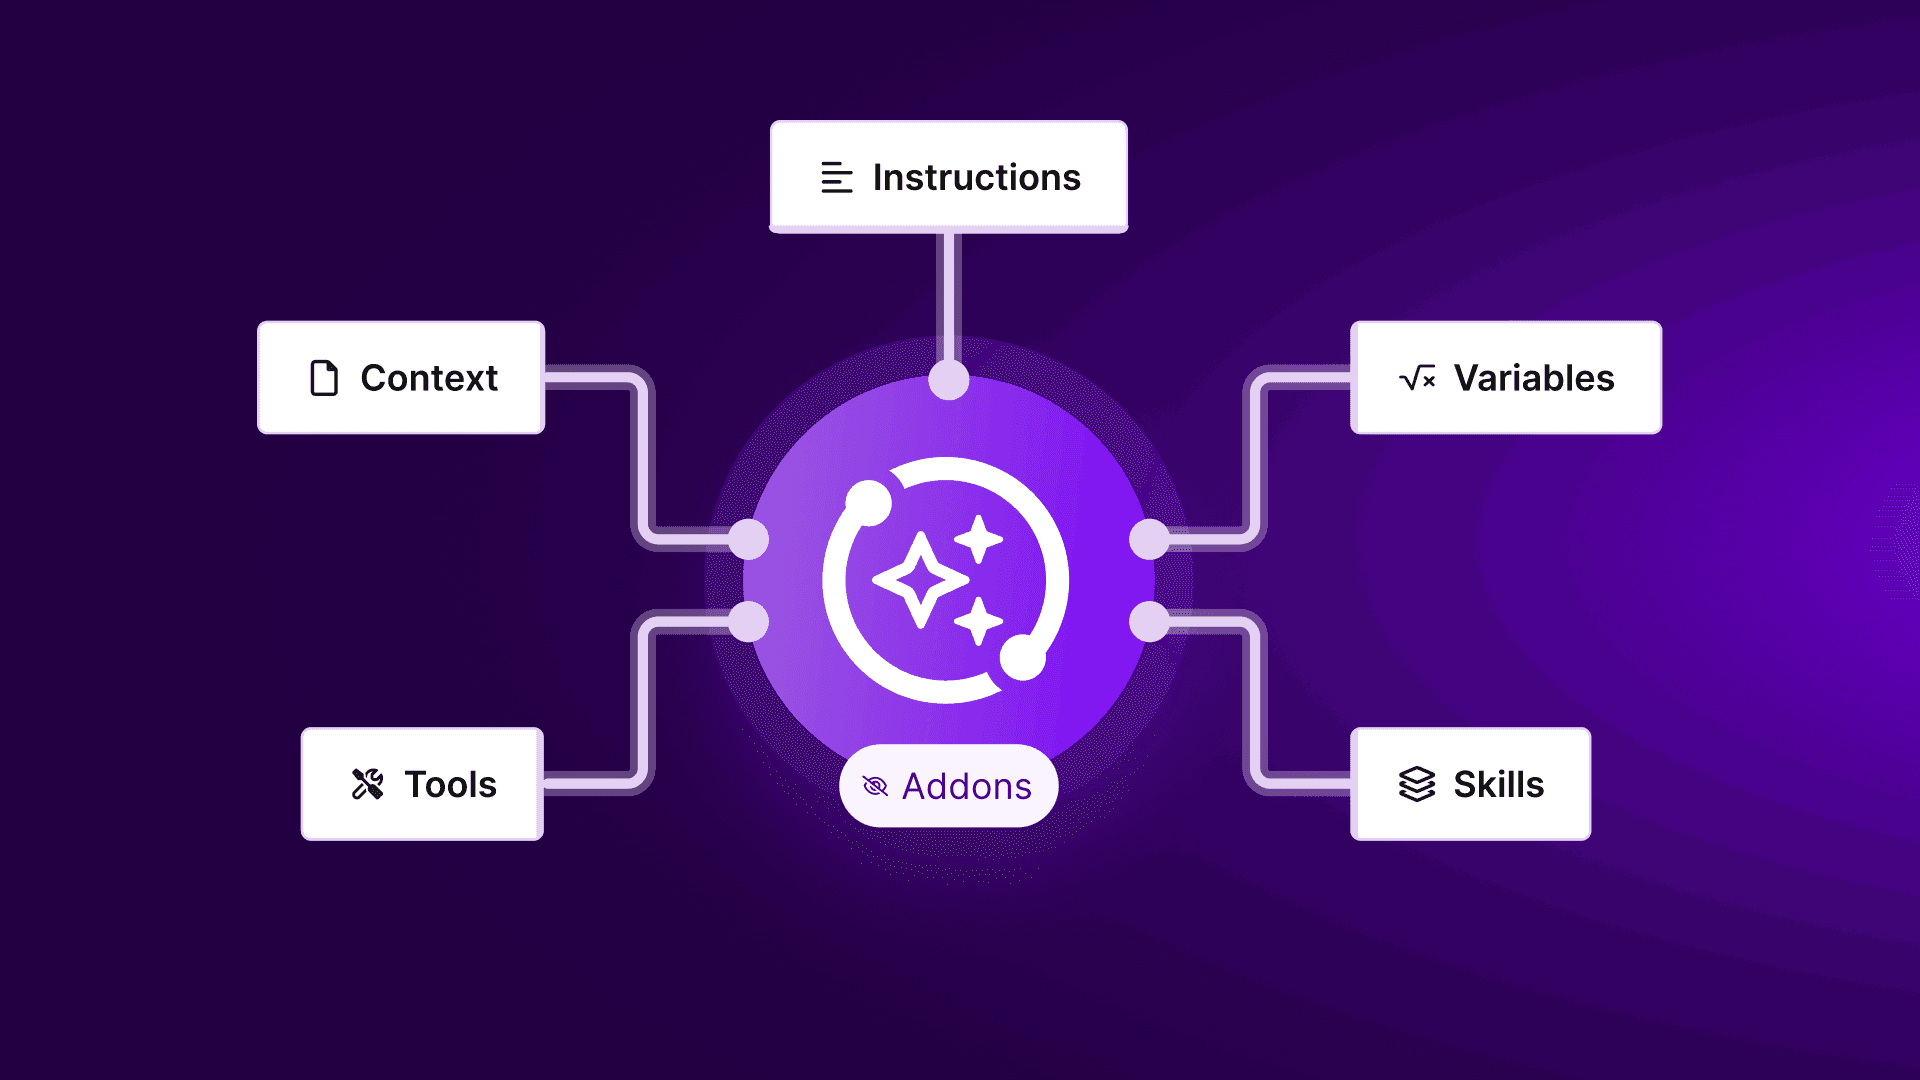
Make AI Agents are goal-driven automations powered by a large language model (LLM). Instead of following a fixed scenario, an agent receives a task, selects from the tools you've attached, and acts based on its reasoning.
In short, you define the goal, and the agent determines how to get there.
Here's how it works:
You describe the agent’s role and behavior in a short system message.
You attach tools – existing Make scenarios that the agent can run to get things done.
You trigger the agent with a prompt, often from Slack, a form, or another connected input.
The agent analyzes the request, uses the available tools, and returns a structured response.
Make AI Agents don’t retain memory between runs – each task is handled independently. That’s why clear instructions and well-defined tools are essential for consistent results.
Let’s build your first agent.
Example: shop inventory agent
To make things concrete, let’s walk through the example of a shop inventory assistant.
Imagine you run a small store and want an AI agent to help manage stock. Your goal is to be able to ask:
“Do we have any blue hoodies in stock?”
“Order 10 more bags of coffee.”
And have the agent take care of it.
We’ll build a Shop Inventory Agent that can:
List current inventory using a scenario that fetches product and stock data from a spreadsheet or database.
Order new stock using a second scenario that creates a purchase order or sends a request to a supplier.
Receive prompts through Slack, which acts as the interface for interacting with the agent.
This setup shows how to combine Make's flexibility with an AI agent's reasoning to build goal-based automation.
While this example uses Slack and Google Sheets, the same approach works with apps like Telegram, Notion, Airtable, and others.
Let’s start by creating the agent.
Step 1: Create your AI agent
Start by setting up the agent that will power your automation. This is where you define what the agent does and connect it to a language model.
1. Open the AI Agents section
From your Make navigation panel, go to AI Agents and click Create agent.
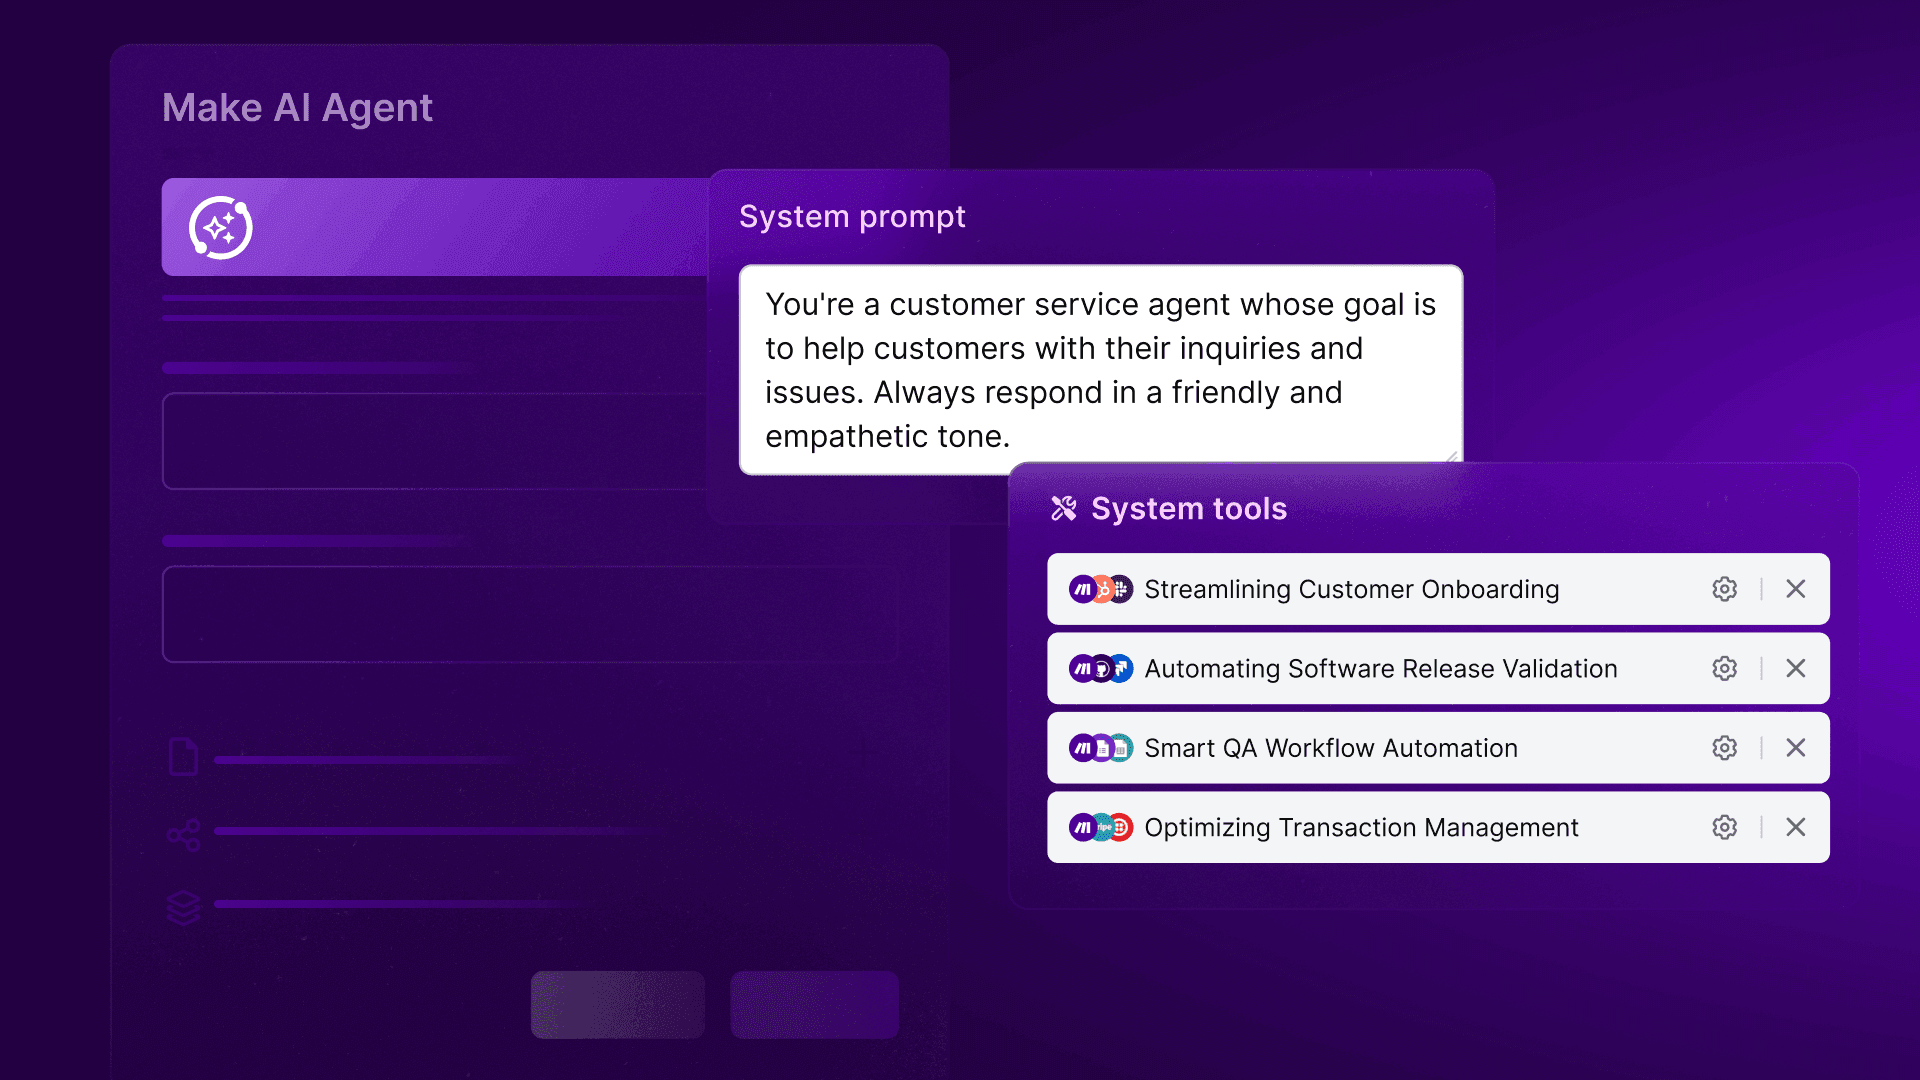
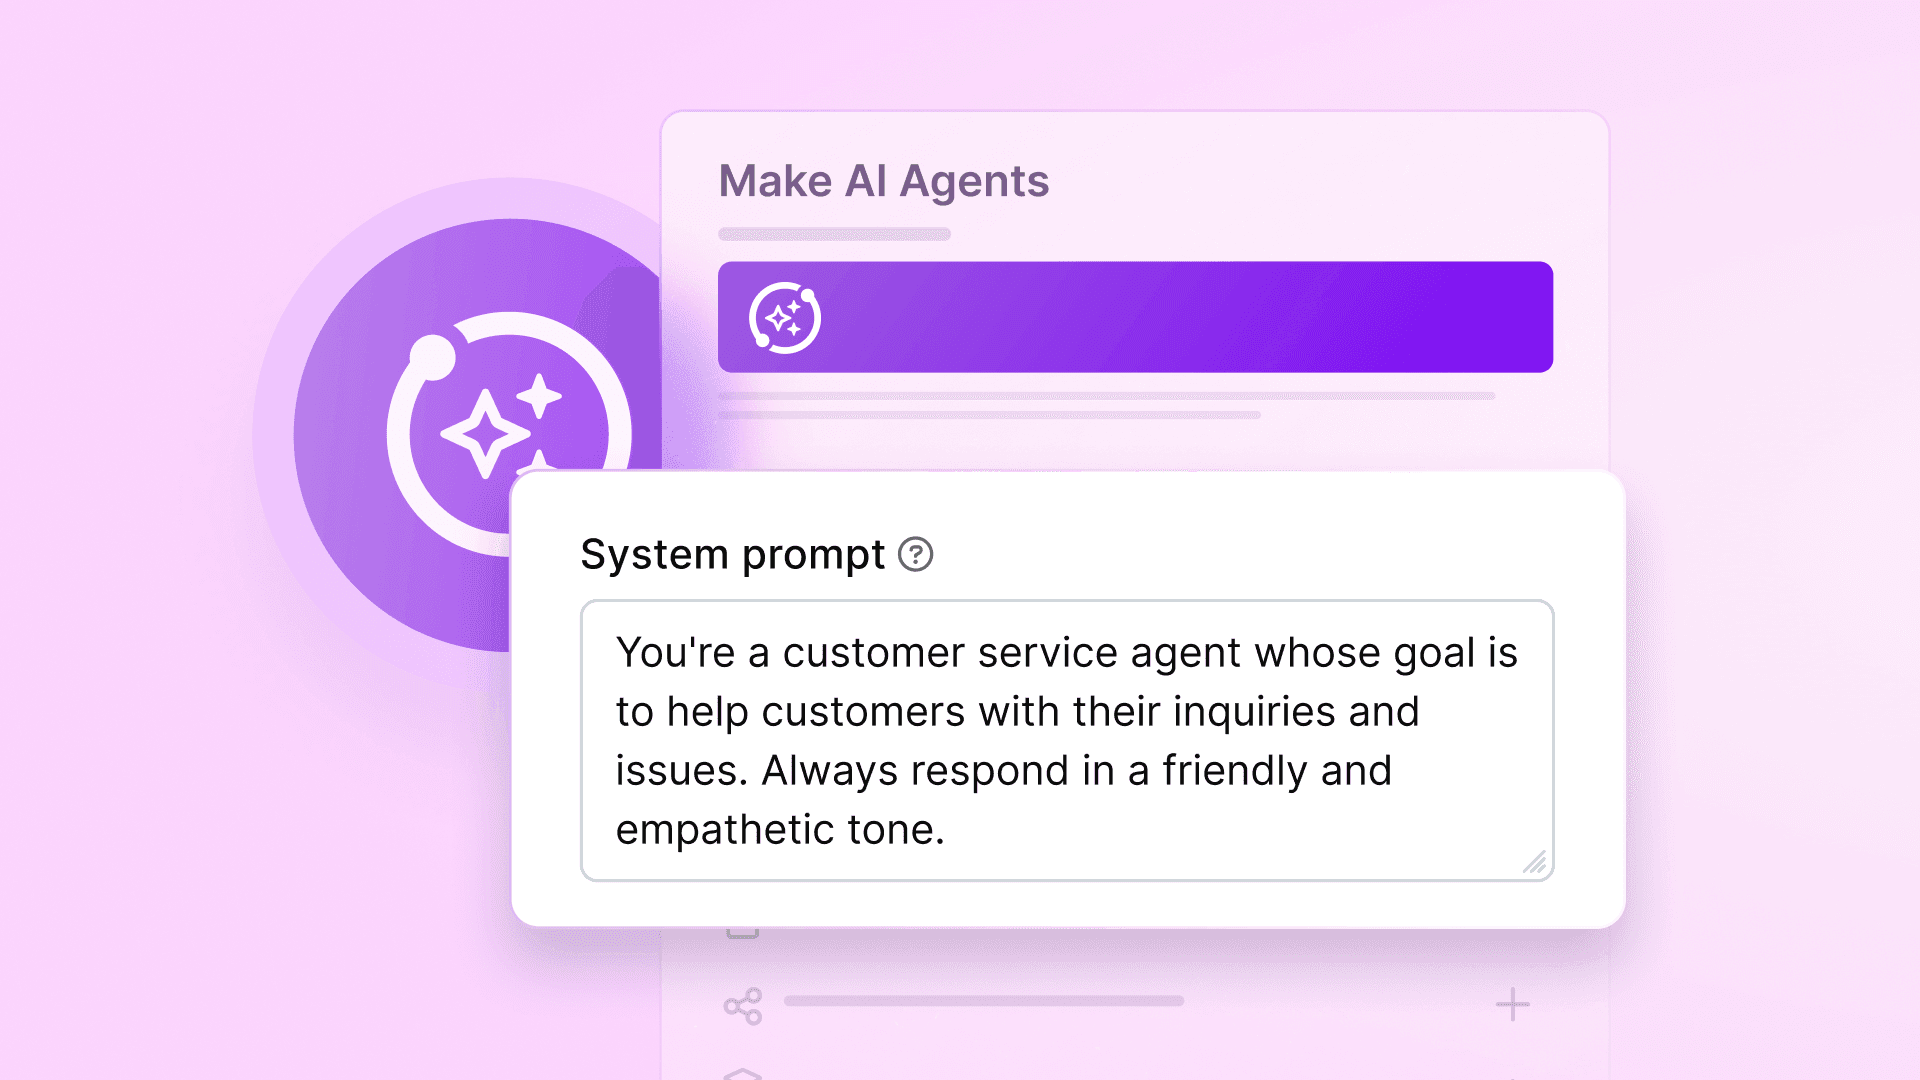
2. Name and describe the agent
Choose a name like Inventory Assistant.
Then write a clear description of the agent’s role. This will guide its behavior each time it runs.
Example: "You help manage store inventory. You can check stock levels or place restock orders using the tools provided. Only respond based on tool outputs and available data."
You can also add limits or rules, like "Do not order more than 100 units" or "Ask for clarification if something is unclear."
3. Connect a language model
Select your provider (such as OpenAI) and enter your API key. This gives your agent the ability to understand and generate responses.
4. Save the agent
Click Create agent to finish setup. It’s now ready to receive tools, which we’ll add in the next step.
Step 2: Add tools (scenarios)
Now that your agent is created, it needs tools to act on your behalf. In Make, a tool is simply a scenario that performs a task. The agent uses these tools to gather data, take action, or return a result.
1. Create your tool scenarios
You’ll build one scenario for each task your agent should be able to complete. For our inventory example:
Tool 1: List Inventory A scenario that pulls stock data from a source like Google Sheets, Airtable, or a database. It should accept optional inputs like product names and return stock details using the Return output module.
Tool 2: Order Stock A scenario that creates a new purchase request. This might involve sending an email, creating a new row in a sheet, or triggering a webhook. It should accept inputs like product name and quantity and return a confirmation message at the end.
Make sure each scenario:
Has clear input fields if needed
Ends with a Return output module (under the Scenarios toolset)
Returns structured, valuable results for the agent to use
Tip: Use descriptive scenario names and descriptions. The agent reads these to decide which tool to use. For example:
Name: List Inventory
Description: Returns stock levels for products in the inventory.
2. Add tools to your agent
Return to your agent's settings once your tool scenarios are saved and tested.
Find the Agent-level tools section
Click + Add
Select the scenarios you just created
The agent now knows what it can do and when to use each scenario based on the incoming request and your descriptions.
Step 3: Connect the agent to inputs and outputs
With your agent and tools in place, you now need a way to interact with it. It is usually done by building a scenario that acts as a front-end: receiving a message, passing it to the agent, and sending the response back.
Example: connect via Slack
Now that your agent has tools, you need a way to send it tasks and get responses. In this example, you’ll create a scenario that lets users interact with the agent through Slack.
1. Set up the Slack trigger
Start by creating a new scenario in Make. Add the Slack > Watch messages module.
Select the channel or direct messages where your agent will listen.
To avoid looping the agent’s own replies, apply filters to ignore messages sent by your Slack app. You can do this by excluding messages with your bot’s App ID or filtering out messages of the subtype bot_message.
2. Add the Run an agent module
After the trigger, add the Make AI Agents > Run an agent module.
Select your agent from the list.
Map the text of the Slack message into the Message field. This is the prompt the agent will use to decide what to do.
Optionally, include other fields like username or timestamp if your tools need them.
3. Reply in Slack
Add the Slack > Create a message module to send the agent's response to the user.
Map the Response from the agent into the message content.
Use the Thread Timestamp from the original Slack message to keep conversations tidy. This ensures your replies stay grouped in the correct thread.
4. Use a custom Slack app (optional)
For better control over your agent’s identity, connect Slack using a custom app. This lets you define the bot’s name, avatar, and behavior. It also helps reduce confusion if you’re using multiple bots across teams.
Use any platform
You’re not limited to Slack. Use:
Tally or Typeform via webhook
Telegram, Teams, or WhatsApp via built-in modules
Email, web chat, or even custom apps
Make AI Agents allow you to use any communication channel to interact with an agent.
Step 4: Test and refine the agent
1. Try a simple request
Send a message like “What’s in stock?” or “Order 10 blue mugs”. The agent should trigger the correct tool and reply with the result in the same thread.
2. Test edge cases
Try less direct prompts like “Running low on espresso beans” or “Do we sell tote bags?”. The agent should either act correctly or respond appropriately without guessing.
3. Check the thread behavior
Make sure the reply stays in the same Slack thread. If it doesn’t, verify that you’re mapping the Thread Timestamp from the Slack trigger to the reply module.
4. Review the logs
Open the scenario run history in Make to check which tool was used, what inputs it received, and what it returned. Ensure each tool ends with a Return output module so the agent can use the result.
5. Adjust if needed
If the agent uses the wrong tool or gives an incomplete answer, update the agent description or improve the tool descriptions. Be specific about what each tool is for and when to use it.
Best practices
To get the best results, don’t just build - guide. Here’s how to keep your agent smart and reliable:
Keep the agent’s scope focused: Start with a specific task, like answering questions or handling one workflow. Focused agents are easier to test and fine-tune. You can expand the scope later once the core setup works reliably.
Write a clear and direct description: The agent’s description guides its decisions. Be clear about what it should do, what tools it can use, and how it should behave. Include limits if needed, like “only use the tools provided” or “do not respond to unrelated messages.”
Use clear tool names and descriptions: The agent looks at tool names and descriptions to decide which one to run. Keep them descriptive and relevant to how users might phrase their requests. Avoid vague names like “Get Info.”
Always return results from tool scenarios: Each scenario the agent uses should end with a Return output module. Without this, the agent won’t receive the result and won’t be able to generate a helpful response.
Only give the agent the tools it needs: Stick to the essentials. Too many tools can confuse the agent or cause unpredictable behavior. You can add more tools later as the agent’s role expands.
Watch early runs in the scenario history: Review the logs to see which tool was used, what input it received, and what output it returned. This helps you quickly spot errors or unexpected behavior.
Set clear expectations if others use the agent: Let teammates or users know what the agent can help with. Sharing a few supported example prompts makes it easier for others to interact with it effectively.
Other real-world use cases
The inventory agent is just one example. The same setup works for many use cases where tasks can be broken into tools. Here are a few:
Customer Support Agent: handle FAQs, check order status, or create support tickets connected to a chat widget or messaging app.
Marketing Assistant: pull analytics data and generate summaries or reports. Marketers could ask for campaign insights, and the agent delivers the numbers.
HR Onboarding Bot: answer internal questions, fetch policy docs, or log IT requests ideal for Slack or Teams.
Project Coordinator: create tasks in Asana or Jira or schedule meetings via a calendar tool, keeping project workflows on track.
No matter the domain, the steps stay the same: define the agent, create tools (scenarios), plug in your input method, and test. If the task can be modularized, it can be agent-powered.
Conclusion
Building an AI agent in Make is a straightforward way to add flexibility and intelligence to your workflows. We used a shop inventory assistant to show the basics, but the same structure works across customer support, HR, marketing, and more.
Focus on what the agent should do, give it the right tools, and let it figure out the steps. Remember: It’s only as smart as your instructions and tools.
With straightforward setup and testing, AI agents can handle repetitive decision-making tasks, saving time and reducing complexity.
Try starting small with a single-use case. As you gain confidence, expand the agent’s scope or build new ones for other parts of your workflow.
Ready to build? Head to Make and start experimenting.
Ready to make the automation revolution happen?