Apr 4, 2023
How to Build Your First WhatsApp Business Chatbot [Tutorial]
In this step-by-step tutorial, you'll learn how to build a WhatsApp chatbot that gives customers three query options, and provides the corresponding replies automatically.

A seamless instant messaging experience with billions of users that businesses can put to good use: That is WhatsApp in a nutshell.
While most businesses are trying to incorporate WhatsApp Business as another channel to build relationships with customers, not everyone succeeds.
This usually happens for a number of reasons, such as:
The logic behind the (intended) WhatsApp chatbot is too complicated.
There are no technical resources to build and deploy the chatbot.
Connecting the WhatsApp Business API can be (too) demanding.
Now, we’re not trying to say that you should abandon your dreams of an AI-powered WhatsApp chatbot (that’s something we can build with Make as well), but it’s better to start with something simpler.
And that’s exactly what we’re going to do: Build a simple WhatsApp chatbot that gives customers three query options, and provides the corresponding replies automatically.
Before we jump into the tutorial, let’s take a minute to understand the concept behind the chatbot, and the tools you’ll need to build it.
WhatsApp chatbots: Dealing with frequently asked questions in the modern era
Some businesses deal with the same questions over and again, and this is a huge time-sink.
When this happens, customers usually have queries on the latest promotions, operating times, customer service information, and so on.
These "standard" questions cause a backlog for the customer care team and prevent them from working on value-added tasks.
So, instead of wasting countless hours on the same old answers, you can build a simple Make scenario that instantly sends those responses back to the customer.
On top of helping the customers get the answers they need, you’ll be preventing the build-up of customer care tickets related to "general questions", which can be answered with a standard template.
To build a WhatsApp Business chatbot, we’ll only need three tools:
Microsoft Excel 365 (you can use Google Sheets too).
A Make account (the Core Plan will be enough).
Once you have all of these, just go to your Make dashboard, and create a new scenario. This is where the magic begins!
Step 1: Connect WhatsApp Business Cloud
In the scenario builder, start by searching for the WhatsApp Business Cloud app.
Select the Watch Events module, which uses a webhook to instantly receive new messages.
Now, it’s time to configure the module. We’ll start by creating a new webhook, so click the Add button.
You can give the webhook a name if you want; it’s good to keep everything identifiable, but not mandatory. Next, click the Add button to connect your account to Make.
You’ll notice that a box appears with three fields:
Connection name
Permanent token
WhatsApp Business Account ID
To obtain your Permanent token and WhatsApp Business Account ID, please follow the instructions here.
Once you’ve established your connection with Make, select Messages as the Event and Save.
Now, you need to enable webhooks in your dashboard.
In the same link we provided above (this one), scroll down to Setting up WhatsApp Business Cloud webhooks and follow the steps outlined there.
To conclude configuring the module, hit OK, and move to the next step.
Step 2: Add a router
Our scenario sends out one of three messages depending on the customer’s selection/question.
This means that the scenario must split into three separate routes, each catering to a specific message.
At the bottom of the scenario builder, you will find the Tools menu. Open it and select the Router.
Then, drag it to the right of the WhatsApp module.
When you click on it once it will open two routes; click on it one more time for the third route to appear.
Now, let’s start configuring the automated messages we want our chatbot to send as replies.
Step 3: Configuring the top route
In the top route of your scenario, add the WhatsApp Business Cloud > Send a message module.
Next, select your connection and read the important information.
After that, scroll down, select Sender ID, and map the Contacts [ ] WhatsApp ID element from the Watch Events module to the Receiver field.
See the image below for reference:
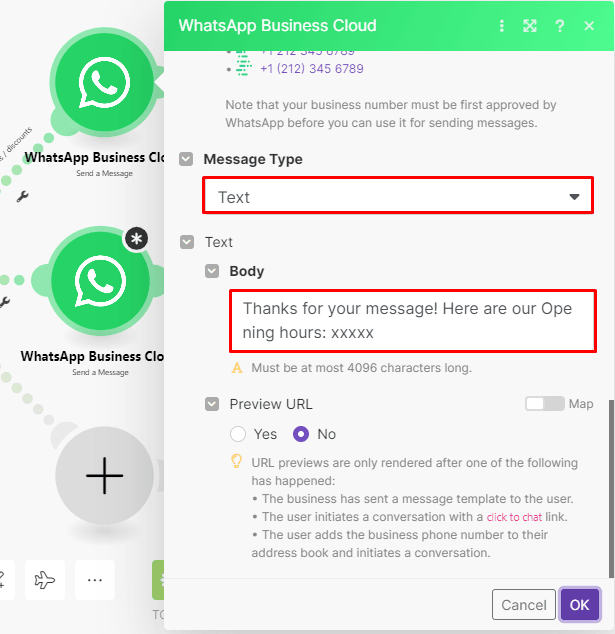
Once you do this, select Text as the Message Type and enter the message in the Body text box.
Now, let’s take a minute to explain what happens next: Recording user inputs.
The number of requests (queries) for each option (responses) should be recorded on a Microsoft Excel spreadsheet to be used for reporting purposes.
This way you’ll know what type of information is the most requested, and make informed decisions going forward.
Fortunately, Make has a tool that will count the requests for you.
In the Tools menu, select the Increment function module and attach it to the WhatsApp Business Cloud > Send a message module.
The module is already configured for you by using Never for the Reset a value option, so simply click OK to continue.
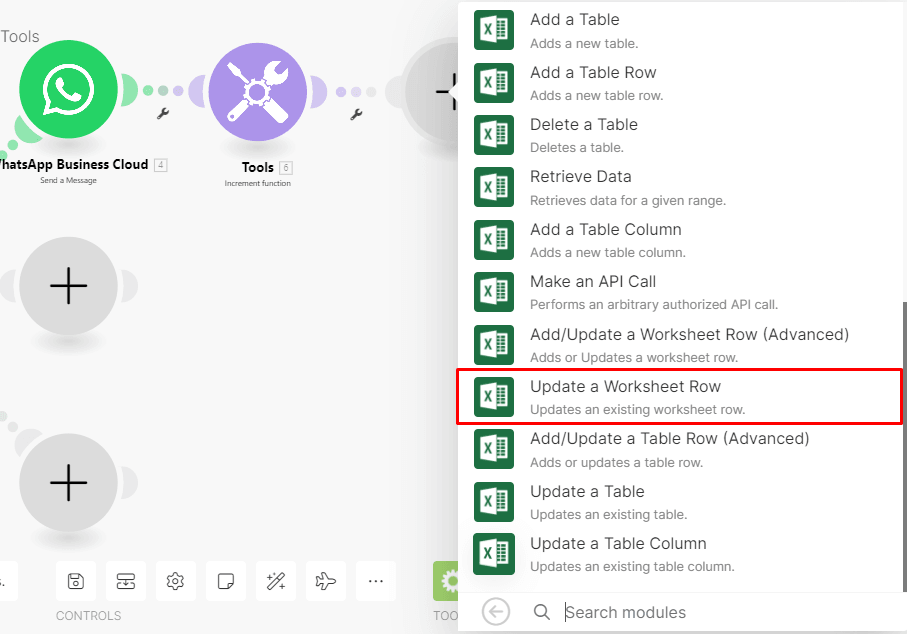
Lastly, we need to record the stats on your spreadsheet, so search for the Microsoft 365 Excel app and add the Update a Worksheet Row module to your top route.
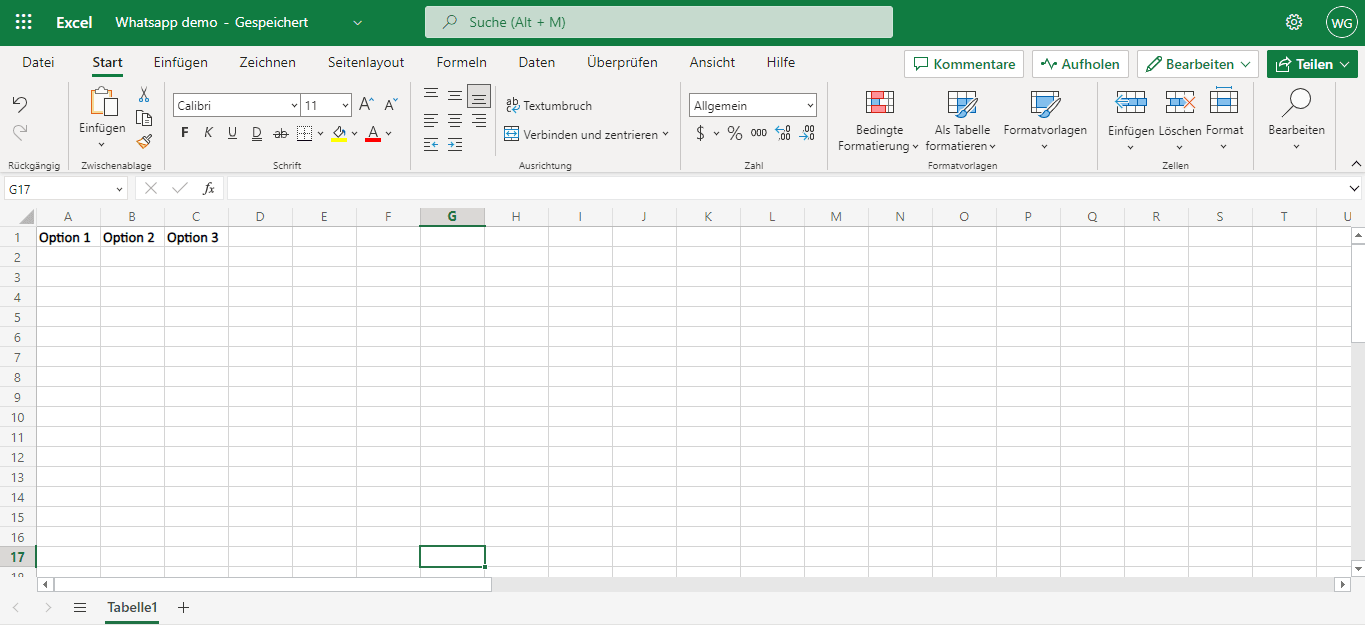
Before configuring this module, we suggest creating a simple Excel spreadsheet with three columns for the options - as you see below.
Once you have the spreadsheet ready, head back to your Make scenario.
In the Update a Worksheet Row module, add a connection to your Microsoft account and choose the Select from the list option.
Then, select your Workbook and Worksheet.
In this sheet, the information gets added to the second row, so in the Row ID field, toggle the map switch and enter 2.
Since this route is for option 1 - Current promotions/discounts, map the increment function output (i) to the Option 1 field.
See the image below for reference:
As it stands, all additional information requests (Options 1,2, and 3) by customers will pass through this route.
But this isn’t correct, as this route is meant for Option 1 only - so how do we prevent the other requests from going through this route?
The answer is a Filter.
By adding a filter, we will ensure that only the option that’s meant to pass through will pass through.
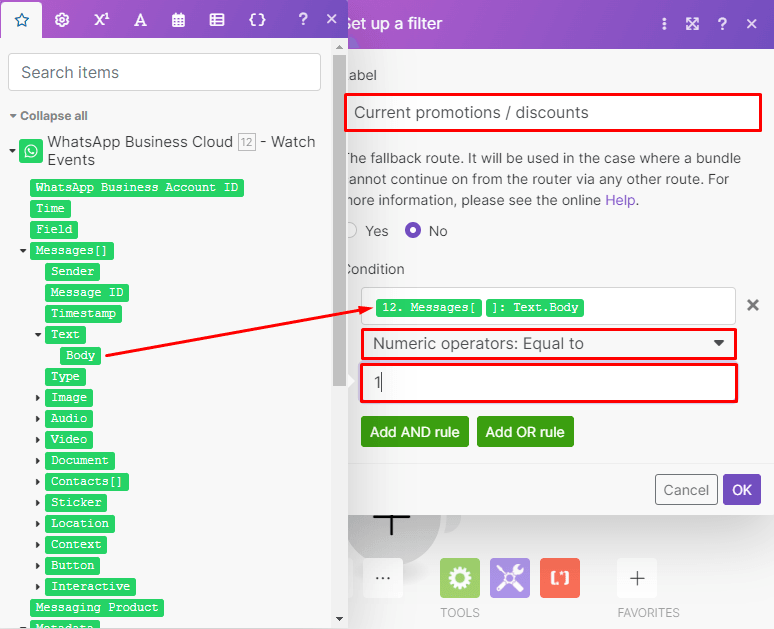
To set up a Filter, click on the link between the Router and the WhatsApp module.
Name the filter after the first option and then:
Map the text Message [ ]: Text.Body element.
Select the Numeric operators: Equal to operator.
Enter 1 in the bottom field since this is what the customer will type.
See the image below for reference:
Good! Now next move on to the next route of the scenario.
Step 4: Configuring the middle route
The next two routes (middle and bottom) are similar to the top route. The only differences are:
The message in the WhatsApp > Send a Message module.
The mapping in the Microsoft 365 Excel > Update a Worksheet Row module.
How the filters are configured.
Let’s start configuring the middle route by clicking on the gray circle and selecting the WhatsApp > Send a Message module.
Configure the module the same as the one in the top route, but enter the corresponding message for Option 2.
Next, add the Increment Function module and the Microsoft 365 Excel > Update a Worksheet Row module.
After setting these up as you did earlier, map the (i) element to the Option 2 field.
The filter on the link between the Router and the WhatsApp > Send a Message module on the middle route should be set up the same as the one above but have the number 2 in the bottom field instead.
Step 4: Configuring the bottom route
Here, all you need to do is follow the same steps as you did in the top and middle routes.
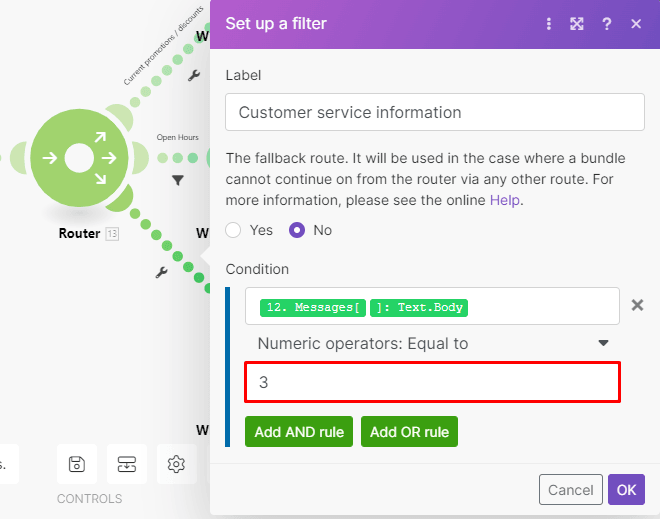
See the images below to check that configurations for the WhatsApp > Send a Message module, the Microsoft Excel > Update a Worksheet Row module and the Filter are correct.
WhatsApp > Send a Message module configuration:
Microsoft Excel > Update a Worksheet Row module configuration:
Filter configuration:
After doing this, save your scenario, and activate it.
And that’s all! This is what the fully configured scenario looks like:
Conclusion: Automate WhatsApp from the ground up
A WhatsApp chatbot that helps answer the frequently asked (and time-draining) questions automatically - not bad for!
A few important notes:
You can add as many routes as you want. If you want 10 pre-packed answers to 10 different questions, go for it!
Yes, you can add ChatGPT to your bot as well - but that’s a story for another day.
Simple communications are very valuable - sometimes, you don’t want messages branching out everywhere, but precise information that goes to the point.
If you’re happy with your first WhatsApp bot and want to keep building interesting stuff, get your Make account and explore our use cases section for more inspiration and solutions!


