Feb 12, 2020 | 4 minutes
How to Automatically Transfer Email Purchase Orders to Google Sheets and Create Invoices with Xero
Still manually updating Google Sheets and creating Xero invoices for orders received through email? Learn how to automate this process!

What this scenario does: Receives an email purchase order instantly from an online store, parses the text, updates the Google Sheet and creates an invoice.
Level Of Difficulty: Intermediate
Implementation Time: Approximately 20 mins
Assumptions: You have a Google and Xero account with all connections added. A Google Sheet with the relevant headers has been created. You have an understanding of Regular expressions and Mailhooks.
Still manually updating Google Sheets and creating invoices for orders received through email? That’s so last decade.
This tutorial shows you how to fully automate this process saving you valuable time that you can use to focus on other aspects of your online business.
Sounds good? Let’s begin.
Configuring the scenario
The scenario consists of the following modules:
Webhooks > Custom mailhook
Text Parser > Match pattern
Google Sheets > Add a row
Router
Xero > Search for contacts
Xero > Create a contact
Xero > Create an invoice
Here's the scenario:
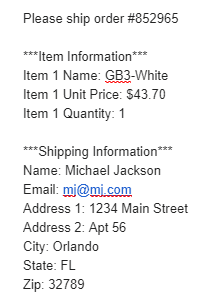
Here is a look at the the layout of the email in this demonstration:
The scenario begins with the Webhooks > Custom mailhook module. After adding the mailhook, copy the mailhook URL and go over to the settings in Gmail.
Under Forwarding and POP/IMAP, click Add a forwarding address. Paste the mailhook and run the scenario.
Also click Forward a copy of incoming mail to that will appear once the connection is successful:
Next is the Text Parser > Match pattern module which is used to parse the text received from the email. The pattern field requires a regular expression.
Here is a useful site that you can use to create regular expressions.
In the Text Parser module, tick the Global match and Multiline boxes. Next map the Text element outputted by the Webhooks > Custom mailhook module to the Text field:
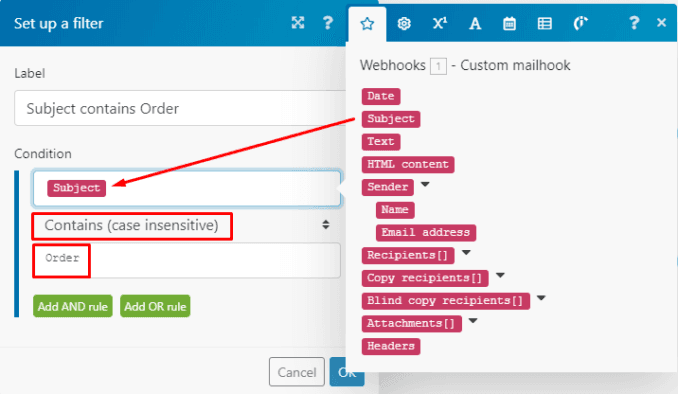
The route between the Webhooks > Custom mailhook and the Text parser > Match pattern modules contains a simple filter.
The purpose of the filter is to verify if the subject line of the email contains the word Order for it to pass through to the subsequent modules.
Map the Subject element outputted by the Webhooks > Custom mailhook module in the upper field. Now select the Contains (case insensitive) Text operator and type the word Order in the field below:
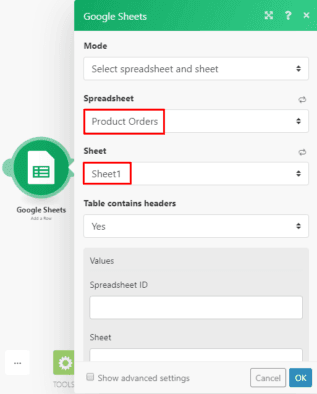
Following the Text Parser module is the Google Sheets > Add a row module that adds all orders received to the sheet. Select the spreadsheet as well as the specific sheet in the spreadsheet:
It’s important to note that the regex pattern in the Text Parser module will differ from user to user. The regex expression used here is purely for demonstration purposes due to the specific email text parsed.
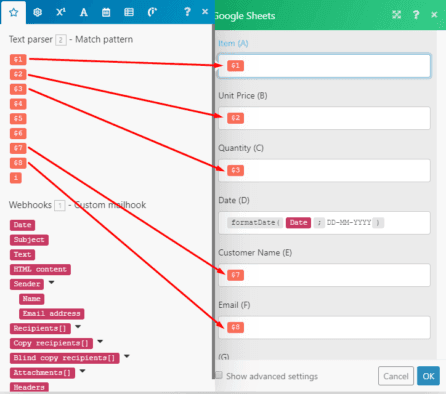
This means that the data contained in the elements outputted by the Text parser will vary and will need to be mapped accordingly.
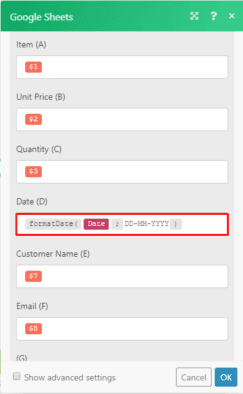
You need to map the elements outputted by the Text Parser module to the relevant fields in the Google Sheets module:
To display the date in a specific format on the sheet, add the formatdate function found under the Date and Time tab in the Date field.
Next, map the Date element from the Webhooks >Custom mailhook module within the parenthesis and enter the relevant tokens for date/time formatting.
In this demonstration, the following format DD-MM-YYYY was used:
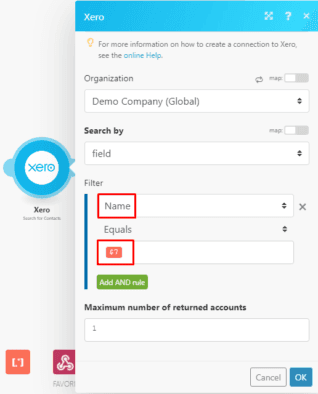
Let’s take a look at the Xero > Search for contacts module that performs a search for the contact in Xero using the customer's name.
You need to select the Organization and under Search By, select field. In the filter setting, select Name, the Equals Text operator and map the element that contains the customer name from the Text Parser module:
Next is a Router that splits the scenario into 2 routes. The top route between Router and the Xero > Create a contact module contains a simple filter.
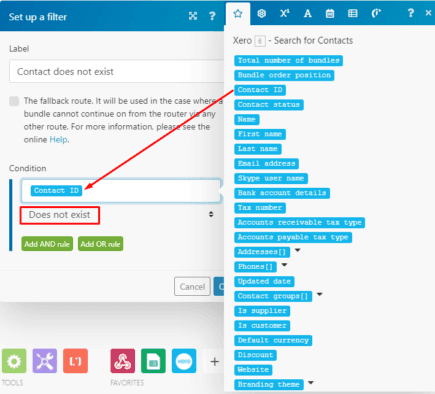
The purpose of this filter is to verify if the Contact IDdoes not already exist in Xero.
A new customer will not have a contact ID therefore the bundle will meet the filter’s criteria and pass through to the subsequent module where the contact will be created.
Here, map the Contact ID element outputted by the Xero > Search for contacts module to the Condition field and select the Does not exist operator:
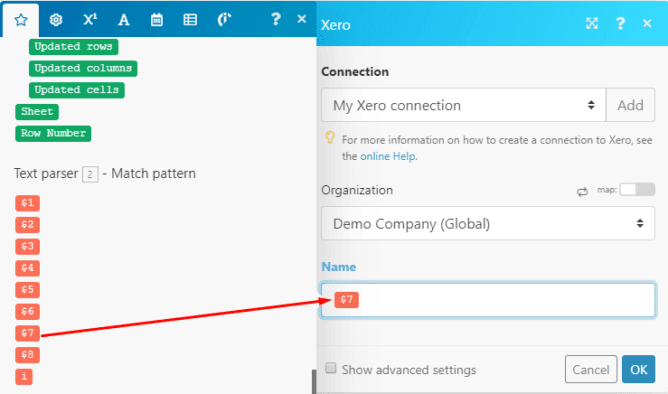
If the contact does not exist, you will need to create the new contact using the Xero > Create a contact module.
To configure this module, simply select the Organization and map the element containing the customer name outputted by the Text Parser module to the Name field:
The last module on the top route is the Xero > Create an invoice module. To create the invoice, select the Organization and select the A sales invoice commonly known as an Accounts Receivable option under Type.
Now map the Contact ID element outputted by the Xero > Create a contact module to the Contact ID field:
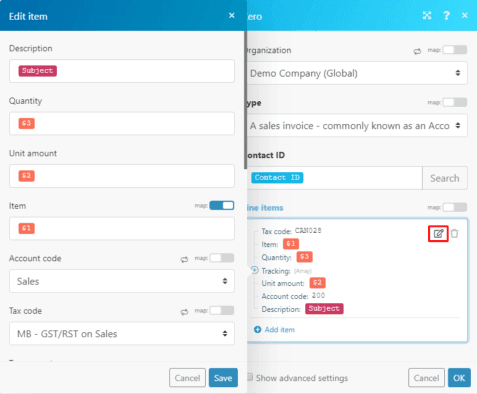
Next, click the edit icon under Line Items and map the Subject element from the Webhooks > Custom mailhooks module to the Description field.
In the Quantity, Unit amount and Item fields, map the elements outputted by the Text parser that contain the corresponding data:
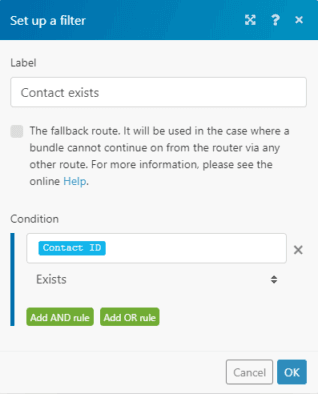
The bottom route between the Router and the second Xero > Create an invoice module also contains a simple filter.
Here, the purpose of the filter is to verify if the Contact ID exists. If the contact already exists, the bundle will meet the filter’s criteria and pass through to the subsequent module to create the invoice.
You need to map the Contact ID element the same as the previous filter but this time select the Exists operator:
The configuration of the second Xero > Create an invoice module is similar to the first module of the same name on the top route. This time around, map the Contact ID outputted by the Xero > Search for contacts module:
The scenario has been fully configured and an email order has been received.
Let’s take a look at the Google Sheet. Here you can see that all the information has been captured correctly:
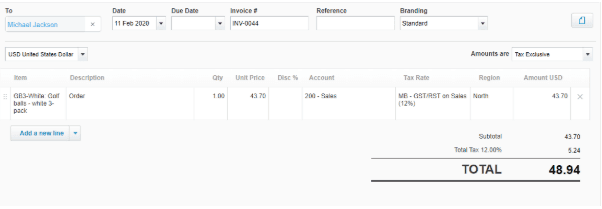
Here is the invoice that was created in Xero:
There you go! I trust that you will find this tutorial useful and beneficial as you implement it.
Happy Automating!
463 likes

Wayne Govender
Solutions Architect at Make who loves all things tech with a focus on workflow automation. Also enjoys fitness and spending too much time on YouTube.


