Connecting an application
To allow your scenarios to get information from and send it to third-party applications, you need to create a connection. For example, a connection lets Make check your Gmail and enter the sender and subject into Google Sheets.
Because third parties have different technologies and standards, there are different ways to create connections in Make. For some apps, creating a connection requires logging in to the third-party app and clicking that you agree to let Make access your profile and data. Other third parties require an API key or OAuth credentials.
Make offers two types of connections:
Standard - the most common kind of connection and the type explained in this article.
Dynamic - a feature for Enterprise customers that lets you easily switch between multiple connections. This way you can have a separate connection for each team or department in your company and change them as needed.
Creating a connection
You create connections in the scenario editor when you add a module. All users in your team can use any connections you create in that team. Use your personal third-party account and credentials carefully, especially when your team has other users.
Important
All team members can manage connections as well. If you want to connect Make with your personal account or data, consider creating a separate team where you are the only member.
The following is the general way to create a connection. For more details, see the article on the specific app you want to connect.
Go to your scenario and add a module. For example, click + and search for Dropbox. Then select the module you want, such as Create a Folder.
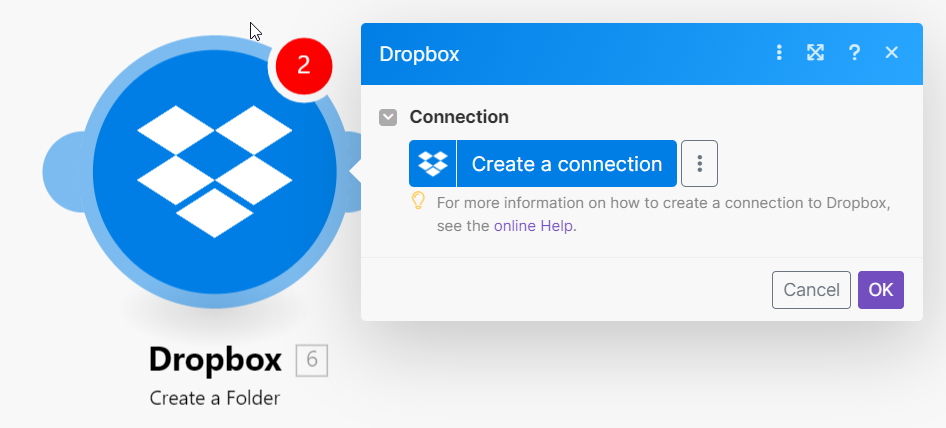
Click Create a connection.
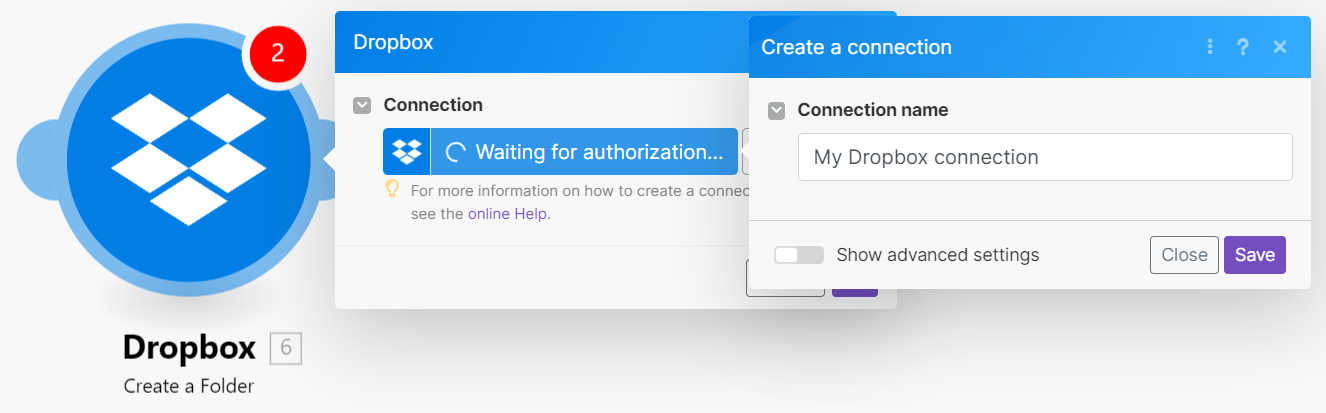
In the Connection name field, you can name your connection. For example, if you have two different Dropbox accounts, you might name one Dropbox-Company, and the second Dropbox-Personal.
Tip
If your app has fields for:
Credentials such as username and password
API Key
Client ID and client secret
Anything not on this list
Refer to the article on the specific app you want to connect for more information.
Click Save. A new window prompts you to grant Make access to your data.
Tip
Steps 4 and 5 can vary. Carefully follow on-screen instructions when granting consent.
Grant Make access to your Dropbox account and data.
You created a connection between your Dropbox account and Make and you can continue setting up the module. You can find the connection in the Connections section:

Managing connections
The connections tab lets you do any of the following to your connections:
Edit
Verify
Reauthorize
Delete
You can find the connections by clicking  in the left sidebar.
Edit connections
You can edit the setup of some connections. Clicking Edit for a connection opens a pop-up where you can adjust the information you previously entered.
Verify connections
You can see whether your connection works by clicking Verify. The button briefly changes to Verifying ... as Make checks. A green check mark in a circle appears when successful.
Reauthorize connections
Some third parties, such as Google only grant access for a limited time. In this case, you may need to occasionally reauthorize your connection. Just click Reauthorize and follow any on-screen prompts that appear.
Delete connections
If you need to delete a connection, click Delete. The button turns red and asks again to confirm that you want to erase that connection. Click again to delete your connection.
Caution
Deleting a connection may cause your scenarios to stop working. Be sure that the connection is not used in any scheduled or active scenarios.