May 20, 2026 | 10 minutes
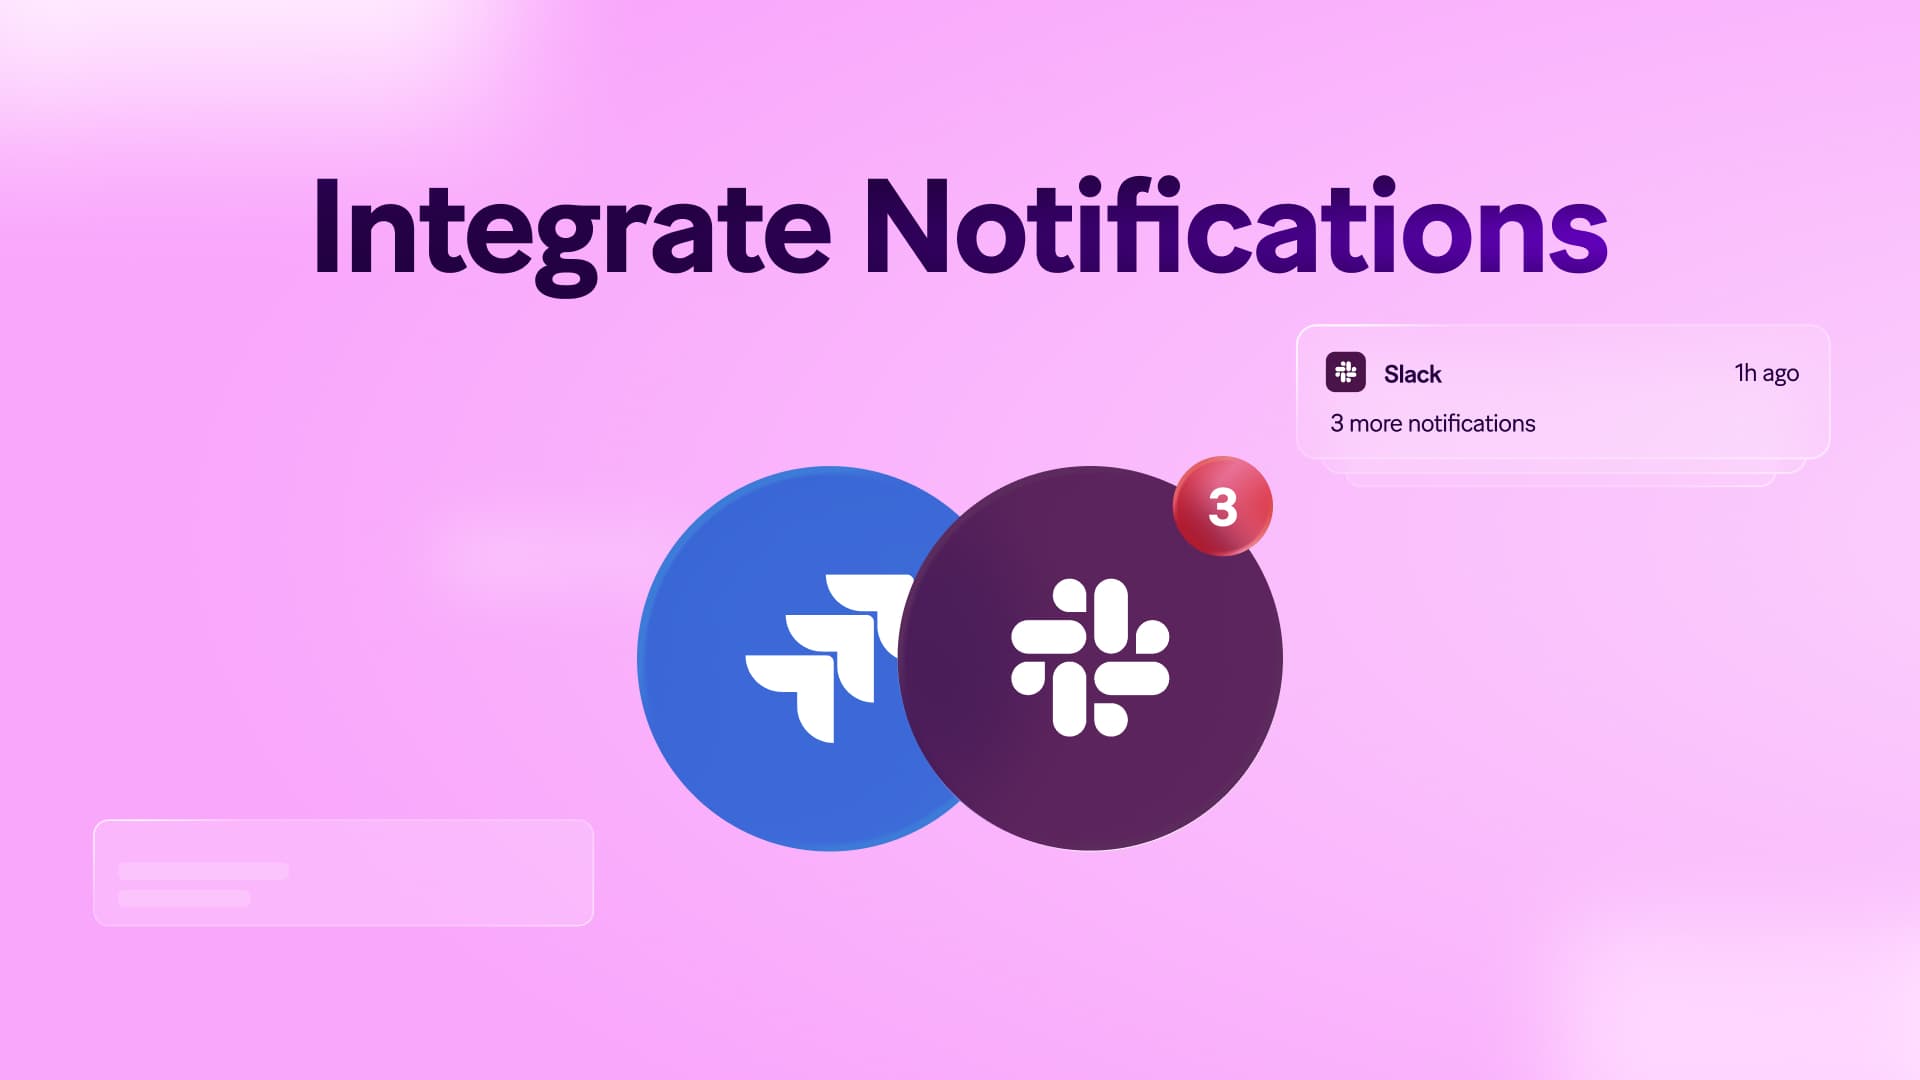
How to integrate Jira and Slack: 2026 guide
Build a two-way scenario that turns Jira issues into routed Slack notifications and Slack messages into Jira tickets.
It's 11pm. A P1 issue lands in Jira. The native Jira Cloud for Slack bot posts the alert into '#engineering-general', buried under twelve low priority updates.
The on call engineer scrolls past it.
This guide walks through how to integrate Jira and Slack using Make to avoid these kinds of issues by routing notifications by priority, populate custom fields on Slack to Jira tickets, and chain events into the rest of your stack.
It's what comes after the native bot, the layer that decides whether requests turn into tickets or disappear into threads, as Console's analysis of Jira-Slack routing patterns frames it.
What do you need before you start?
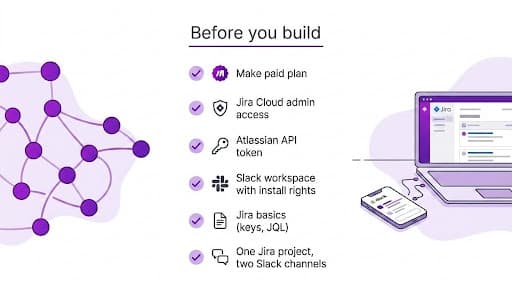
Before you build anything, line these up. The scenario won't work without all six.
A Make account on a paid plan. Engineering team volumes burn through Free plan credits fast, so Core or Pro is the realistic starting point. Make moved from operations to credits as the billing unit in November 2025, so check the latest allowances on the before you commit to a plan.
A Jira Cloud workspace with admin access. You'll need to generate an API token, and only admins can register webhooks. If you don't have admin rights, get them assigned now rather than mid build.
An Atlassian API token. Create one at the . Copy it the moment you create it, Atlassian shows the token once and never again.
A Slack workspace where you can install apps. Workspace owners often restrict third party app installs. Confirm your permissions before you start debugging OAuth failures that turn out to be policy issues.
Working knowledge of Jira basics. Issue keys, project keys, and enough JQL to write a filter. You don't need to be a power user, but you'll be referencing these as you map fields.
One Jira project and at least two Slack channels for testing. One channel for high priority alerts, one for general updates. Routing logic needs two destinations to prove it's actually routing.
One thing worth flagging: when teams skip the workspace permissions check, OAuth failures show up later as silent errors with no useful message.
The fastest way to integrate Jira and Slack without that detour is to confirm install rights in Slack before you open Make.
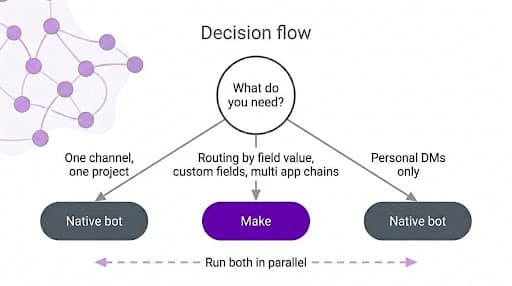
How does Make connect Jira and Slack differently from the native bot?
The native bot covers one channel, one project. Make handles routing, custom fields, and multi app chains across the entire stack.
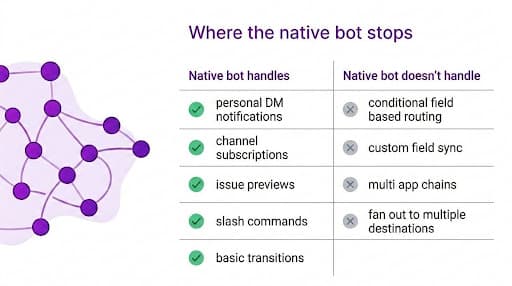
What does the native Jira Cloud for Slack app do?
The native Jira Cloud for Slack app covers the basics well.
It handles personal notifications via DM with @Jira, channel subscriptions to a project, issue previews when someone pastes a key, and basic two way actions: transition, assign, comment, watch, all through '/jira' slash commands.
It works for one team, one project, one channel.
Here is what it doesn't handle:
Conditional routing based on field values (priority, label, sprint, custom fields)
Custom field sync in either direction
Chains that go beyond Slack and Jira into a third or fourth tool
Anything where a Jira event needs to fan out into more than a single Slack message
For teams whose needs stop at channel subscriptions and slash commands, the native bot is a solid baseline.
The next section is for everyone whose requirements have outgrown it.
How does Make extend the native integration?
A Make scenario watches Jira for events and turns each one into a bundle.
That bundle then flows through routers, filters, and transformations before it reaches Slack, or any other app on the same canvas.
The difference shows up in three places:
One visual canvas, not buried config. Every step lives in the : which fields get read, which conditions a bundle must meet, what happens when an API rate limits, where data transforms.
Editable routing logic. Routes and filters are visual objects you can click into and rewrite, not JSON in a notification rules page.
Reach beyond two apps. The same scenario that posts to Slack can also page on call via PagerDuty, log to Notion, or pass context to an LLM for summarisation, all in one run.
When someone new joins the team, they open the canvas and read the routing logic in about 90 seconds.
No separate config file, no tribal knowledge.
When should you use Make instead of (or alongside) the native bot?
The two tools solve different problems, and most teams that integrate Jira and Slack at scale end up running both.
Scenario | Best fit |
One project posting updates to one Slack channel | Native bot |
Notifications routing by priority, project, or label | Make |
Slack messages creating Jira issues with custom fields populated | Make |
Events chaining into PagerDuty, Notion, or an LLM | Make |
Personal DM notifications for individual users | Native bot |
A common pattern in large engineering orgs: the native bot owns personal DM notifications (where it shines), and a Make scenario owns team channel routing (where field level logic matters).
The two run in parallel without conflict, as long as the bot's channel subscriptions are scoped narrowly so the same event doesn't fire twice.
For teams that want one tool covering both directions plus the rest of the stack, the is the layer that does it.
Building the Jira-to-Slack scenario step-by-step
This is the build. Six steps, two connections, one router, and the error handling that keeps it alive in production.
Step 1: How do you connect Jira and Slack to Make?
Two connections, roughly five minutes if you have the right access. Do Jira first because the API token has a short copy window.
For Jira:
Copy the token immediately, Atlassian shows it once
In Make, add the Jira Cloud Platform module to your scenario, click 'Add' next to Connection
Paste your Atlassian site URL (ending in '.atlassian.net'), your account email, and the token
For Slack:
Add a Slack module to the same scenario
Click 'Add' next to Connection, sign in via OAuth, and approve the scopes Make requests
If OAuth fails with no clear error, the workspace owner has restricted third party app installs. Get permissions cleared before you debug anything else.
💡 Pro tip: Store your Atlassian site URL and account email in a Make data store rather than hard coding them into every Jira module. When you rotate API tokens (every 90 days, ideally), you update one record instead of opening every scenario.
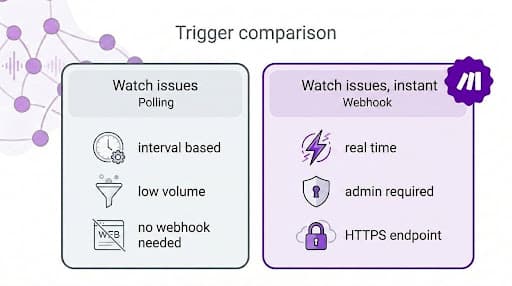
Step 2: Which Jira trigger module should you choose?
Two trigger modules, two different tradeoffs.
The choice depends on how much latency you can tolerate and whether you have Jira admin access.
Trigger | How it works | Use when |
Watch issues | Polls Jira every 1, 5, or 15 minutes | Low event volume, latency tolerant, or no webhook support |
Watch issues, instant | Webhook fires the moment Jira logs an event | Incident response, two way sync, anything latency sensitive |
For most engineering ops use cases, instant is the right call. The setup needs a Jira admin once, then runs without polling overhead.
Add the module to your scenario, generate the webhook URL inside it, then go to Jira's System > Webhooks (path documented in Atlassian's Jira Cloud webhooks reference) and paste the URL into a new webhook.
Select the event categories you need: 'issue: created', 'issue: updated', 'issue: deleted'.
One thing to confirm: only HTTPS URLs are allowed and the webhook must be registered by a Jira admin. If you're not one, get a five minute meeting with someone who is.
Step 3: How do you route notifications to the right Slack channel based on Jira fields?
This is the routing logic the native bot can't do. Add a Router module immediately after the Jira trigger.
Each route handles a specific case and a working three route setup looks like this:
Route | Filter conditions | Destination |
P1 incidents | Priority.name' equals 'Highest' AND 'Issue Type.name' equals 'Bug' | Slack > Create a Message to '#incidents' |
Customer reported sprint bugs | Labels' contains 'customer-reported' AND 'Sprint' is not empty | Slack > Create a Message to assignee DM |
Catch all | (empty filter) | Slack > Create a Message to '#jira-updates' |
For the assignee DM route, add a Slack > Search for User module before the message module and key the lookup on the Jira reporter's email. That maps the Jira 'accountId' to a Slack user ID at runtime.
One non obvious detail: route filters evaluate top to bottom, and only one route fires per bundle by default.
To let a P1 bug fire both the '#incidents' route and the assignee DM route, toggle each route's filter to non exclusive. The Make router documentation covers the toggle and the order of evaluation.
Skip this step and every Jira event ends up in one channel, which is the failure mode that pushed you off the native bot to begin with.
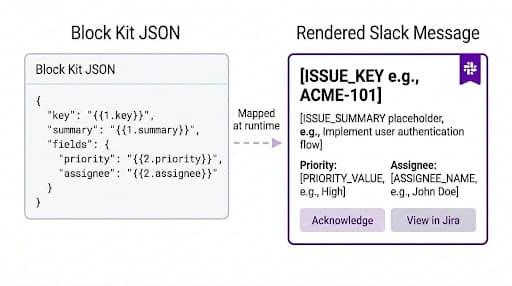
Step 4: How do you format the Slack message so engineers can act on it without opening Jira?
Use the standard Create a Message module for plain text plus a link.
For action buttons, formatted issue context, and structured fields, switch to Create a Message (Advanced) and pass it a Block Kit JSON payload.
The fastest workflow: design the layout in Slack's Block Kit Builder, copy the JSON, and map dynamic Jira values into it inside Make.
Before you map fields, verify what the Jira trigger actually returns by clicking the module after a test run. Typical fields available in the output bundle:
'key', 'summary', 'status.name', 'priority.name'
'assignee.accountId', 'assignee.displayName', 'assignee.emailAddress'
'reporter', 'project.key', 'created', 'updated'
Custom fields, returned as 'customfield_XXXXX'
Custom fields are where most mapping mistakes happen on the first run. Jira returns them by their numeric ID, never by the human readable label you see in the Jira UI.
Confirm the right ID before you map, or your Slack message will arrive with an empty field where the severity rating was supposed to be.
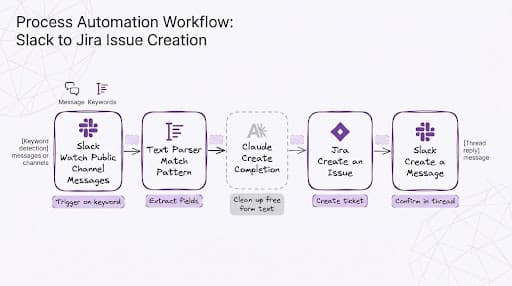
Step 5: How do you build the Slack to Jira direction?
For the reverse flow, use Watch Public Channel Messages as the trigger, filtered by a keyword like '/jira-create' or an emoji reaction.
Chain it through Text Parser > Match Pattern to extract structured fields, optionally pass the result through an to clean up free form input, then call Jira > Create an Issue with the parsed values.
Close with a threaded Slack > Create a Message confirming the new issue key.
Step 6: Where should you add error handling, and what type?
Three failure modes will trip your scenario in the first month of running it. Right click each module that's likely to fail and select Add error handler.
The right depends on the failure type.
Failure | Why it happens | Handler |
Slack returns HTTP 429 | Workspace hit rate limit during a Jira backfill | Break with 60 second retry interval, max 3 retries |
Jira API token revoked | Token expired after 90 day rotation | Resume routing the failed bundle to a Slack DM in '#automation-alerts' |
Custom field missing on issue type | Field doesn't exist on every issue type | Ignore so the scenario keeps moving |
💡 Pro tip: Send every error handler across every scenario to one '#automation-alerts' channel. That channel becomes the single source of truth for scenario health, replacing the daily execution log check.
Step 7: How do you run the scenario for the first time?
Click Run once in the bottom left of the canvas, then trigger the event manually. For Watch issues, instant, that means creating or updating an issue in Jira.
The canvas animates each module as the bundle flows through. Click any module to see its output bundle.
Verify three things on the first run:
The Jira trigger output bundle contains the fields you expect
The router sends the bundle down the correct route
The Slack message lands in the right channel with all dynamic values populated
If a field shows '[Object]' or empty in Slack, the mapping points at a Jira object instead of a sub field.
Fix it by opening the Slack module's input bundle, finding the field, and remapping to the sub field (for example, 'Priority.name' rather than 'Priority').
What are the best Jira and Slack use cases to automate?
The scenario you've built is the foundation. The same canvas extends in three directions worth knowing about.
Each is two or three modules added to what you already have, not a new scenario or a rebuild.
Use case | What it does | When it earns its keep |
AI summarised incidents | Adds an Anthropic Claude or OpenAI module between the Jira trigger and the Slack message to generate a one paragraph executive summary | Leadership channels that need a digest, not a raw payload |
Natural language scenario building | Generate the first draft of a Jira and Slack scenario from a prompt, review the modules in the Scenario Builder | Teams new to Make who want a working draft before learning the module library |
AI Agents and dependency mapping | Promote the scenario to a callable tool for an AI Agent, use Make Grid to see every scenario touching Jira or Slack on one dependency map | Production environments with 10+ scenarios where dependency tracking matters |
For teams already running multiple scenarios, is the layer that surfaces which scenarios will break when Jira retires a webhook event or Slack changes a scope.
Outside the Make ecosystem, lists native rules worth running in parallel with Make scenarios where they don't overlap.
So what should you build next?
The scenario you've built handles real time routing of Jira events into Slack with field level logic, plus error handling that survives a Slack rate limit and a revoked Jira token. So what's the next layer?
Pick one extension and add it to the same canvas:
Chain into PagerDuty for on call paging when a P1 fires
Add a Notion module to log every resolved incident to a public facing changelog
Insert an LLM step that drafts the release note for engineering review before the ticket closes
Each is two or three modules on the canvas you already have. Not a new scenario, not a rebuild.
If you're starting from zero, the Free plan covers everything in this guide. Sign up for Make for free and build your first Jira and Slack scenario today.
Frequently asked questions
Q1. How do I send Jira notifications to Slack?
The fastest path is the native Jira Cloud for Slack app: install it from the Slack Marketplace, run '/jira connect' in your channel, and pick the project. For routing logic beyond one project to channel mapping, build a Make scenario with the Watch issues, instant trigger and a router.
Q2. Is the Jira and Slack integration free in Make?
The Jira Cloud Platform and Slack apps are both verified, maintained by Make, and free to use as modules. You pay in credits, which every module run consumes against your monthly plan allowance. Make moved from operations to credits in November 2025, so check current pricing before you scale.
Q3. Can you integrate Jira and Slack without the native Atlassian bot?
Yes. A Make scenario talks to the Jira REST API via API token and to Slack via the Slack app Make installs. Make can run alongside the native bot or replace it. The tradeoff is losing '/jira' slash commands and personal DM notifications, which come from the bot, not the API.
Q4. How do you stop duplicate notifications when both the native bot and Make are running?
If both fire on the same Jira event, the channel gets two messages. Option one: scope the native bot to a narrow event set and let Make handle everything else. Option two: turn off the bot's channel subscriptions entirely and let Make own all routing. Most teams pick option two.
Q5. Does Make support Jira Server or Data Center, or only Jira Cloud?
The standard integration is the Jira Cloud Platform app, which connects to a Jira Cloud site via API token. For Jira Server or Data Center behind a firewall, the connection needs a publicly reachable HTTPS endpoint. Self hosted teams can use Make's HTTP module to call Jira's REST API directly.
Ready to make the automation revolution happen?