Jul 23, 2026 | 8 minutes
How to connect Stripe and NetSuite using Make in 2026
A step by step guide to syncing Stripe payments, customers, and refunds into NetSuite without custom code.

📌 Quick answer
A Stripe NetSuite integration connects Stripe's payment data, including charges, customers, and refunds, to NetSuite's ERP records so finance teams don't have to enter it by hand.
In Make, this means a scenario that triggers on a Stripe event and then creates or updates the matching record in NetSuite.
The three building blocks are a Stripe trigger, a filter and router for logic, and NetSuite record modules that write the data.
Introduction
Stripe reports payments as charges and bundled payouts. NetSuite expects invoices, cash sales, and customer payments.
That mismatch is why finance teams still reconcile Stripe and NetSuite by hand.
A Stripe NetSuite integration built in Make closes that gap, and it's one of many patterns finance teams use across Make's .
You choose the trigger, the logic, and exactly which NetSuite record each Stripe event should update.
What you will need
A Make account on a plan that supports the operations volume you expect, and note that the NetSuite app requires Make's custom Enterprise Plan
A Stripe account with a restricted API key scoped to the objects you need (customers, payment intents, refunds).
A NetSuite account with token based authentication enabled (Setup > Company > Enable Features > SuiteCloud) and a role with REST and SOAP web services permissions.
The NetSuite Internal ID or External ID scheme you use for customers and transactions, since Make's record modules match on one of these.
A decision on which Stripe objects map to which NetSuite record types: Customer, Cash Sale, Invoice, or Credit Memo.
Optionally, a Make Data Store to log failed writes and avoid duplicate processing.
The difficulty in connecting Stripe and NetSuite
Stripe and NetSuite describe the same transaction in different vocabularies. Stripe tracks charges, payment intents, and payouts; NetSuite organizes the same activity into invoices, cash sales, and customer payments.
That mismatch causes real friction. A single Stripe payout can bundle many customer payments, fees, and refunds into one bank deposit, and a basic sync often drops that detail, leaving someone to manually match every line item in NetSuite.
It's the same category of problem Make's describes on the CRM side: two systems that model the same business event differently, with someone stuck rekeying the gap by hand.
Stripe's own handles standard billing sync well, and it's the right starting point for straightforward invoicing. It's less flexible for custom record types, multi-entity NetSuite setups, or logic specific to your business. That's where a Make scenario is fit for purpose: not a replacement for the official connector, but a way to handle what it doesn't.
The Make scenario that fixes this problem
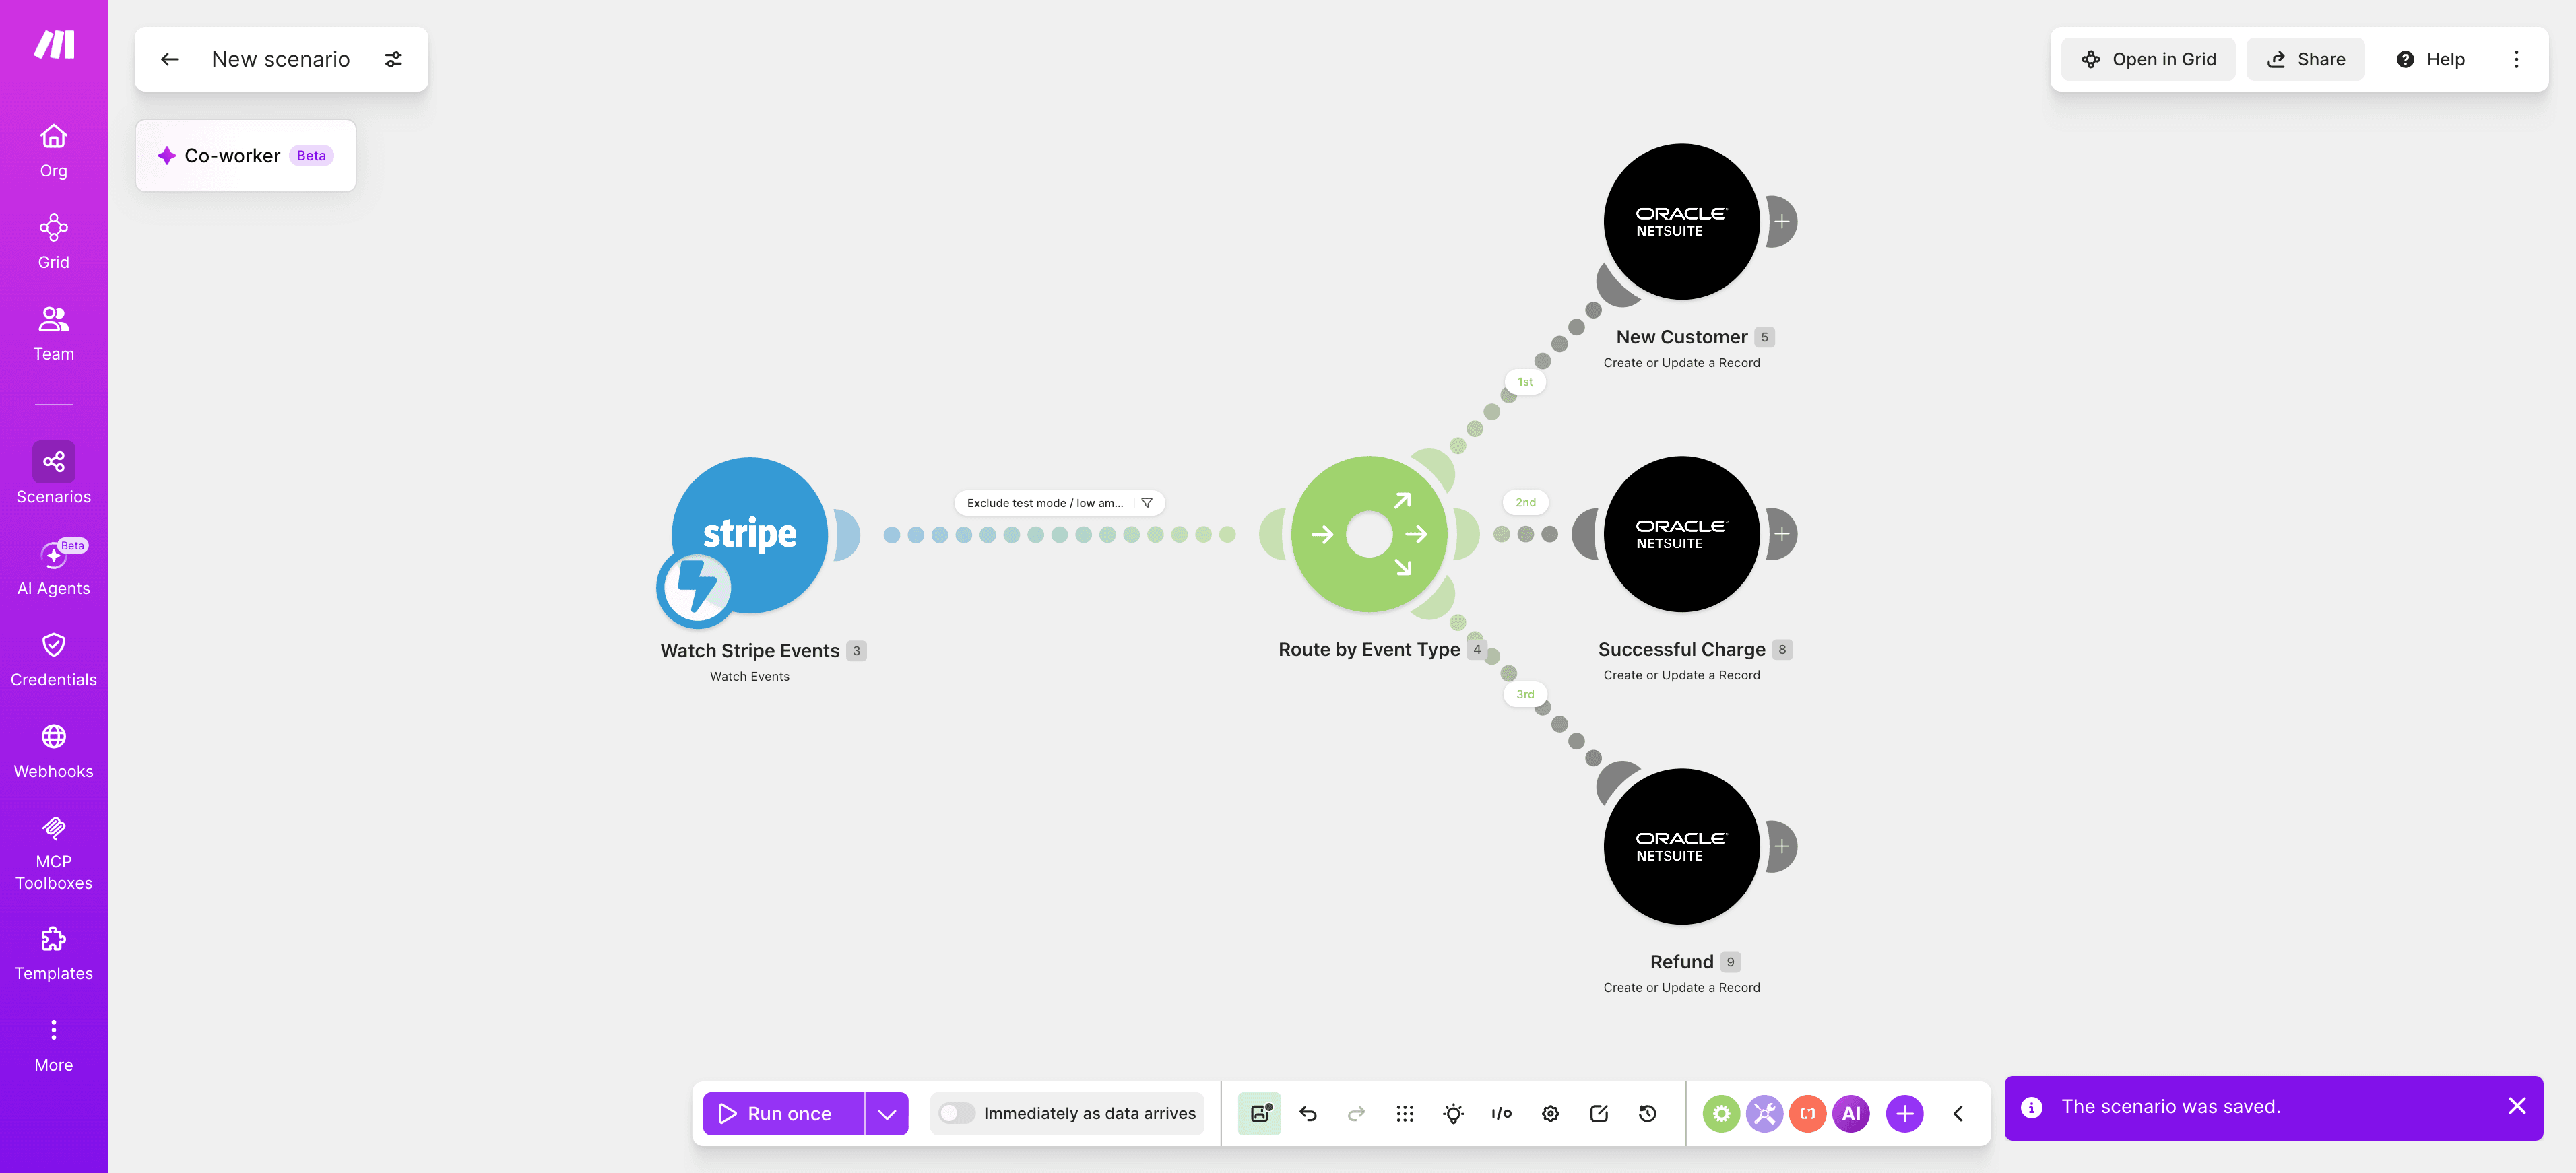
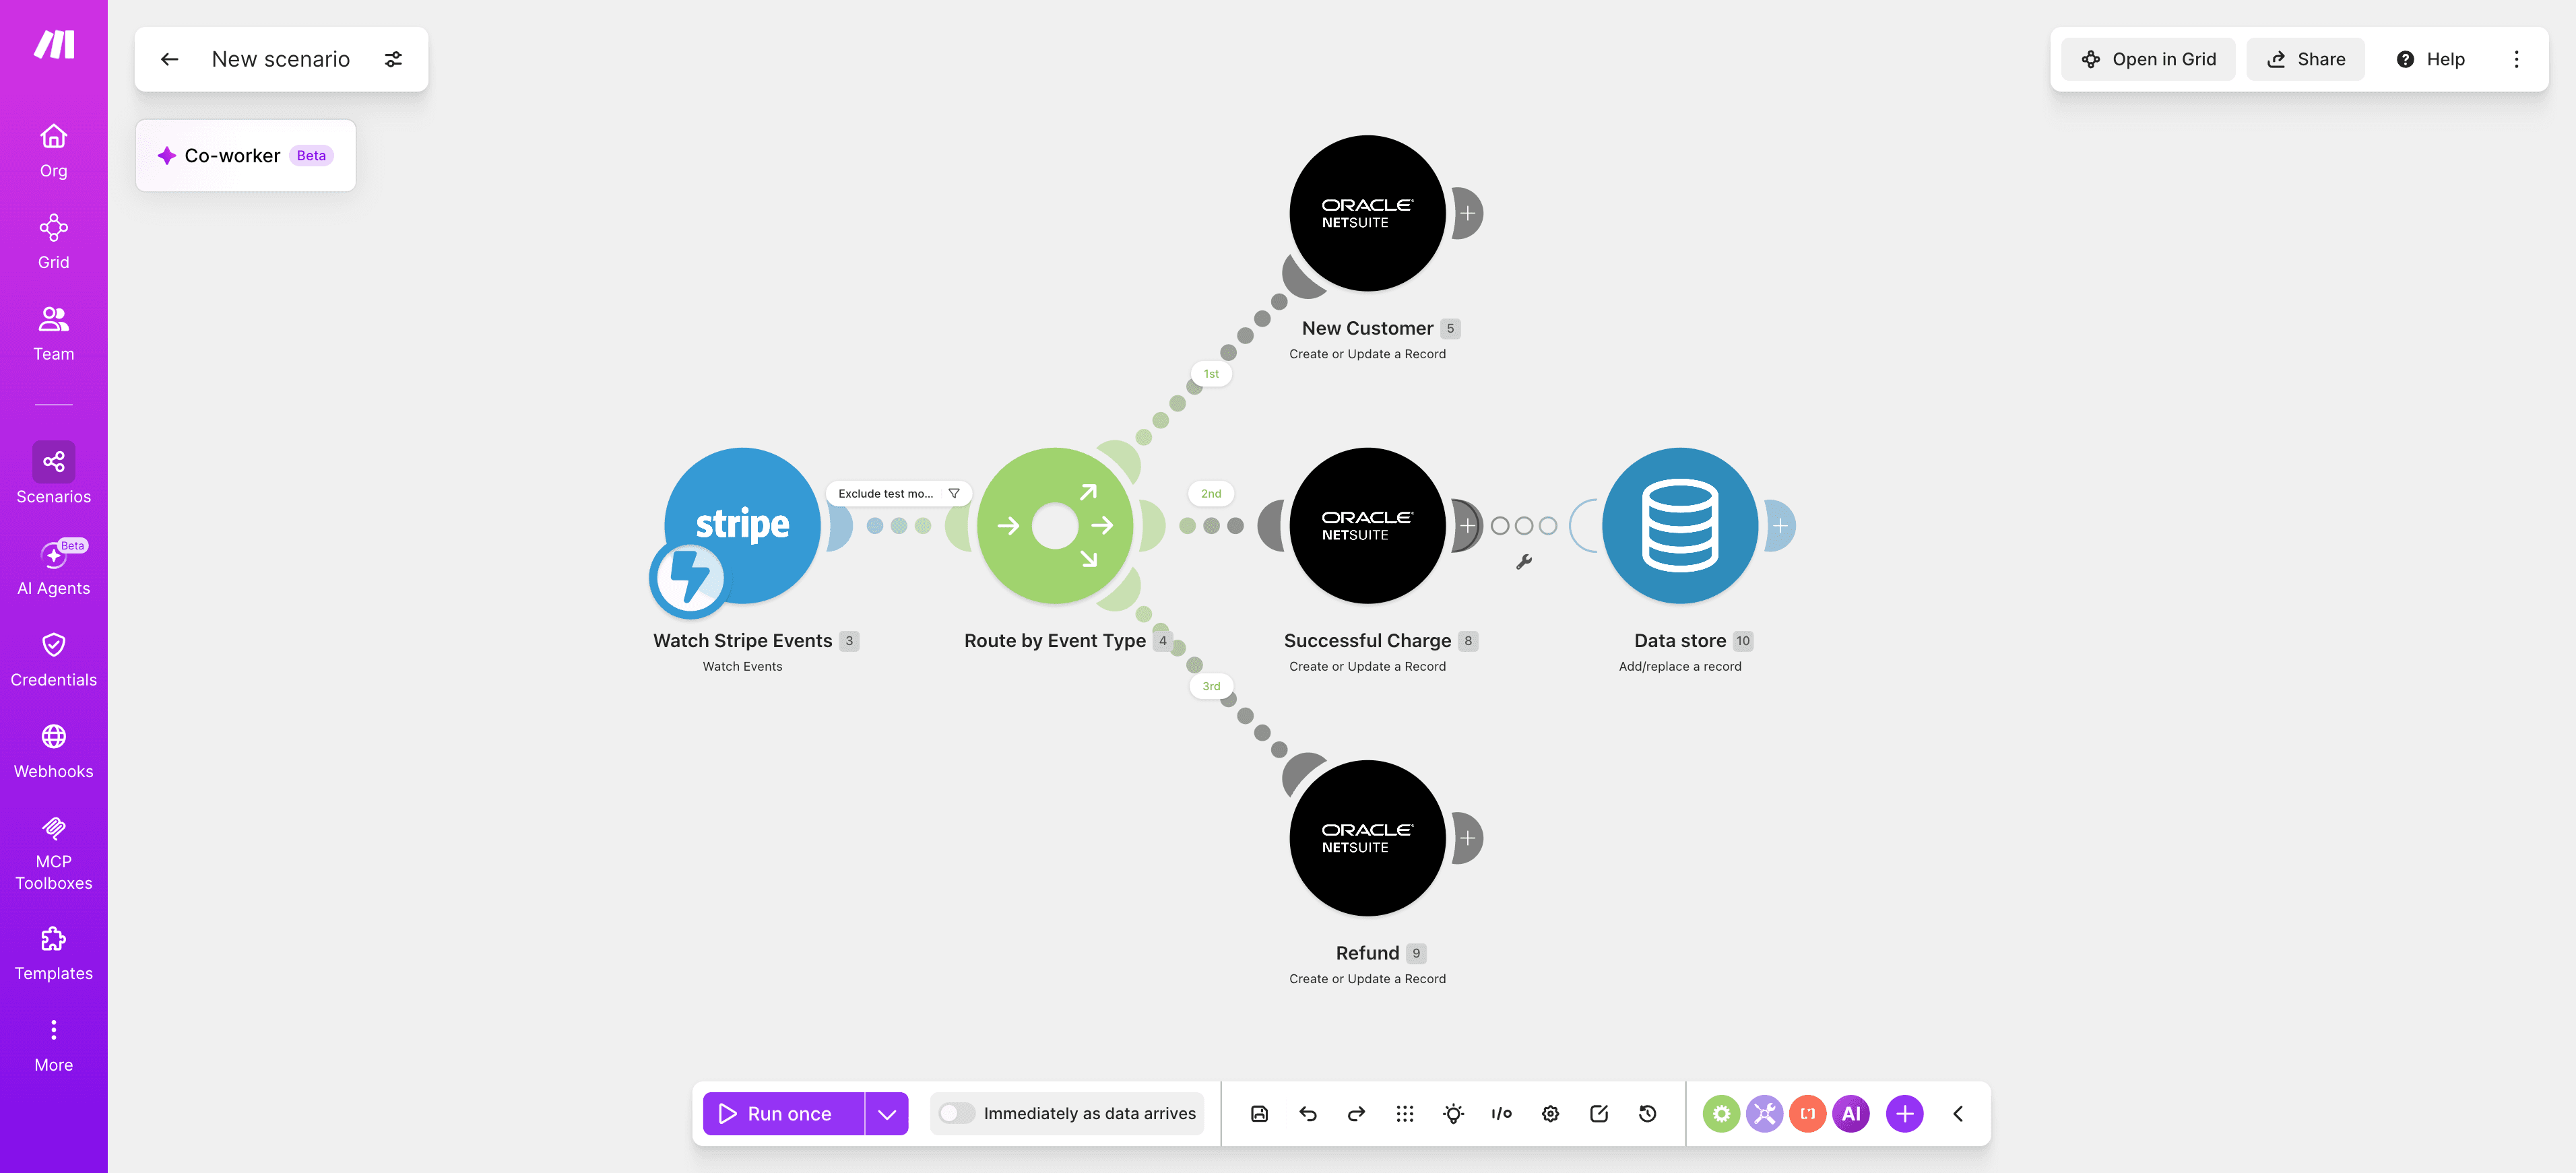
The scenario has four parts: a Stripe Watch Events trigger, a Filter to exclude test or irrelevant events, a Router that branches by event type, and NetSuite record modules that create or update the matching object.
The key design choice is matching. Every NetSuite write maps the Stripe object ID (customer ID, charge ID) to a NetSuite External ID field, so if the scenario runs twice on the same event, it updates the existing record instead of duplicating it.
Error handling sits alongside the main path: a failed NetSuite write logs to a Data Store rather than stopping the run.
Once you're running more than one of these scenarios, gives you a visual map of how this one connects to everything else in your automation landscape.
How to build it in Make
This is one build pattern among many.
Make's cover comparable step-by-step builds for other app pairs if you want to see the pattern applied elsewhere first.
Step 1: Connect your Stripe account
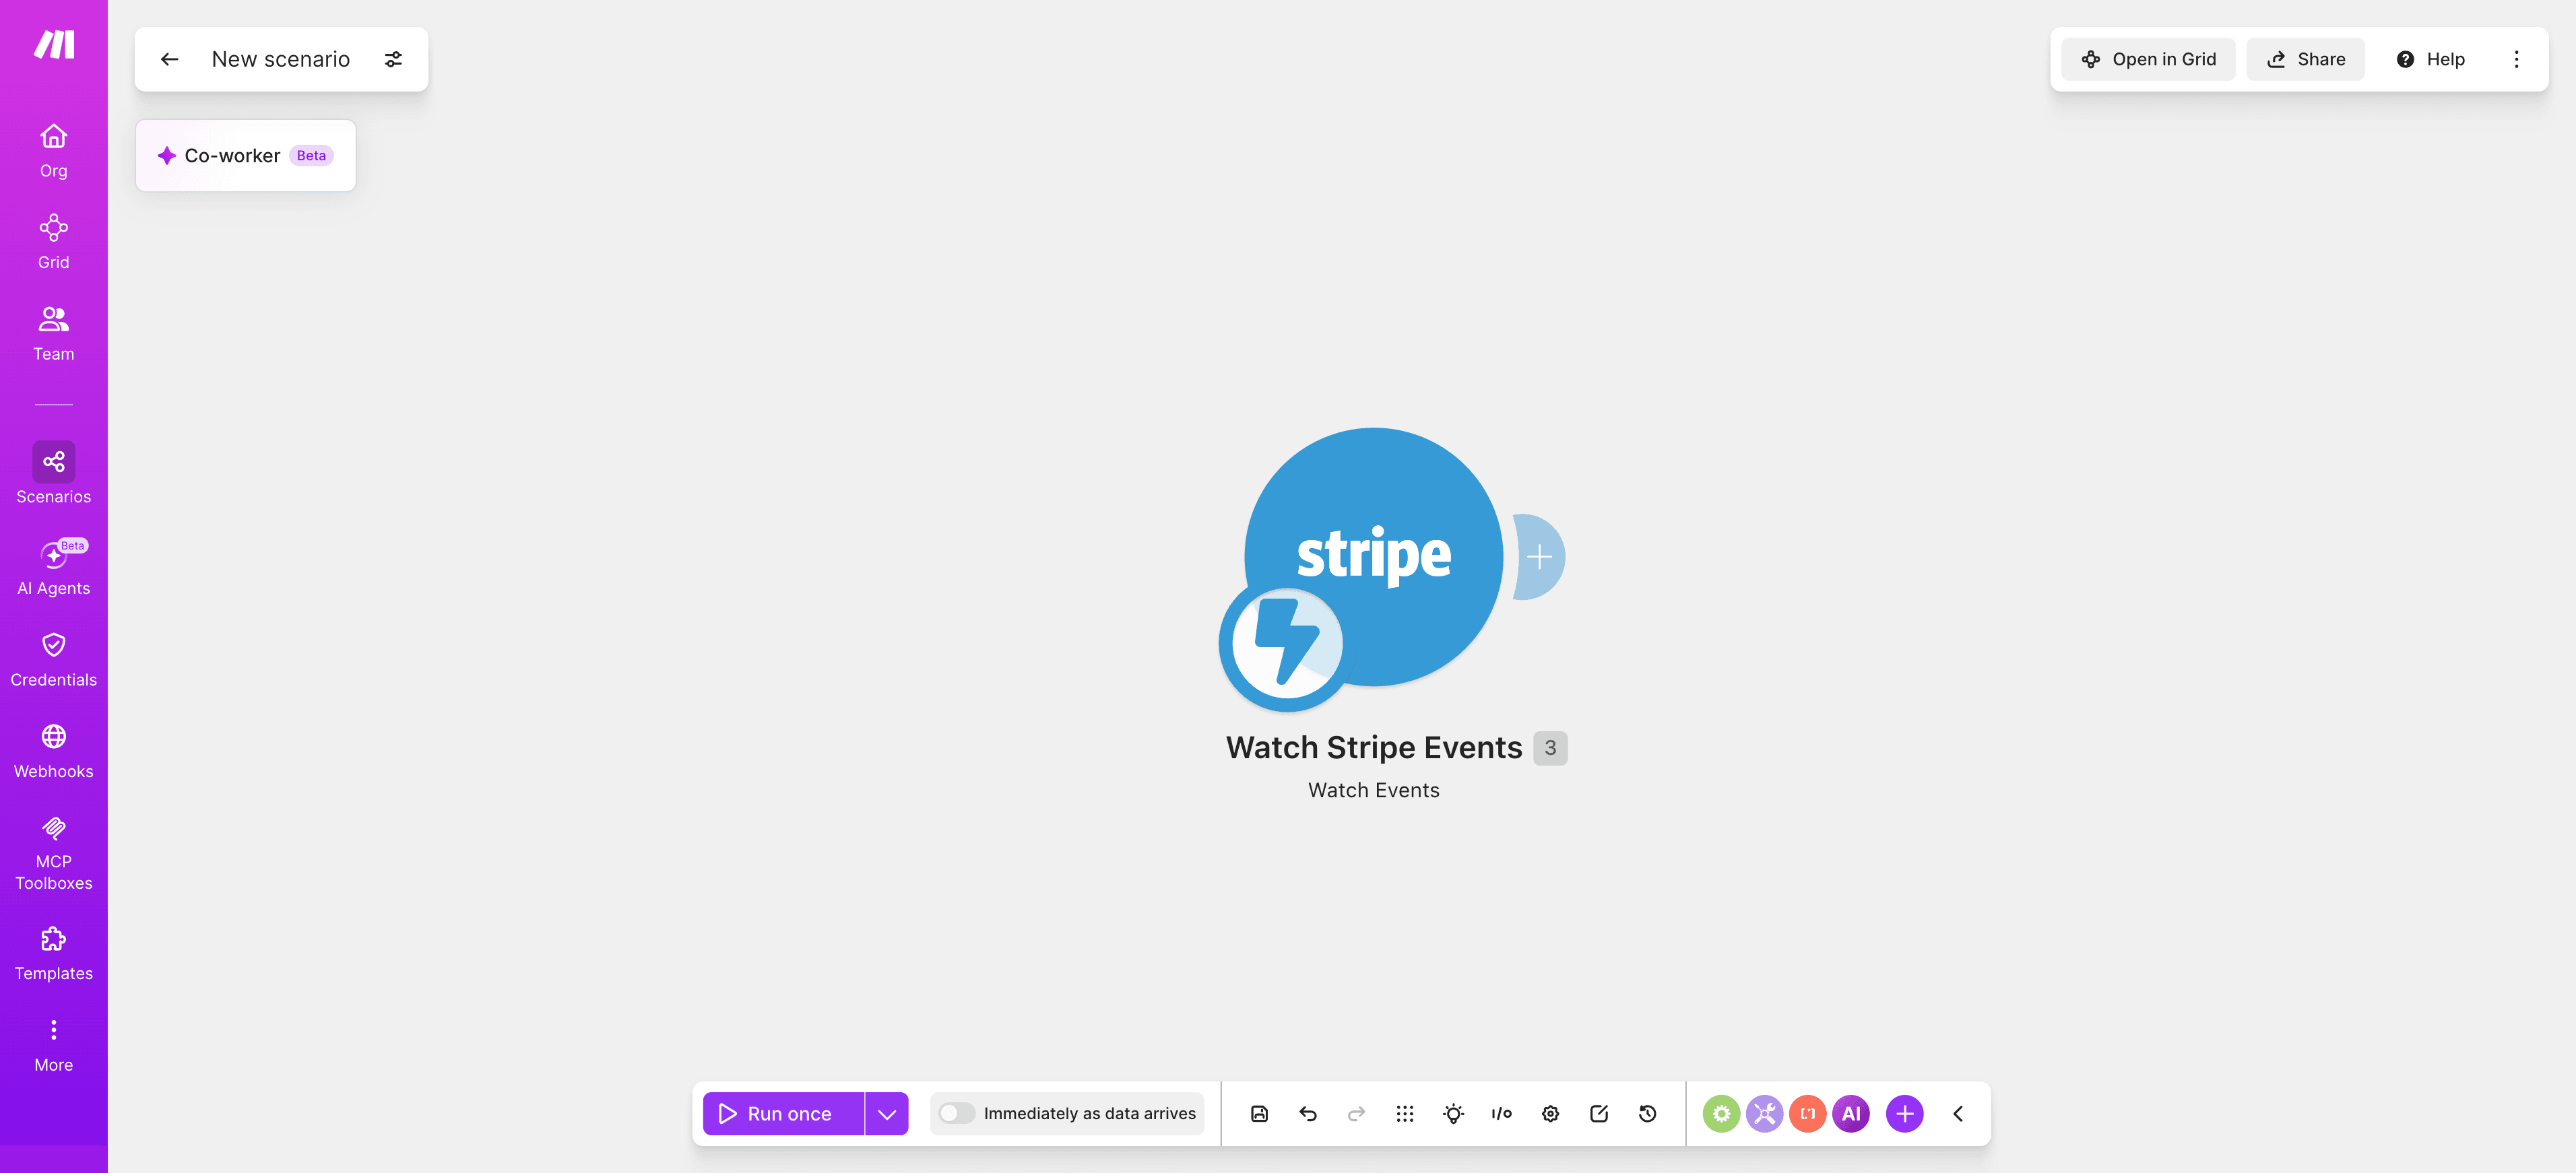
Add the Stripe app to a new scenario and select the Watch Events trigger.
In Stripe, go to Developers > API keys > Restricted keys, click "+ Create restricted key," select "Providing this key to another website," name it Make, and set read access on the objects you need before copying the key into Make's connection dialog.
Step 2: Choose which Stripe events to watch
Configure the Watch Events module's Group and Events fields to select specific event types rather than watching everything.
charge.succeeded for completed payments.
charge.refunded for refunds.
customer.created for new customers.
Step 3: Add a filter to exclude irrelevant events
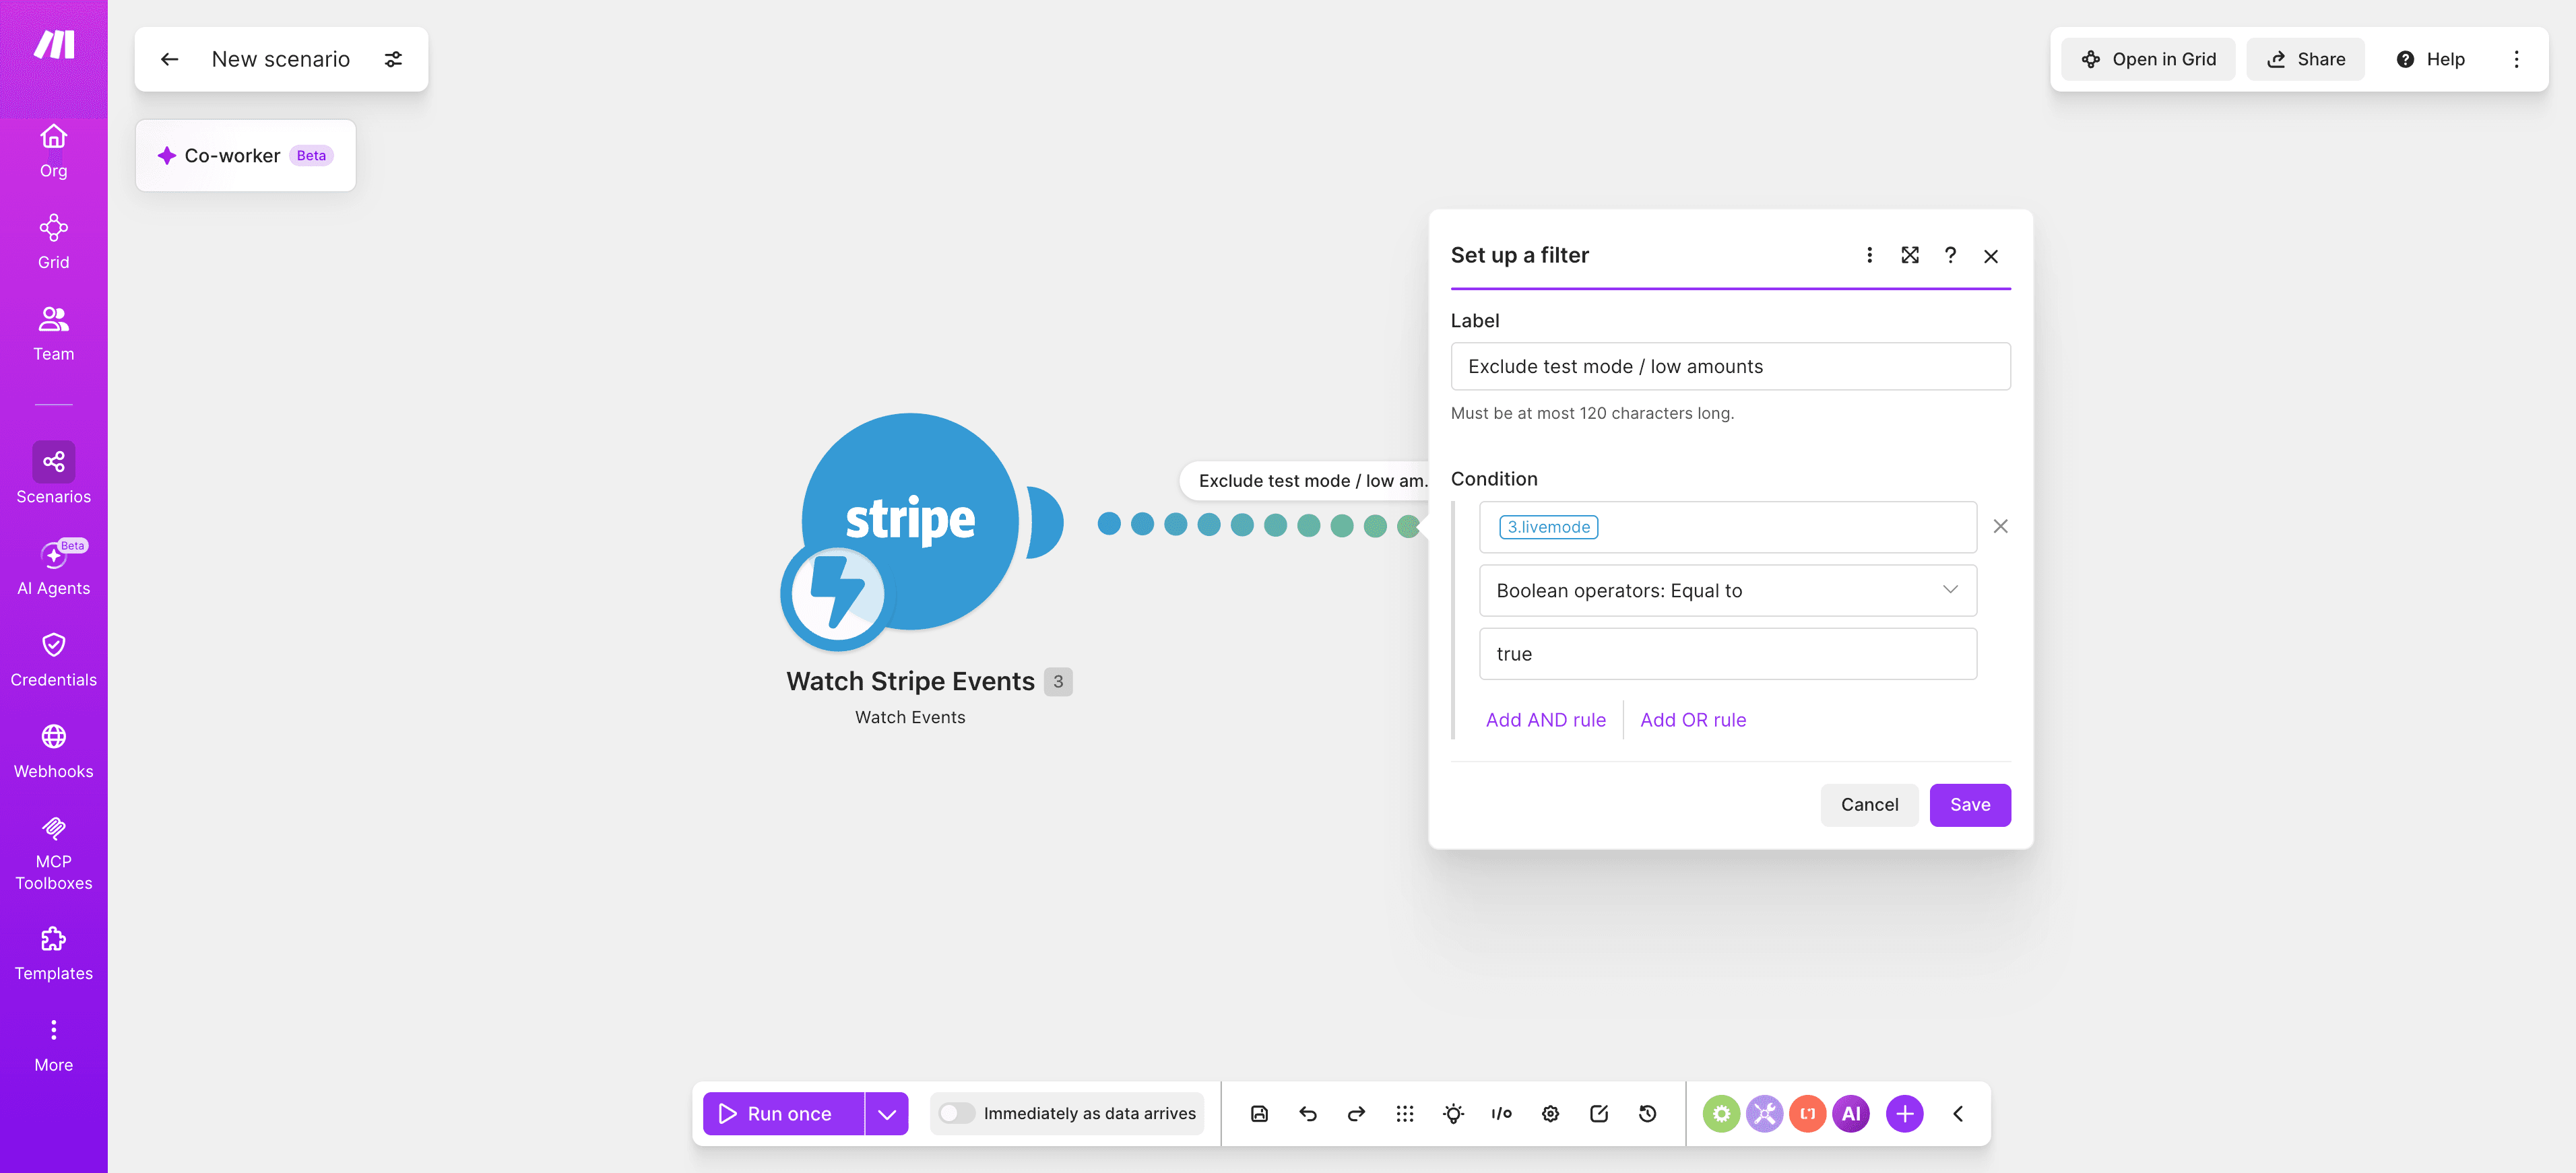
Add a Filter between the trigger and the next module to exclude Stripe test mode events or transactions below a minimum amount.
Pro tip: Stripe event payloads carry the full object state at the time of the event, not a diff, so you can map fields directly from the trigger without a separate retrieval call in most cases. That saves an operation on every run.
Step 4: Connect your NetSuite account
In NetSuite, go to Setup > Integration > Manage Integrations > New. Enable "Token-based Authentication" and the "TBA: Authorization Flow," and save the consumer key and consumer secret it generates.
Enter those in Make's NetSuite modules connection dialog.
Step 5: Route by event type
Add a Router after the filter with one route per Stripe event type: new customer, successful charge, and refund, so a failure on one route doesn't block the others.
Step 6: Create or update the NetSuite customer record
On the customer route, add Create or Update a Record, set the Action field to "Create a record and get an internal ID," and the Record type field to Customer.
Map the Stripe customer ID to a NetSuite External ID field, then map name, email, and phone.
Step 7: Create the NetSuite payment record
On the payment route, add another Create or Update a Record module, and set Record type to a standard transaction type such as Customer Payment or Cash Sale.
Map amount, currency, and the Stripe charge ID into the Entity custom fields panel.
Pro tip: Stripe bundles multiple transactions and fees into a single bank payout. Mapping at the charge level, as done here, rather than waiting for the payout event, preserves per-transaction detail that the payout object alone can't give you.
Step 8: Add error handling and activate
Right-click the Create or Update a Record module and add an error handler set to Break, connected to a Data Store "Add a record" module that logs the Stripe event ID, the error message, and a timestamp.
Save and activate the scenario.
How to test and troubleshoot
Test in Stripe's test mode first. Trigger a test event from the Stripe dashboard and confirm the record lands correctly in a NetSuite sandbox before running against live data. For a comparable end-to-end verification pattern on a different finance scenario, see Make's .
Common issues:
Duplicate records: usually means the External ID mapping in Step 6 or 7 is missing. Map the Stripe object ID to the same NetSuite field every time.
Permission errors on NetSuite writes: the connected role lacks access to that record type. Fix it in NetSuite's role settings, not in Make.
Bundled payout mismatches: confirm you're mapping at the charge level, per Step 7, rather than the payout level.
Silent scenario failures: confirm the error handler route from Step 8 is actually connected, not just present.
Currency mismatches: Stripe amounts arrive in the smallest currency unit (cents), so confirm the conversion before the value reaches NetSuite.
Outcomes you can expect
Teams running this scenario spend less time manually matching Stripe payouts against NetSuite bank deposits, close books faster, and stop creating duplicate customer records, the same direction of benefit Make's covers more broadly.
Since Scenario Builder logs every run, finance teams also get a visible audit trail, something spreadsheet based reconciliation doesn't offer.
Variations and next steps
This scenario covers the common case. A few variations are worth building depending on your setup.
Use case | Approach | Difficulty |
Sync Stripe subscriptions instead of one time charges | Watch invoice.paid events, map to NetSuite Invoice records | Moderate |
Reconcile bundled Stripe payouts against NetSuite deposits | Add a scheduled scenario using Search Records to match payout line items | Advanced |
Multi-entity NetSuite (OneWorld) | Add a Router branch per subsidiary, mapping Stripe metadata to the subsidiary field | Advanced |
Sync Stripe disputes | Watch charge.dispute.created, route to a Create a Custom Record for finance review | Moderate |
Flag anomalous transactions before they post | Add Make AI Agents to review charge amounts against historical patterns before the NetSuite write | Advanced |
Conclusion
You now have a working Stripe to NetSuite scenario that handles customers, payments, and refunds without custom code.
This scenario complements Stripe's own NetSuite connector rather than replacing it. Use the official connector for standard billing, and use Make when you need logic it doesn't offer. For more builds like this one, Make's covers automation patterns across finance, sales, and operations.
Get started free or to build this scenario in Make.
Frequently asked questions
Q1: Do I still need the official Stripe connector for NetSuite if I use Make? Not necessarily. The official connector suits standard billing sync. A Make scenario is fit for purpose when you need custom record types, multi-entity routing, or logic the connector doesn't support.
Q2: Will this duplicate records if the scenario runs twice on the same event? No, as long as you map the Stripe object ID to a NetSuite External ID field, as shown in Step 6. Create or Update a Record updates instead of duplicating.
Q3: Can this handle Stripe subscription billing, not just one time payments? Yes. Watch invoice.paid events instead of charge.succeeded and map to NetSuite Invoice records, as covered in the variations table.
Q4: How does this help with bank reconciliation specifically? Mapping at the charge level, rather than the payout level, in Step 7 preserves individual transaction detail, so NetSuite reflects each payment instead of one bundled deposit.
Q5: Can I add AI review to this scenario without rebuilding it? Yes. Make's shows how to insert a reasoning step, such as anomaly review, into an existing scenario like this one without changing the core trigger and record logic.
Ready to make the automation revolution happen?