Clockify
With Clockify modules in Make, you can control time entries and manage workspaces, projects, tasks, clients, and tags in your Clockify account.
To get started with Clockify, create an account at clockify.me/signup.
Note
Refer to the Clockify API documentation for the list of available endpoints.
Connect Clockify to Make
To connect your Clockify account to Make, you must obtain an API key from your Clockify account.
Log in to your Clockify account.
In the upper right corner, click on your Profile icon > Profile Settings.
Scroll down to the API section and click Generate.

Copy the generated API key to your clipboard.
Log in to your Make account, add a Clockify module to your scenario, and click Create a connection.
Note: If you add a module with an
instanttag, click Create a webhook, then Create a connection.Optional: In the Connection name field, enter a name for the connection.
Paste the API key copied in step 4 into the API Key field and click Save.
You have successfully established the connection. You can now edit your scenario and add more Clockify modules. If your connection requires reauthorization at any point, follow the connection renewal steps here.
Set up Clockify Webhooks
This app uses webhooks to trigger a scenario when an event occurs instantly. Follow the steps below to set them up.
Add the Clockify
instantmodule to your scenario and click Create a webhook.Optional: In the Webhook name field, enter a name for the webhook.
Select the corresponding connection for the webhook in the Connection field and click Save.
Click Copy address to clipboard to copy the generated webhook link and click OK.
Log in to your Clockify account and go to app.clockify.me/webhooks.
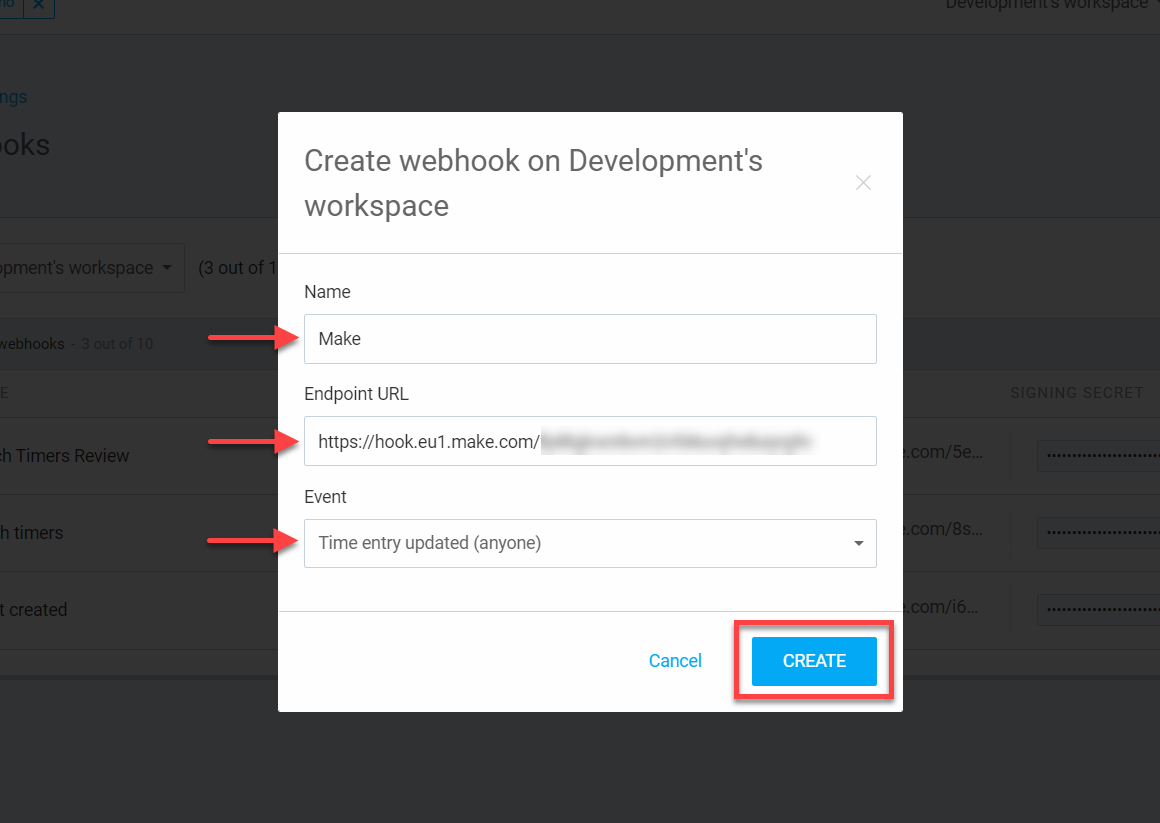
Click Create New in the top right corner.
Fill in the Name field, paste the address copied in step 5 in the Endpoint URL field, select the relevant Event type, and click Create.
Clockify will now send data to Make through the webhook when the selected event occurs.
Build Clockify Scenarios
After connecting the app, you can perform the following actions:
Watch Time Entries
Find Time Entries
Get a Time Entry
Run/Add a Time Entry
Update a Time Entry
Stop a Time Entry
Delete a Time Entry
Watch Projects
Find Projects
List Project Custom Fields
Get a Project
Add a Project
Delete a Project
Watch Tasks
Add a Task
Update a Task
Find Tasks
Watch Clients
Find Clients
Add a Client
Delete a Client
Watch Tags
Find Tags
Add a Tag
Watch Timers
Find Workspaces
Add a Workspace
Get a Summary Report
Get a Detailed Report
Get a Weekly Report
Get an Expense Report
Add a Group
Update a Group
List Groups
Delete a Group
Make an API Call