Upgrading to the Enterprise plan
With the Enterprise plan, you get access to the most advanced Make features, wider limits, priority support, and a separate Celonis Amazon Web Service environment.
After signing up for Enterprise, you will need to migrate your data to our dedicated server in your region. This will give you access to a more stable and reliable infrastructure. Make provides an effective tool to let you migrate your data fast and easy.
In this article, you will learn how to use the Make Migration tool to move your data and start enjoying the Enterprise plan.
Migration scope overview
The Migration tool has two modes:
Fast mode enables automatic migration of selected scenarios and their associated data. In some cases, the system may require you to take manual steps.
Manual mode allows you to choose which data to migrate and how to handle it in your Enterprise instance.
Which data can you migrate?
The Migration tool migrates the following items:
Scenarios and scenario folders;
Connections (except those that are associated with connected systems and On-prem Agents);
Webhooks and mailhooks;
Keys;
Data stores;
Data structures;
Custom apps.
Note
If the following items exist in your source instance, but no scenarios use them, the Migration tool doesn't move them to the target instance:
Connections;
Webhooks and mailhooks;
Keys;
Data stores;
Data structures.
Which data can't you migrate?
User accounts;
Organizations;
Scenario executions history and logs;
Incomplete executions;
Connections associated with connected systems and On-prem Agents;
Webhook and mailhook queues and logs;
Prepare your data
The Migration tool has some peculiarities that you need to keep in mind when migrating your data either in a fast or a manual mode. To arrange your target instance better, consider taking some measures that allow you to overcome limits of the Migration tool.
Teams
Keep in mind that: Migration involves transferring data from one team in the source instance to another team in the target instance.
Do it: To have your data in different teams in the target instance:
In the target instance, create as many teams as needed.
In the Migration tool, select the team you want to migrate scenarios to, and then select the specific scenarios to be moved to the selected team.
Tip
You can't move scenarios from one team to another after finishing migration. When migration is complete, you can clone scenarios and select the desired team for them.
To avoid data inconsistency, we recommend not migrating data from the same team more than once.
Time zones
Keep in mind that: The Migration tool doesn't migrate the time zone settings. You need to set up time zones in the target instance.
Do it: If you aim to run scenarios in the target instance according to the time zone that you have in the source instance, manually set up a time zone in the target instance. Learn more about managing time zones.
Scenarios
Keep in mind that: If your scenarios contain apps that require you to whitelist IP addresses for access, you need them to have relevant IPs associated with the target instance.
Do it: Before migrating such scenarios, add the following IPs to apps depending on your zone: eu1.make.celonis.com or us1.make.celonis.com. You may delete those IPs from apps in the source instance after the migration is done.
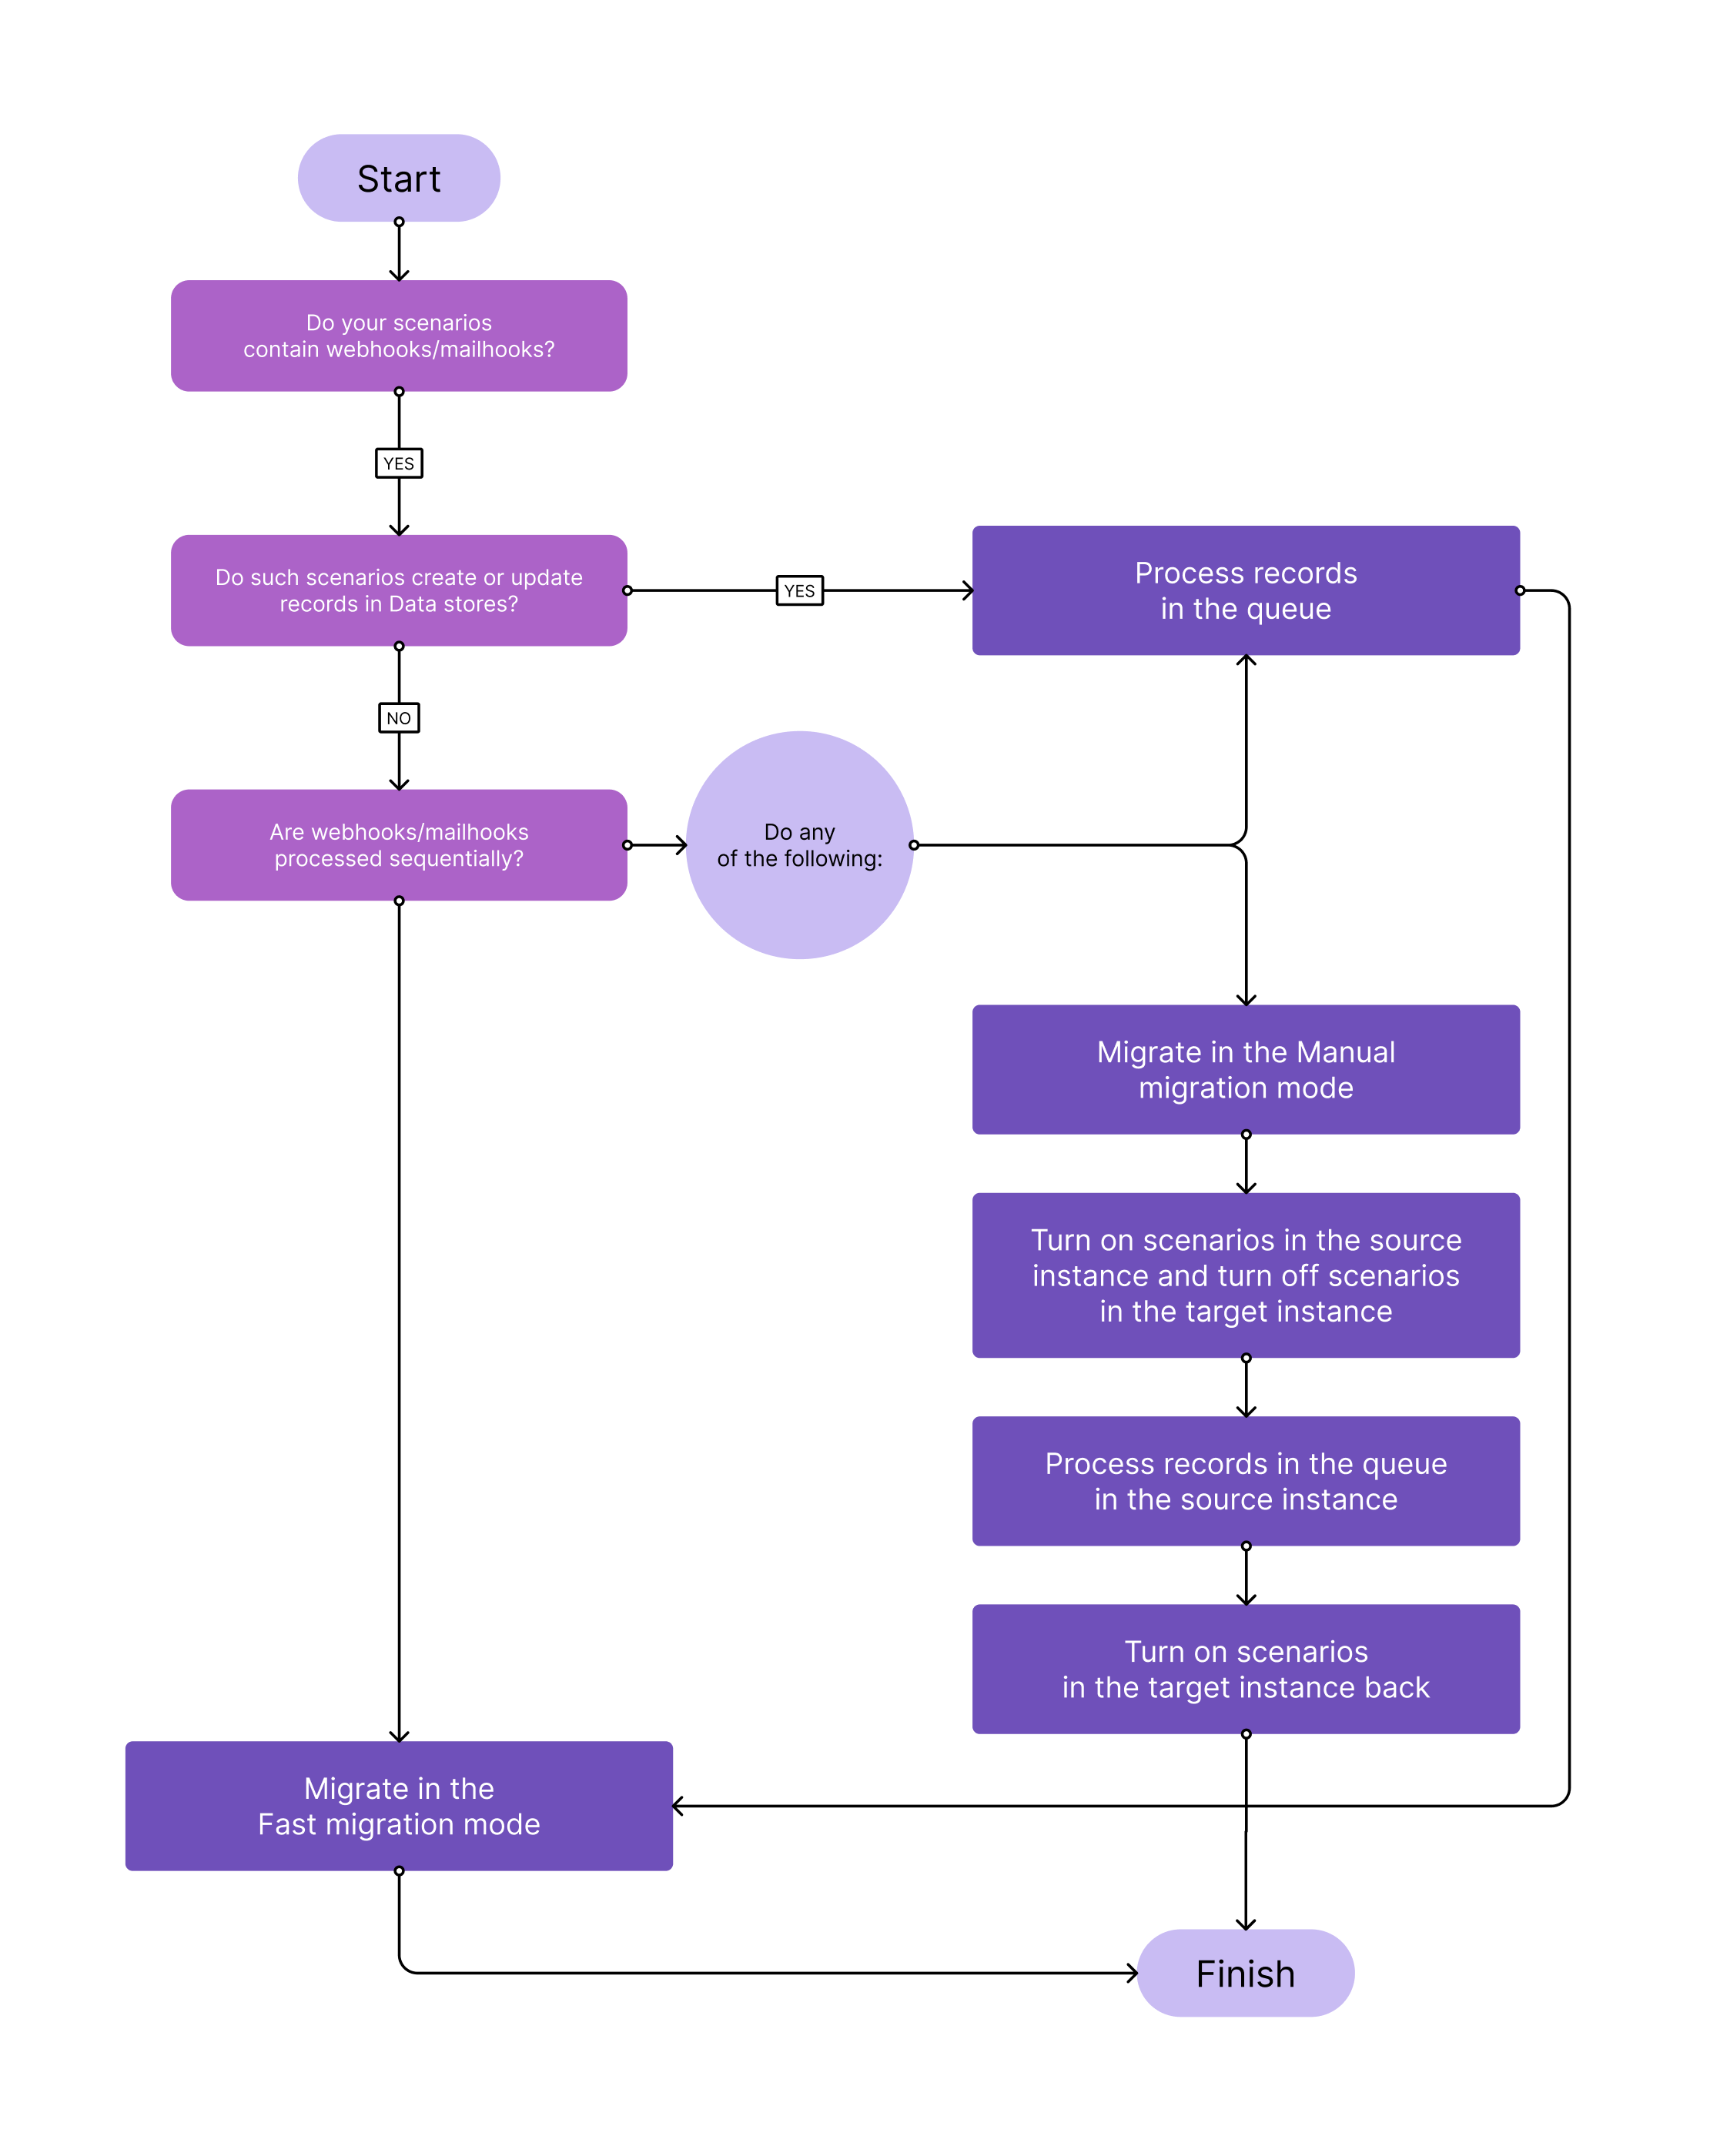
Keep in mind that: The Migration tool doesn't migrate a webhook or mailhook queue. It can cause problems if you use sequential processing because scenarios data may arrive to the target instance before the queue is processed in the source instance.
Do it: To ensure sequential processing, do one of the options:
Option 1: Process the entire queue in the source instance before migrating.
Option 2:
Migrate scenarios in the manual mode.
Disable scenarios in the target instance and enable scenarios in the source instance.
Process the webhook queue.
Once all the data is processed, enable scenarios in the target instance.
Note
Data received after migration goes to the new webhook URL and will be processed once you enable scenarios in the target instance.
 |
Connections
Keep in mind that: The Migration tool doesn't replace one connection with another if they have different scopes and permissions.
Do it: Ensure that scopes and permissions of connections in the target instance match scopes and permissions of connections that you want to replace.
Data stores
Keep in mind that: Data may be inconsistent between the source and target instances if the Migration tool moves scenarios that update data stores more frequently than every five minutes.
Do it: To avoid inconsistency:
Stop all scenarios in the source instance before starting migration.
Note
You have to stop only scenarios that contain the Add/replace a record, Delete all records, Delete a record, and Update a record modules.
Migrate scenarios.
Run scenarios in the target instance.
Custom apps
Keep in mind that: You cannot migrate scenarios with published custom apps if you didn't install those apps into the target instance beforehand.
Do it: To have scenarios with custom apps in the target instance:
If the custom app has the Private status, publish it. Refer to the App Builder documentation to learn more.
Note
It is not possible to migrate apps that have the Private status. Publish the app after making all the necessary changes.
When the custom app has the Published status, you cannot:
Make the custom app Private again
Delete the custom app
Delete a module from the custom app
Install the published custom app in the target instance.
Migrate scenarios.
Migrate your data
It's time to proceed with the migration process. You can migrate as many scenarios as you want at once. If you didn't migrate all scenarios at once, you can continue later.
Follow the next steps to start migration:
Go to the Migration tool.
Read all the information and click Let's start.
In the Source and Target sections, select Make.
In both sections, click Sign in to source and Sign in to target respectively, and log in to both Make instances. Then click Continue.
In both Organization dropdown lists, select the source organization to migrate data from, and the target organization to migrate the data into
In both Team dropdown lists, select the source team to migrate data from, and the target team to migrate data into. Then click Continue.
You see the list of all scenarios that your source instance has. You can select the migration mode: fast or manual.
Note
The Migration tool doesn't migrate scenarios that have errors: you can find them in the Non-migratable scenarios tab. If you want to move those scenarios to the target instance, you must first resolve the errors.
Manage your data and finish migration
Depending on the migration mode you chose, you need to decide how to handle your data from the source instance. Some options are available only for the manual mode.
We highly recommend using the fast migration mode to ensure smooth and easy data transferring.
Select custom apps to replace ones that migrated scenarios use.
Select the action for connections:
Duplicate a connection in the target instance.
Replace a connection with the one that exists in the target instance.
Note
The set of scopes or permissions of a particular connection might differ between the source and the target instance. To see the scopes of a specific connection, go to the Connection section and click the eye
 icon.
icon.If you need to extend scopes:
Log in to either a source or a target instance depending on where you need to extend scopes.
Create a new scenario or open an existing one.
Add a module that requires additional scopes.
Create a new connection. Make will ask you to provide additional permissions. Click Continue.
On the app page where you're redirected to, confirm granting new scopes.
Optional: Delete the module or the newly created scenario if you don't need it.
Some apps allow adding scopes manually when creating a new connection. If you created a custom application in a service itself, you may extend scopes in your service account.
Use a previously migrated connection.
Select the action for webhooks and mailhooks:
Duplicate a webhook or mailhook.
Duplicate a webhook or mailhook and forward traffic.
Note
We recommend always choosing the second option. If you just duplicate a webhook or mailhook, traffic will still be sent on the webhook or mailhook that you have in the source instance, and no data will appear in the target instance.
A duplicated webhook will have a different URL.
If you have linked devices in your source instance, create a mock device in the target instance.
Note
You need to replace a mock device with a real device. See more information in the section below.
Select the action for data stores:
Duplicate a data store and migrate its content.
Duplicate a data store without its content.
Replace a data store with the one that exists in the target instance.
Note
The Migration tool will replace data in the data store in the target instance with data from the source instance. If you use auto-generated keys, Make will store data under different keys in the target instance.
Select the action for data structures:
Duplicate a data structure.
Replace a data structure with the one that exists in the target instance.
Select the action for keys:
Duplicate a key.
Note
A duplicated key contains the relevant data, but the key ID is different.
Replace a key with the one that exists in the target instance.
Select the action for folders:
Duplicate a folder.
Replace a folder with the one that exists in the target instance.
Select what you want to do with scenarios both in the source and target instances.
Important
If at least one scenario contains webhooks or mailhooks, Make automatically disables all migrated scenarios. You may enable them manually after migration.
Click Start migration
The migration is completed. The Migration tool shows the list of scenarios and entities it migrated and confirms that the migration process was successful. Click Show log to see the migration log.
If the migration fails, the Migration tool rolls back all changes made both to the source and target instances. Check the migration log out to find out reasons for the failure.
Post-migration data setup
Using the Migration tool to move your data to a different server environment ensures smooth and easy migration. Still, you must consider specific details and take certain actions after migration to fully benefit from the Enterprise plan.
Your data will remain in your source instance after migration.
Subscriptions and coupons
Make doesn't automatically cancel your source instance subscription. After you fully set up your target instance, you need to manually cancel your subscription. After that, your source instance moves to the Free pricing plan: you can use all available features within this plan.
Extra operations remain in the source instance. Contact our Support to move extra operations to the target instance.
Scenarios
After migrating scenarios scheduled as immediately, they execute once the scenarios trigger receives new data.
Some scenarios require additional configuration after migration. Pay attention to scenarios that contain:
Custom apps: They may require additional setup.
Apps that require IP whitelisting: Make sure that the migrated scenarios have updated IPs in their apps.
The Make app: Create a new connection and update all IDs mapped in the app modules. New IDs should be associated with the data based on the target instance.
On-prem connections
The Migration tool doesn't migrate connections associated with connected systems and On-prem Agents. You need to manually create connections in the target instance and then link them to connected systems.
Webhooks and mailhooks
If during migration you selected duplicating webhooks or mailhooks and forwarding traffic, the old URL in the source instance still receives traffic, but redirects it to the new URL in the target instance. Don't delete the old URL in order not to lose traffic. Contact our Support to receive a list of pairs of old and new URLs.
Devices
The Migration tool creates mock devices in the target instance to migrate scenarios that use the iOS or Android app.
Note
The mock device is called a deaf device in the target instance.
 |
After migration, to use such scenarios, you must:
Create a new device manually in the target instance.
Replace a mock device with the newly created in all relevant scenarios.
Delete all mock devices.