Using the On-premise agent
With the On-premise agent (On-prem agent) installed on your system, your scenarios can access applications and databases on your local network without changing the settings of your firewall.
Note
This is the BETA launch. The full version will come later. We would like to encourage you to provide us with your feedback in Make Community, so we will be able to improve the On-prem agent feature and make it comfortable for you to work with.
The On-prem agent is available only on the Enterprise plan.
The general On-prem agent architecture:
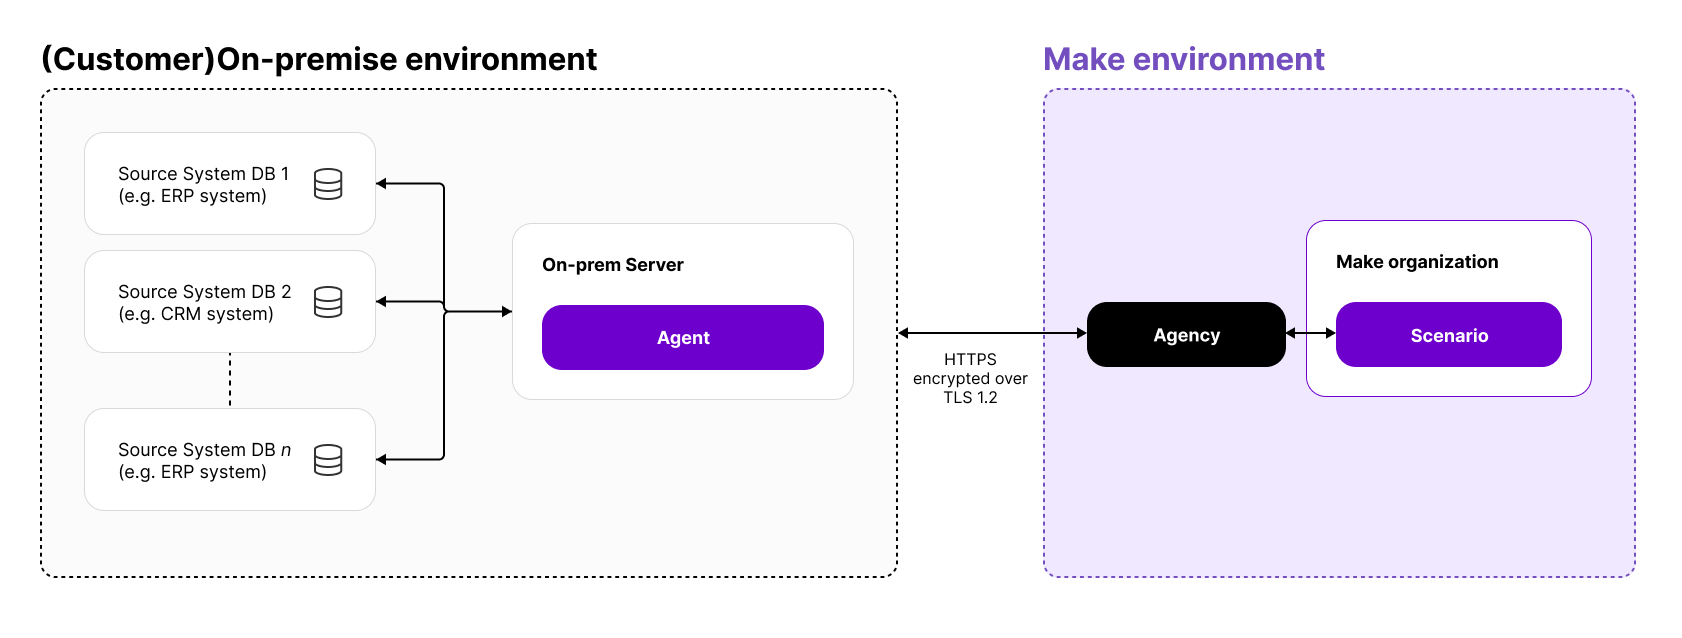
One On-prem agent can connect to many applications that are located in the same network. Currently, we provide an HTTP Agent app that allows connecting with other custom systems that provide an API or a web service.

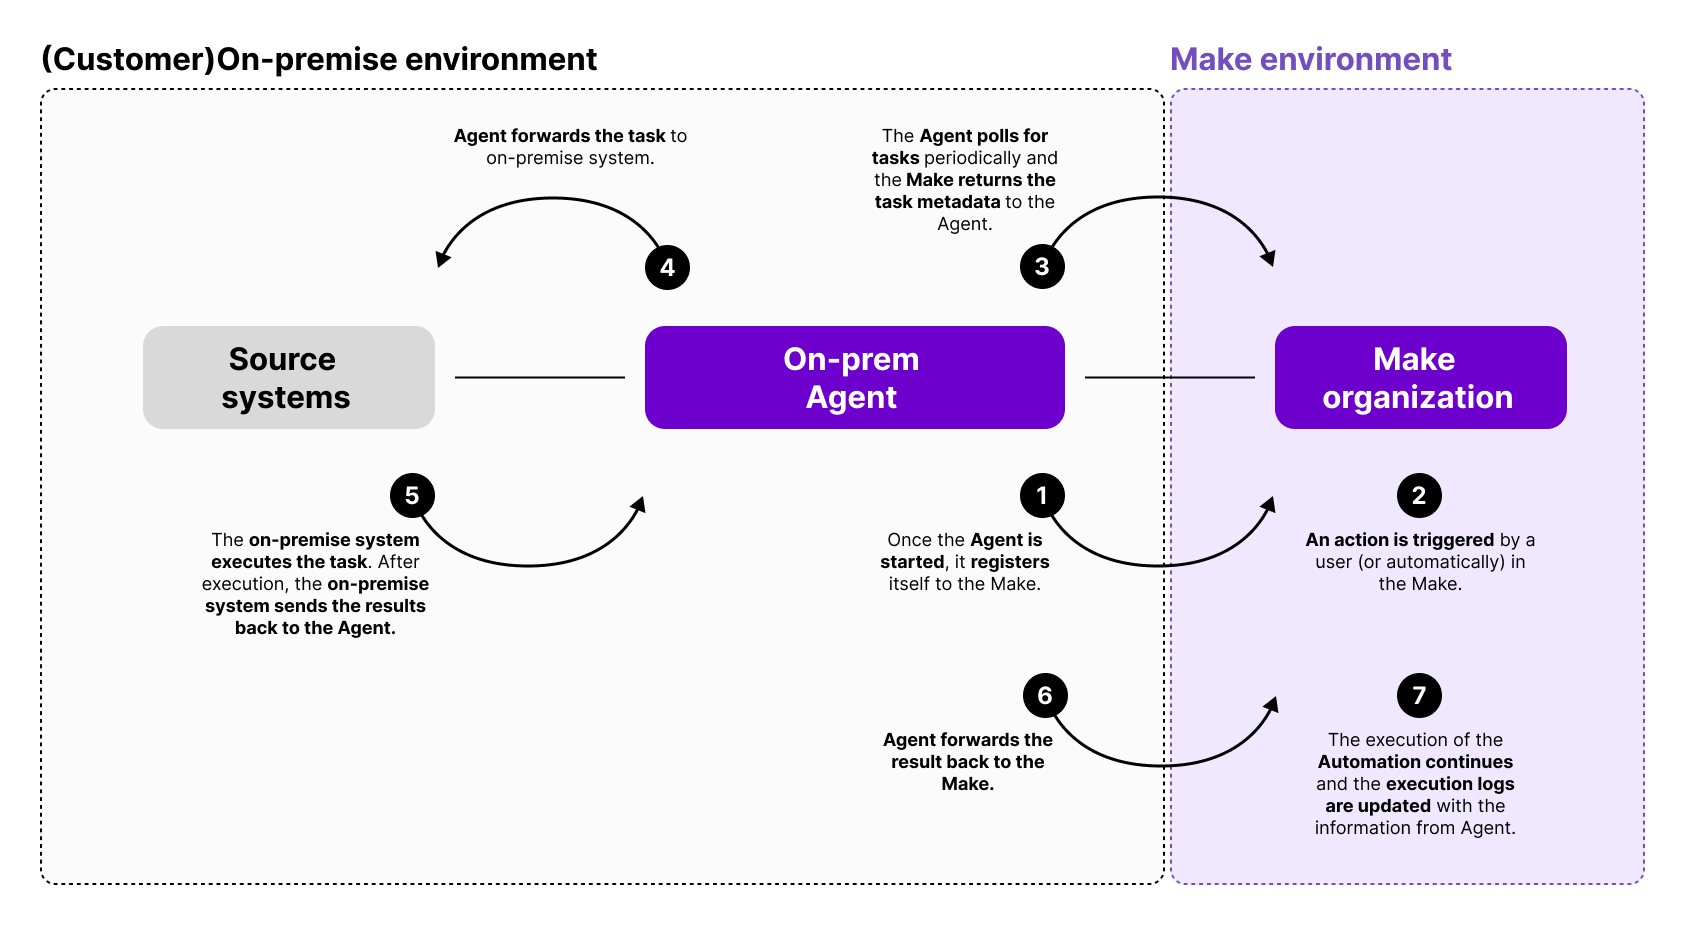
The deeper visual explanation of the solution:
To start using an On-prem agent in your scenarios, you need to:
Create a new On-prem agent in the On-prem agents section of the Organization dashboard.
Connect a system (an application) to the installed On-prem agent.
Add a connection between Make and the connected system when adding the application module in your scenario.
Adding an On-prem agent
The installation process consists of three steps:
Creating an On-prem agent in the On-prem agents section, in Make.
Downloading the On-prem agent to your device.
Installing the On-prem agent on your device.
Important
Only users with the Owner, Admin, and App dev organization roles can perform all three steps.
Creating an On-prem agent
First, you need to create a new On-prem agent in Make.
Go to the Organization section, the On-prem agents tab, and click Create a new on-prem agent. A window appears.

In the On-prem agent name field, enter the agent name.
Click Create agent. A page with credentials appears.
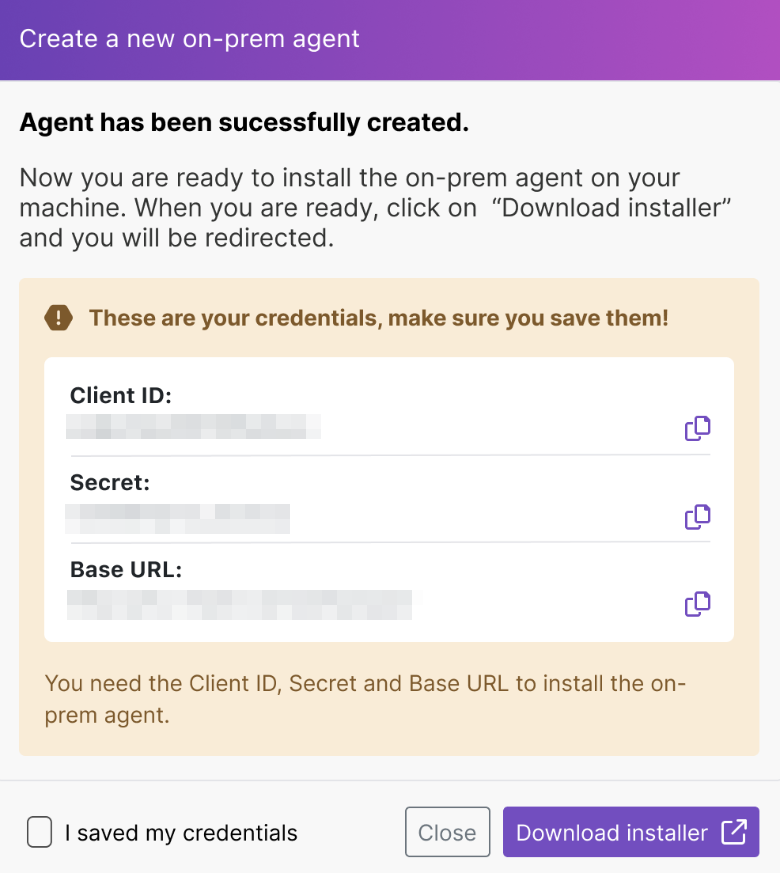
Save the Client ID, the Secret, and the Base URL because you will need these credentials in the installation stage later. Check I saved my credentials.
Warning
Make sure to save the credentials in this step in a secure location. This is the only time when Make shows the On-prem agent credentials.
Click Download installer.
Make redirects you to the download page, where you can choose your device OS and download the On-prem agent installer. In the Organization section, on the On-prem Agent tab, you can see the created On-prem agent with the Registered status.

Downloading the On-prem agent
You need to download the installation package for the On-prem agent to run on your device.
After creating the On-prem agent, Make redirects you to the download page.

Select the OS of your device, and click Download.
Tip
For macOS download the file for Linux: it is a .ZIP archive you will have to unzip when installing.
Tip
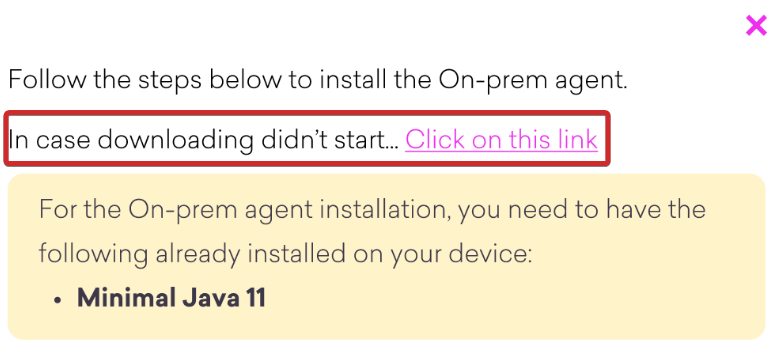
If the auto-download doesn't start automatically, follow the link that appears after you click Download.
Define where you want to save the On-prem agent installation package on your device.
Click Save.
You downloaded the On-prem agent installation package to your device. You're ready to install the On-prem agent.
Installing the On-prem agent
Installation is the last step you need to start using the On-prem agent in Make. Here you will find steps for installing the On-prem agent on Windows, macOS, and Linux.
Important
For the On-prem agent installation, you need to have the following already installed on your device:
Java 11 and above
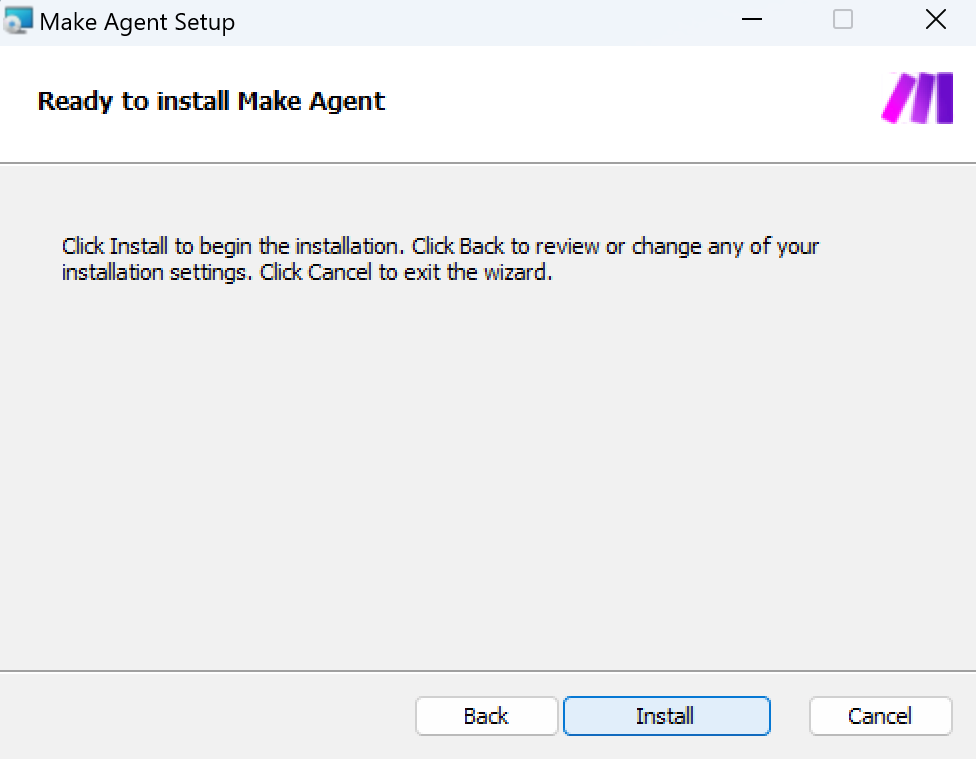
Go to the folder where you saved the On-prem agent when downloading, right-click the file, and select Run as Administrator. An installation window appears. Click Install.
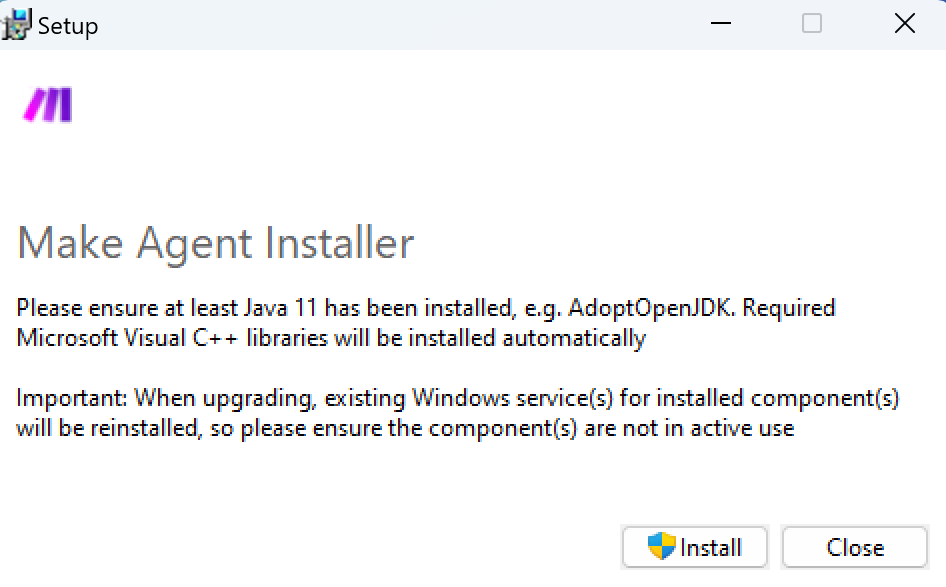
Important
Since the installer is at the moment not signed by a trusted authority, you might face such a warning:
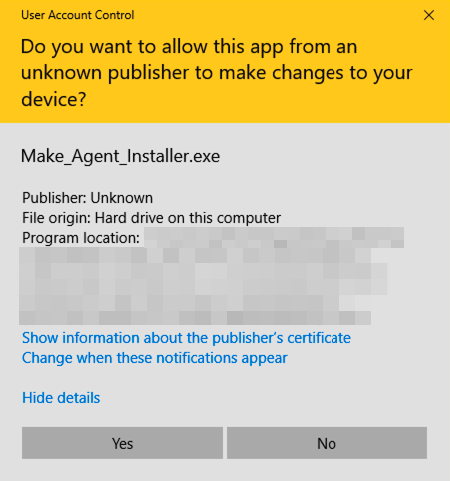
Click Yes to continue the installation process.
Insert the credentials you saved when creating the On-prem agent in Make.
In the Client ID field, insert the Client ID.
In the Secret field, insert the secret.
In the Base URL field, insert the base URL.
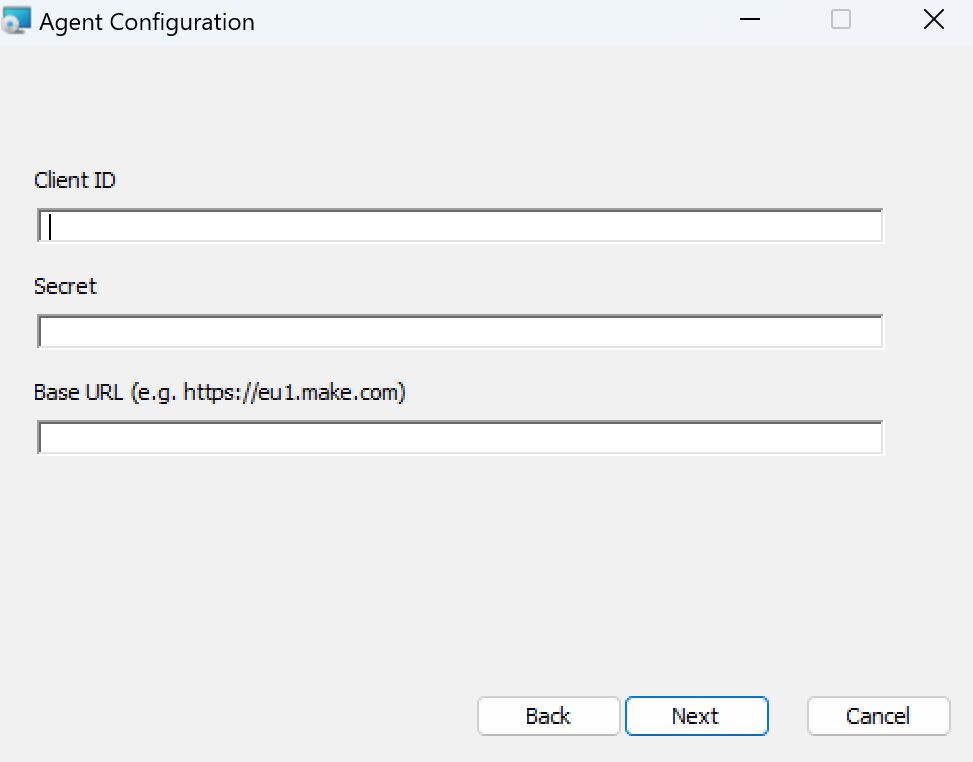
Click Next.
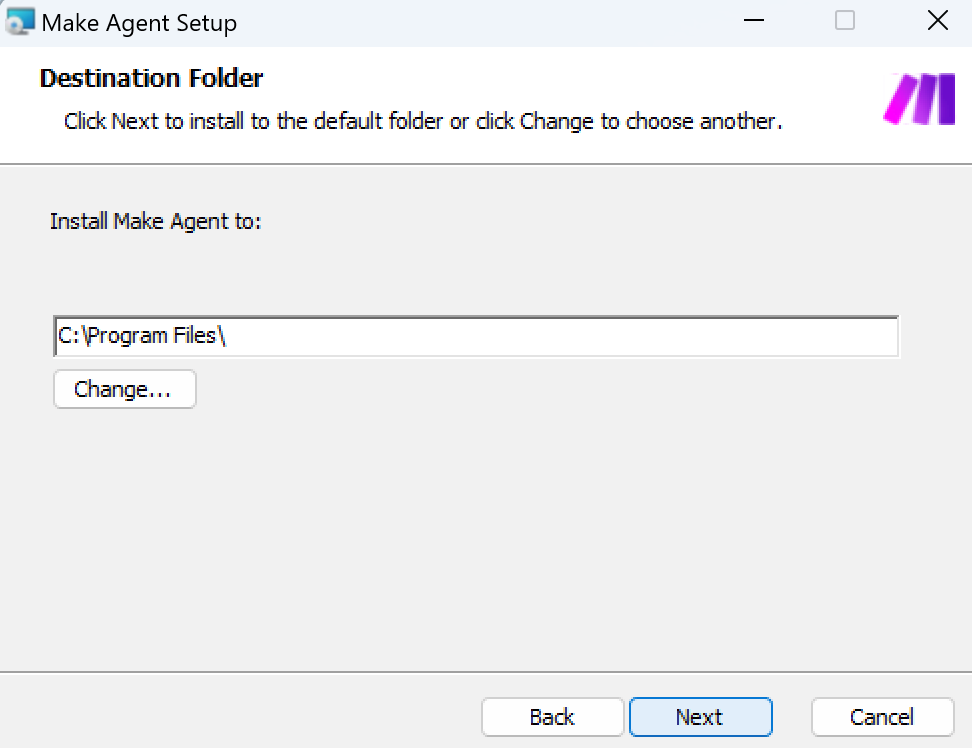
Select the path. Click Next.
Make sure your internet connection is stable. Click Install.
Complete the installation by clicking Finish.
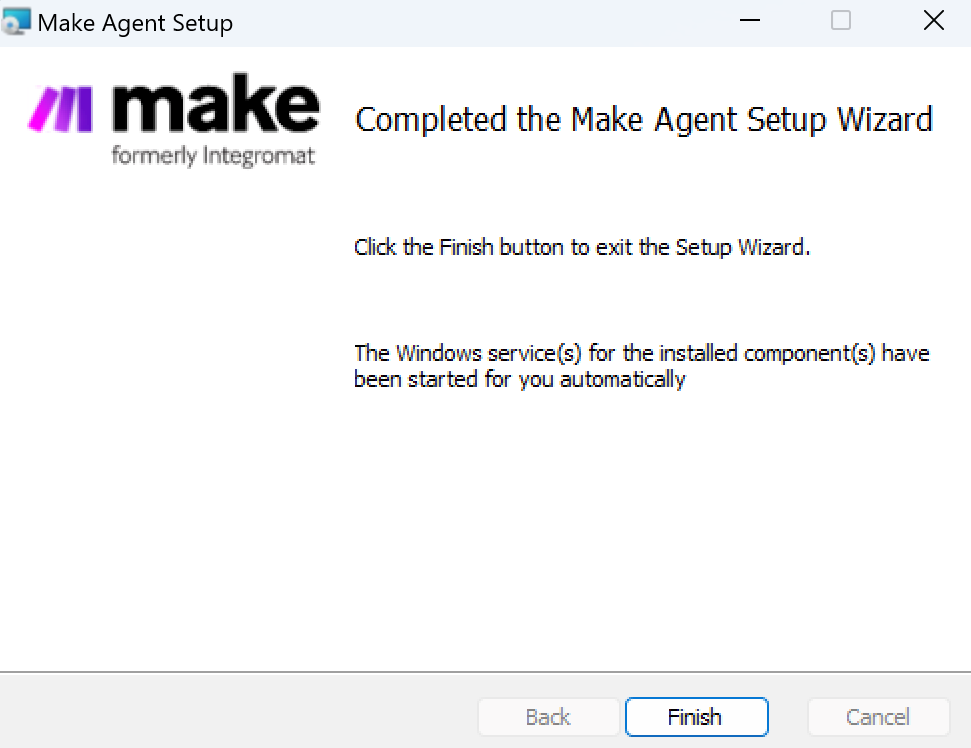
A confirmation window appears. Click Close.
The On-prem agent status changes to Active in Make after refreshing the On-prem agents page. You can connect a system to it.
 |
You can also check if the installation is successful:
Open the Services app on your computer.
In the list of services, find Make Agent. If the status is Running, you can start using the On-prem agent in Make. If there is no status, check the troubleshooting guide.

Important
The installer works only for the agent you've downloaded. If you need to run more than one agent on your server, you need to download the installer once again and repeat the whole installation procedure.
Important
For the On-prem agent installation, you need to have the following already installed on your device:
Java 11 and above
Go to the folder where you saved the .ZIP archive.
Unzip the archive.
Open the
application-local.ymlfile and fill in the following fields with the data you saved when adding an On-prem agent in Makemake: authentication: client-idmake: authentication: client-secretmake: authentication: base-url
Save the changes in the file.
Open the Terminal.
Open the folder that you unzipped from the archive in the Terminal. It is called Linux-Mac.
Launch the file using this command:
java -jar agent.jar
The system launches the On-prem agent. If you see the
Successfully connected Agent with ID...andStarted to poll for tasksstrings, it means the Agent is installed successfully. You can connect a system to it.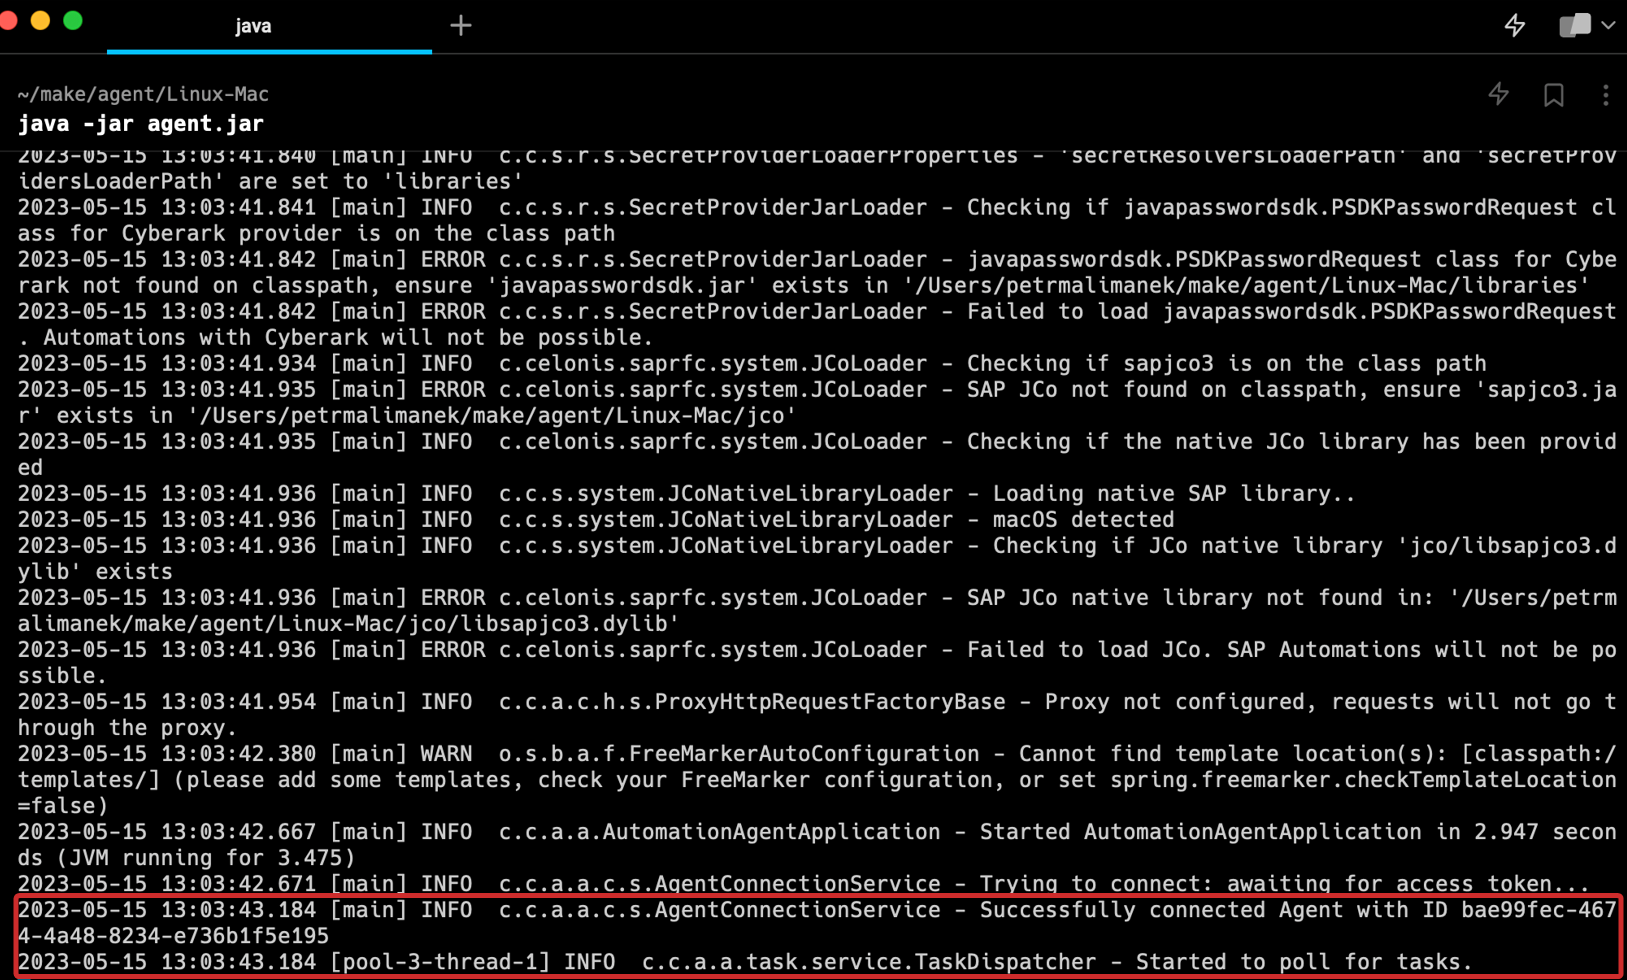
Important
For the On-prem agent installation, you need to have the following already installed on your device:
Java 11 and above
Go to the folder where you saved the .ZIP archive.
Unzip the archive.
Copy the
application-example.ymlfile, and rename the copied file toapplication-local.yml.Open the
application-local.ymlfile and fill in the following fields with the data you saved when adding an On-prem agent in Make:make: authentication: client-idmake: authentication: client-secretmake: authentication: base-url
Save the changes in the file.
Open the Terminal.
Open the folder that you unzipped from the archive in the Terminal. It is called Linux-Mac.
Launch the file using this command:
java -jar agent.jarThe system launches the On-prem agent. If you see the
Successfully connected Agent with ID...andStarted to poll for tasksstrings, it means the Agent is installed successfully. You can connect a system to it.
Connecting a system
Once you installed the On-prem agent, you can connect it to an application (a connected system). You can connect several systems to one On-prem agent.
Important
Only users with the Owner, Admin, and App dev organization roles can connect a system.
Note
In the BETA version, Make supports only HTTP Agent for the On-prem agent. There will be more apps in the future.
Connect the HTTP system
Go to the On-prem agents section and click the active agent that you want to use for a particular system (application).

Click Connect system.
In the Name field, insert a connection name. This name appears when adding an application module to a scenario.
In the Choose app to connect dropdown list, select the HTTP Agent app.
Define the base URL to the application API.
Tip
The URL contains a host, a port, and a definition of API for a particular app. If the app runs on the same device where the On-prem agent is installed, the host is
localhost. If the app runs on another device, the host is the device IP address. The port and the API definition vary based on the app.In this example URL:
https://localhost:3000/api:the host is
localhostthe port is
3000the definition of API is
/api
In the URL field, insert the URL to the application API.
Click Save.
In the connected systems list, you see a new connection that works with this specific On-prem agent. Now you can start building a scenario.
Note
You might be asked to renew the access to the connected system after a certain period of time. If so, click Revoke in the Connected systems section.
Creating a connection in the scenario
To create a connection , go to the scenario editor.
Note
Currently, Make supports only HTTP Agent application for the On-prem agent usage.
Click Create a new scenario.
Select the HTTP Agent from the dropdown list.
Select a module and connect it to Make.
Finish configuring the module settings.
After adding the module, you can continue building your scenario. The module uses your selected On-prem agent.
On-prem agent status
The following table explains the possible On-prem agent status.
Status | Description | Recommended next steps |
|---|---|---|
Active | The On-prem agent is installed on your device and works under normal conditions. You can connect a system to it and use it in scenarios. | |
Not responding | The On-prem agent is disconnected. Make checks its activity every four minutes. If the On-prem agent doesn't respond, it means the Internet connection is lost. | Check On-prem agent troubleshooting. WarningWhen in |
Registered | The On-prem agent is created and appears in the On-prem agents section. |
|
Stopped | The On-prem agent was stopped manually. | Make your On-prem agent active again if needed. |
Troubleshooting
Here you can find solutions for the most common issues when working with the On-prem agent in Make.
If the installation process breaks, and the progress bar remains the same, do the following:
Check if you have these drives installed and updated:
Visual Studio 2019
AdoptOpenJDK 11
Java 11 and above
Restart the installation process.
The following error appears if you have the wrong version of Java installed on your device:
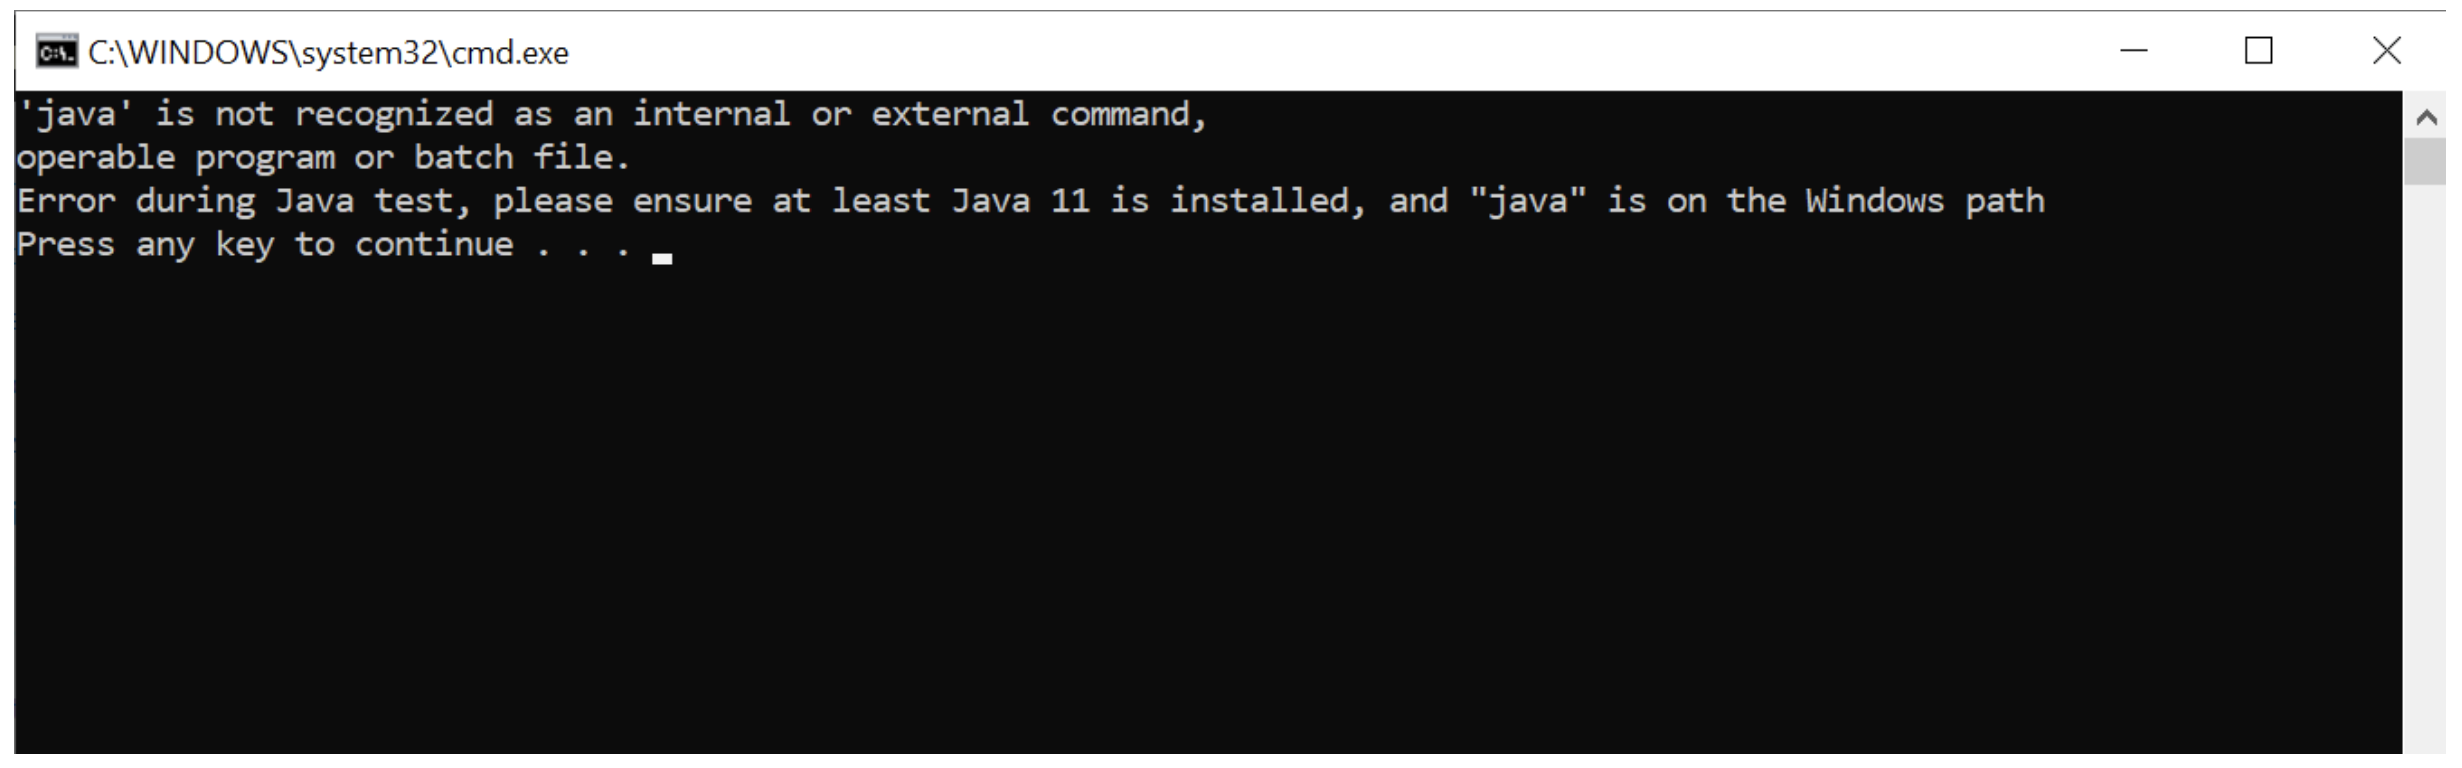 |
Do the following:
Open the Command line.
Use the
echo %JAVA_HOME%command to make sure Java is in the Windows PATH variable.Use the
java -versioncommand to make sure Java 11 or above is installed.
Right-click the installer and click Run as Administrator.
Check and do the following:
The device where the On-prem agent is installed is operational.
The device is connected to the Internet.
The Internet connection is stable.
Your firewall and anti-virus software don't block the On-prem agent.
Restart the On-prem agent on your device (Windows only):
Open the Services app.
Find the Make Agent service in the list.
Click Restart the service.
If you open the Services app on Windows and see that the Make Agent app doesn't have the Running status, you can do the following:
Go to the folder where you saved the On-prem agent on your machine.
Open the application-local file and check your credentials: Client ID, Secret, and Base URL.
Open the logs folder and locate the problem.