HubSpot CRM
With HubSpot CRM modules in Make, you can manage the events, records, contacts, engagements, files, and form submissions in your HubSpot CRM account.
To use the HubSpot CRM modules, you must have a HubSpot CRM user account. You can create a user account at https://app.hubspot.com/signup-hubspot.
To use HubSpot CRM webhooks and a few other features, you must have a HubSpot CRM developer account. You can create a developer account at https://app.hubspot.com/signup-hubspot/developers.
Refer to the HubSpot API Documentation for a list of available endpoints.
Connect Hubspot CRM to Make
To establish the connection in Make:
Log in to your Make account, add a Hubspot CRM module to your scenario, and click Create a connection.
Note: If you add a module with an
instanttag, click Create a webhook, then Create a connection. You will need to have a developer account and use advanced settings for this feature. For more information, see Connect Hubspot CRM to Make using advanced settings below.Optional: In the Connection name field, enter a name for the connection.
Click Save.
If prompted, authenticate your account and confirm access.
You have successfully established the connection. You can now edit your scenario and add more Hubspot CRM modules. If your connection requires reauthorization at any point, follow the connection renewal steps here.
The following modules require a Hubspot CRM developer account and a connection using advanced settings:
Watch Notifications (uses a webhook)
Create a Timeline Event
List Timeline Event Templates
To establish the connection using advanced settings, you must:
Create a Hubspot CRM custom application
To create a custom application:
Log in to your HubSpot developer account.
If you do not have any existing apps, click on Create an app . If you have existing apps, click on Manage apps > Create app.
In the App Info tab, enter the following details:
Public app name
Enter the app name.
App logo (Optional)
Click the Upload button to add an image.
Description (Optional)
Enter the app details.
In the Auth tab, enter the following details:
Install URL (OAuth)
Leave this field blank.
Redirect URLs
Enter
https://www.integromat.com/oauth/cb/hubspotcrmScopes
This is only required if you are using the Watch Notifications module, as this module requires a webhook.
Add required scopes based on the subscriptions you will watch for. Refer to the Required Permissions for Hubspot CRM Webhooks Custom App Scopes column for the required scopes to include.
If you are not using a webhook module, you can leave this section blank.
Click Save changes.
Scroll up to the App credentials section, copy the Client ID and Client Secret values, and store them in a safe place.
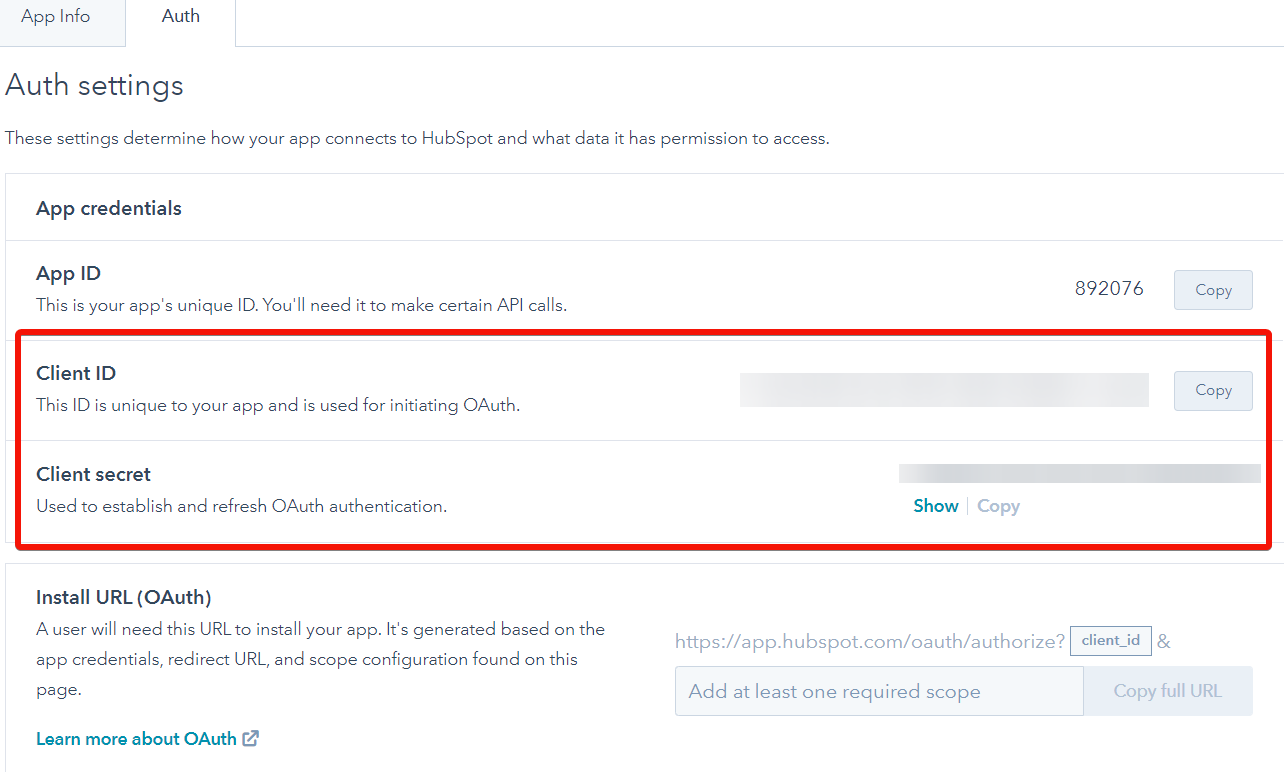
You now have the client credentials to use when creating your OAuth connection in Make .
Note
Each HubSpot CRM Custom Application can only be associated with one webhook URL. To watch for multiple events (subscriptions), add all desired subscriptions when configuring the module in Make.
Refer to your HubSpot CRM subscription for information regarding how many Custom Applications you can create.
Obtain your Hubspot CRM developer API key and User ID
To obtain your API key and User ID:
In your HubSpot developer account, click on the Apps tab in the top menu.
Click Get HubSpot API key.
If you have an existing API key, click Show key and copy the key value. If you do not have an existing key, click the Create key button and copy the key value. Store it in a safe place.
Copy your User ID and store it in a safe place.
You now have the API key and User ID values to use when creating your webhook's OAuth connection in Make .
Establish an OAuth connection between Hubspot CRM and Make
To establish your OAuth connection:
Log in to your Make account, add a Hubspot CRM module to your scenario, and click Create a connection.
Note: If you add a module with an
instanttag, click Create a webhook, then Create a connection.Optional: In the Connection name field, enter a name for the connection.
Click Show advanced settings.
In the HubSpot Developer API Key and User ID fields, enter the values you saved in Obtain your Hubspot CRM developer API key and User ID above.
In the Client ID and Client Secret fields, enter the client credentials you a saved in Create a Hubspot CRM custom application above.
Click Save.
If prompted, authenticate your account and confirm access.
Select the associated user account to connect to and click Choose Account.
Confirm access by clicking Connect app.
If you are using a webhook module, in the Subscriptions field of the module, add or map the Subscription Type to watch for.
Note: Make sure you add all desired subscriptions (and their scopes) as this field cannot be updated at a later time.
Click Save.
You have successfully established the connection. You can now edit your scenario and add more HubSpot CRM modules. If your connection requires reauthorization at any point, follow the connection renewal steps here.
When using the Watch Notificationsinstant module, the following permissions must be added as HubSpot CRM custom app Scopes and OAuth connection Custom Scopes.
Subscription | Custom App Scopes | Connection Custom Scopes |
Company - created |
| CRM Companies Read |
Company - deleted |
| CRM Companies Read |
Company - specified property is changed |
| CRM Companies Read |
Contact - created |
| CRM Contacts Read |
Contact - deleted |
| CRM Contacts Read |
Contact - deleted for privacy compliance reasons |
| CRM Contacts Read |
Contact - specified property is changed |
| CRM Contacts Read |
Deal - created |
| CRM Deals Read |
Deal - deleted |
| CRM Deals Read |
Deal - specified property is changed |
| CRM Deals Read |
For permission information regarding additional subscriptions, refer to the HubSpot Developer Webhook subscriptions documentation.
Legacy API
If you are using the legacy version of HubSpot, refer to the HubSpot Legacy Docs Webhooks documentation for permission information.
HubSpot CRM Video Tutorial
This tutorial explains how to build a scenario that grabs new contacts from HubSpot CRM, inserts their information into a Google Docs Template, uploads the compiled document to Dropbox, and sends it via Gmail.
Build Hubspot CRM Scenarios
After connecting the app, you can perform the following actions:
Watch CRM Objects
Search for CRM Objects
Get a Record Property
Create a Custom Object Record
Get a Custom Object Record
Update a Custom Object Record
Delete a Custom Object Record
Watch Contacts Added to a List
Watch Contacts
Create or Update a Contact
Add Contacts to a List
Remove a Contact from a List
List Contacts
Create a Contact
Update a Contact
Get a Contact
Search for Contacts
Merge Contacts
Delete a Contact
Watch Deals
Create a Deal
Update a Deal
Get a Deal
List Deal/Ticket Pipelines
Search for Deals
Delete a Deal
Watch Companies
Create a Company
Update a Company
Get a Company
Search for Companies
Delete a Company
Watch Engagements
Create an Engagement
Delete an Engagement
These modules require a Hubspot CRM developer account and a connection using advanced settings.
Watch Notifications
Create a Timeline Event
List Timeline Event Templates
Watch Files
Create a Folder
List Files
Upload a File
Update File Properties
Delete a File
Delete a Folder
Get an Owner
List Owners
Watch Tickets
Create a Ticket
Update a Ticket
Get a Ticket
Search for Tickets
Delete a Ticket
Watch Submissions for a Form
Get a File Uploaded via Form
List Forms
Submit Data to a Form
Add a Contact to a Workflow
Remove a Contact from a Workflow
Note: You cannot subscribe a contact to an email address that is already subscribed.
Watch Subscriptions Timeline for a Portal
Subscribe Contact
Unsubscribe a Contact
Create an Association
List Associations
Delete an Association
Create a Call
Update a Call
Get a Call
Search for Calls
Delete a Call
Create a Note
Update a Note
Get a Note
Search for Notes
Delete a Note
Create a Task
Update a Task
Get a Task
Search for Tasks
Delete a Task
Create a Product
Update a Product
Get a Product
Search for Products
Delete a Product
Create a Line Item
Update a Line Item
Get a Line Item
Get a Line Item
Search for Line Items
Delete a Line Item
Create an Order
Update an Order
Get an Order
Search for Orders
Delete an Order
Create a Meeting
Update a Meeting
Get a Meeting
Search for Meetings
Delete a Meeting
Create an Email
Update an Email
Get an Email
Search for Emails
Delete an Email
Create a Communication
Update a Communication
Get a Communication
Search for Communications
Delete a Communication
Get an Invoice
Search for Invoices
Search for Quotes
Create a Quote
Get a Quote
Update a Quote
Delete a Quote
Make an API Call
Numeric Value Character Limit
HubSpot imposes a 18 digit character limit for numeric values and automatically truncates values that exceed the limit. For example, when you filter by a custom field with more than 18 digits, the API will automatically truncate the number to 18 digits.
To disconnect the Make app from your HubSpot CRM account:
Log in to your HubSpot account.
Go to the App Marketplace and click Manage Apps.
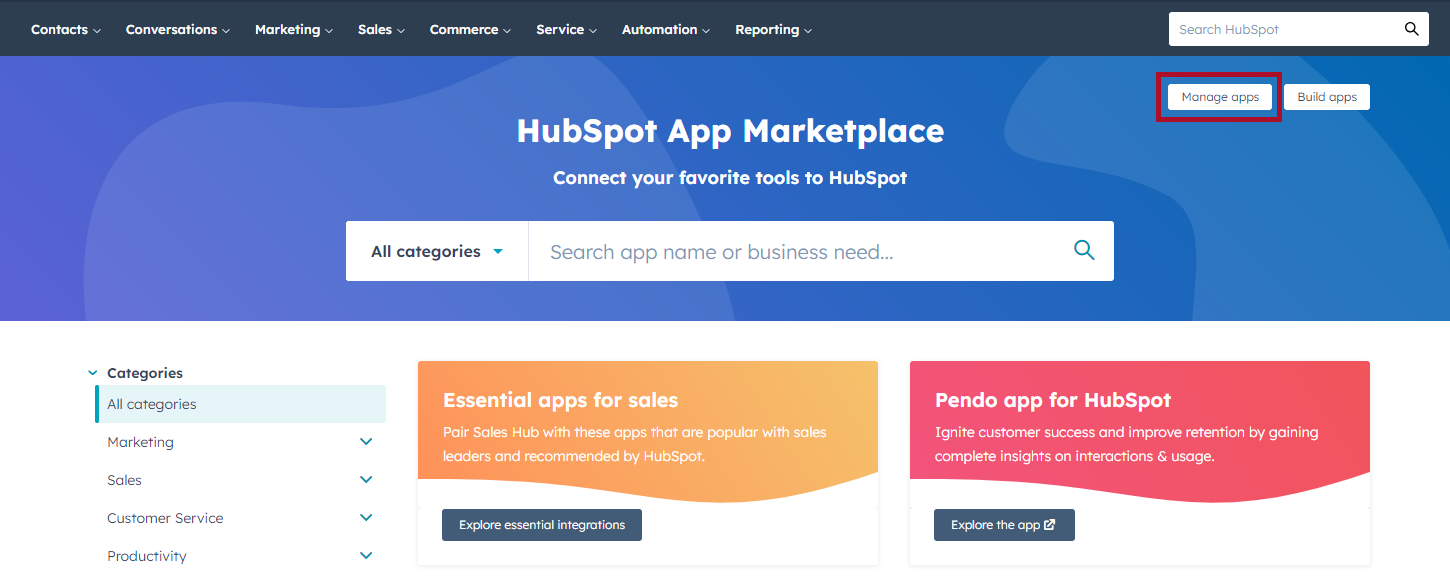
Under the Connected apps section, in the app you want to disconnect, click Actions > Uninstall.

The app has been disconnected.