Textline
The Textline modules allow you to monitor, create, update, send, retrieve, list, and delete announcements, agents, conversations, and customers in your Textline account.
Getting Started with Textline
Prerequisites
A Textline account - you can create a Textline account at textline.com/.
Note
The module dialog fields that are displayed in bold (in the Make scenario, not in this documentation article) are mandatory!
To connect your Textline account to Make you need to obtain an access token from your Textline account and insert it in the Create a connection dialog in the Make module.
1. Log in to your Textline account.
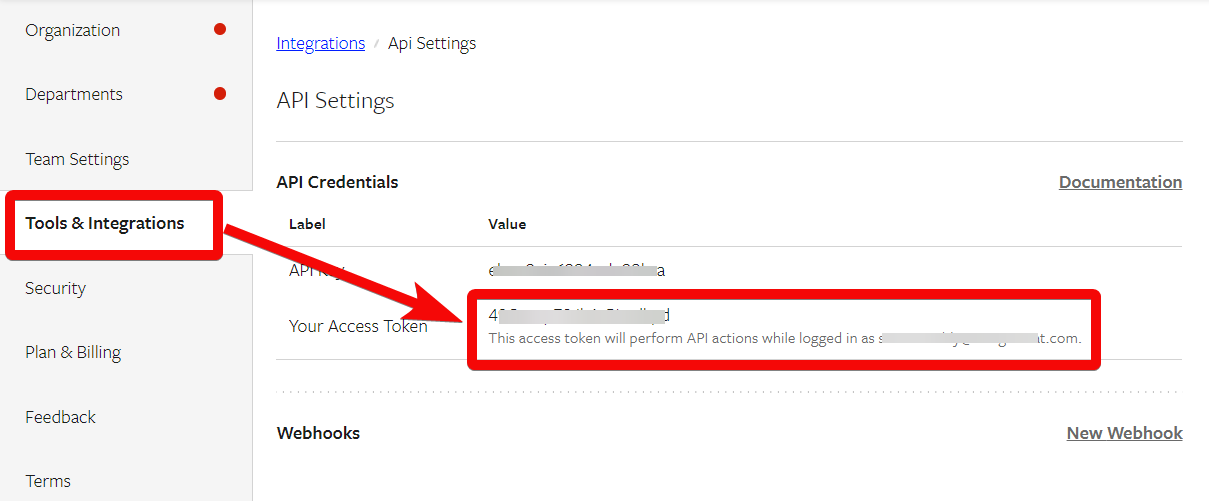
2. Click Settings > Tools & Integrations > Developer API.
3. Copy the Access Token to your clipboard.
4. Go to Make and open the Textline module's Create a connection dialog.
5. In the Connection name field, enter a name for the connection.
6. In the Access Token field, enter the token copied in step 4, and click Continue.
The connection has been established.
See Setting Up Textline Webhooks to add the webhooks in your Textline account.
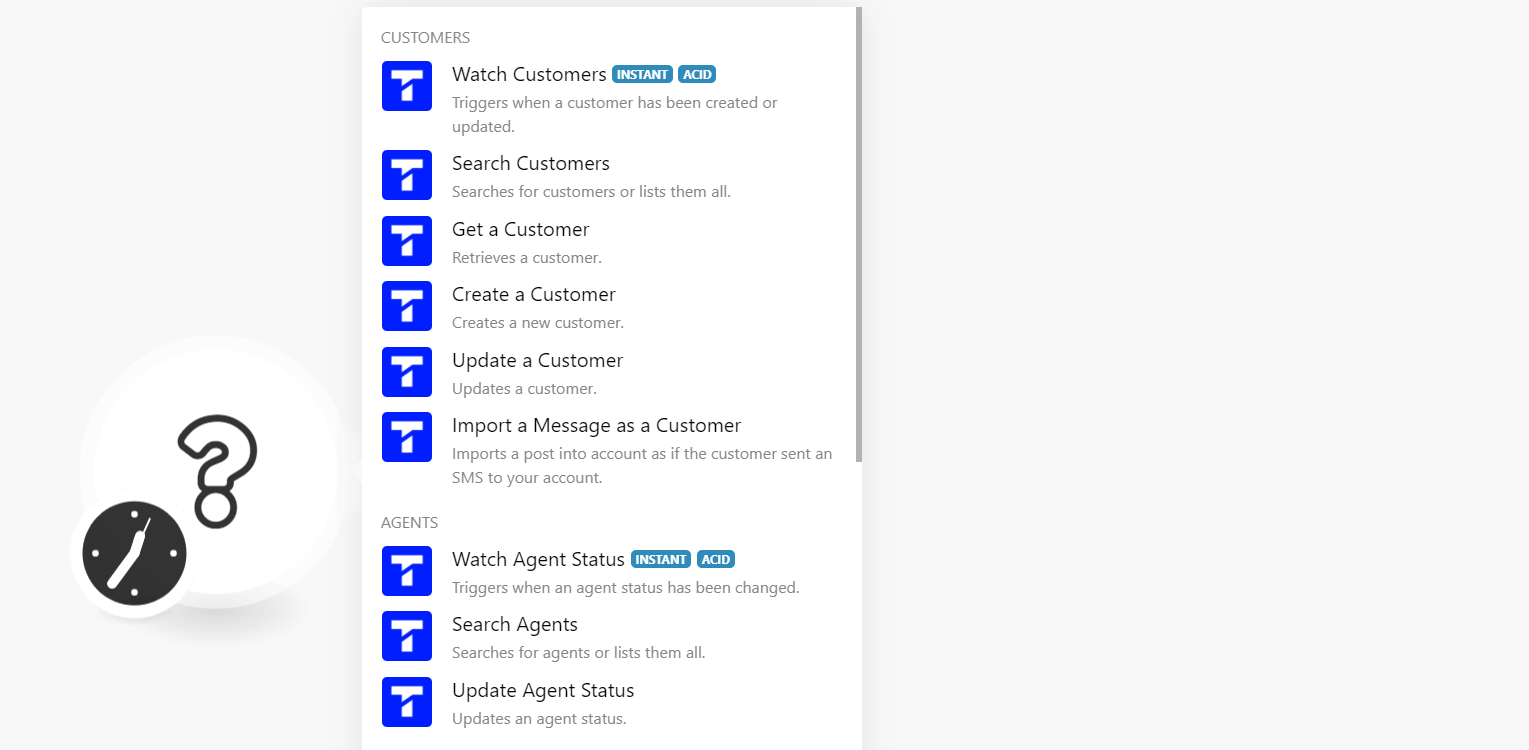
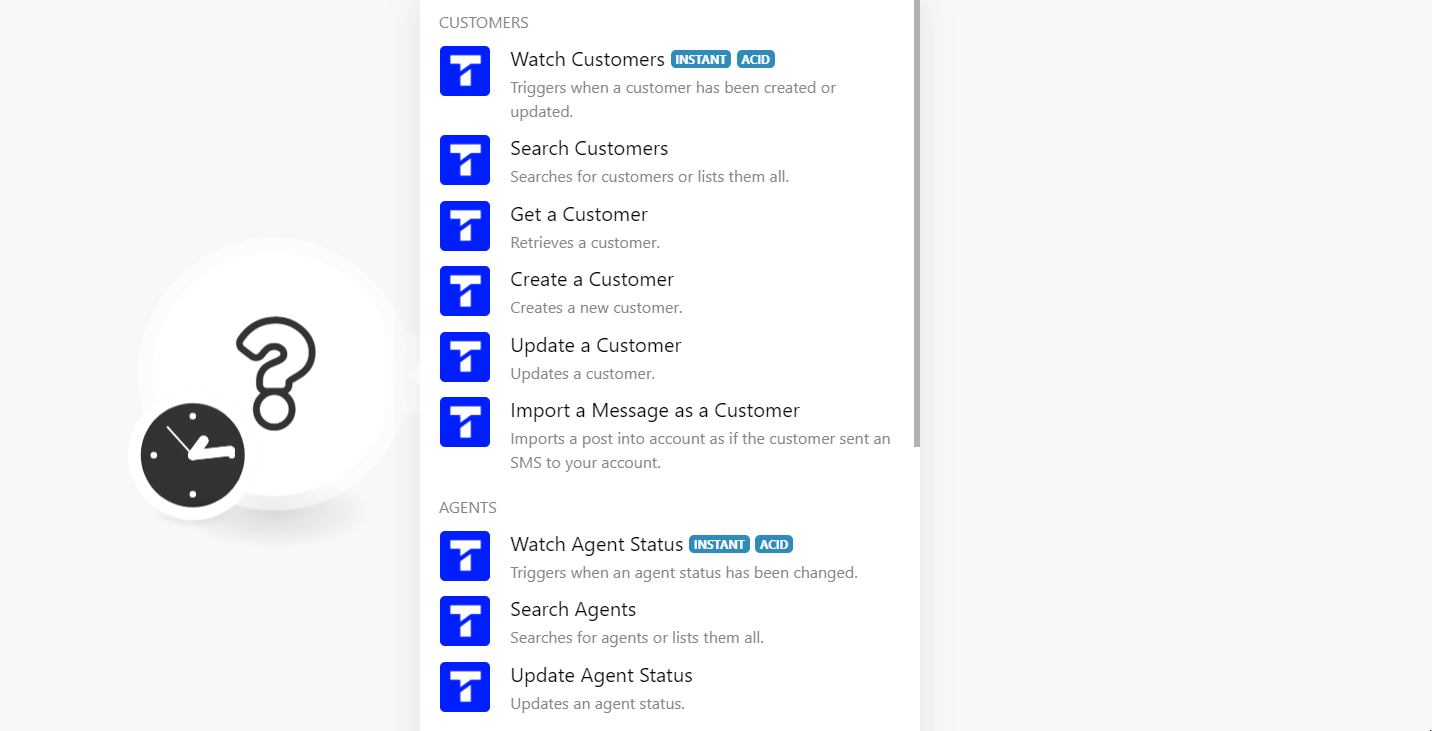
Watch Customers
Triggers when a customer has been created or updated.
Webhook Name | Enter a name for the webhook. |
Connection |
Search Customers
Searches for customers or lists them all.
Connection | |
Search | Enter (map) a keyword or phrase to search the customers that match the specified criteria. |
Limit | Set the maximum number of customers Make will return during one execution cycle. |
Get a Customer
Retrieves a customer.
Connection | |
Customer UUID | Select or map the Customer UUID whose details you want to retrieve. |
Create a Customer
Creates a new customer.
Connection | |
Phone Number | Select or map the phone number of the customer. For example, (222) 222-2222. |
Enter (map) the email address of the customer. | |
Name | Enter (map) the customer name. |
Notes | Enter (map) the additional information about the customer. |
Tags | Add the tags for the customer. |
Custom Fields | Add the custom fields and their values. For example, address. NoteTo update the custom field for a customer, you must first get the custom field's UUID and use that to replace field_uuid. |
Update a Customer
Updates a customer.
Connection | |
Customer UUID | Select or map the Customer UUID whose details you want to update. For example, (222) 222-2222. |
Enter (map) the email address of the customer. | |
Name | Enter (map) the customer name. |
Notes | Enter (map) the additional information about the customer. |
Tags | Add the tags for the customer. |
Archived | Select whether the customer is archived. |
Custom Fields | Add the custom fields and their values. For example, address. NoteTo update the custom field for a customer, you must first get the custom field's UUID and use that to replace field_uuid. |
Import a Message as a Customer
Imports a post into your account as if the customer sent an SMS to your account.
Connection | |
Phone Number | Select or map the phone number of the contact whose conversation message you want to retrieve. For example, (222) 222-2222 |
Body | Enter (map) the message text. |
Group UUID | Select or map the Group UUID to which the contact belongs. |
See Setting Up Textline Webhooks to add the webhooks in your Textline account.
Watch Agent Status
Triggers when an agent's status has been changed.
Webhook Name | Enter a name for the webhook. |
Connection |
Search Agents
Searches for agents or lists them all.
Connection | |
Agent UUID | Select or map the Agent UUID whose details you want to list. |
Enter (map) the email address to list the agents that match the specified email address. | |
Limit | Set the maximum number of agents Make should return during one execution cycle. |
Update Agent Status
Updates an agent's status.
Connection | |
Agent UUID | Select or map the Agent UUID whose status you want to update. |
Available | Select the checkbox to make the agent status to available. |
See Setting Up Textline Webhooks to add the webhooks in your Textline account.
Watch Customer Posts
Triggers when a message from a customer has been received.
Webhook Name | Enter a name for the webhook. |
Connection |
Watch Outbound Messages
Triggers when an outbound message has been sent.
Webhook Name | Enter a name for the webhook. |
Connection |
Watch Conversation Status
Triggers when a conversation status has been changed.
Webhook Name | Enter a name for the webhook. |
Connection |
Watch Whisper
Triggers when a whisper from an agent has been received.
Webhook Name | Enter a name for the webhook. |
Connection |
Message a Phone Number
Sends an outbound message to a phone number.
Connection | |
Phone Number | Enter (map) the phone number to which you want to send the message. |
Body | Enter (map) the message text you want to send. |
Resolve | Select the checkbox to resolve the message text after sending the message. |
Group UUID | Select or map the Group UUID of the department from which you want to retrieve conversations. If you are not using a department UUID then the message will go out on your first department. |
Attachments | Add the URL addresses of the attachments which you want to attach to the message. |
Message a Conversation
Sends an outbound message to a conversation.
Connection | |
Conversation UUID | Select or map the Conversation UUID you want to message. |
Body | Enter (map) the message text you want to send. |
Resolve | Select the checkbox to resolve the message text after sending the message. |
Attachments | Add the URL addresses of the attachments which you want to attach to the message. |
Send a Survey
Sends a new survey.
Connection | |
Survey UUID | Select or map the Survey UUID you want to send. |
Selection Type | Select or map the option to send the survey:
|
Tags | Add the survey tags separated by a comma. |
Phone Numbers | Add the phone number of the contacts to whom you want to send the survey. |
Saved Search UUID | Enter (map) the saved Search UUID to whom you want to send the survey. |
Send an Announcement
Sends an announcement to a group of contacts.
Connection | |
Selection Type | Select or map the option to send the announcement:
|
Tags | Add the tags of the contact separated by a comma to send the announcement that matches the specified tag. |
Phone Numbers | Add the phone number of the contacts to whom you want to send the announcement. |
Group UUID | Select or map the Group UUID to whose contact you want to send the announcement. |
Comment Body | Enter (map) the announcement text. |
Title | Enter (map) a title for the announcement. |
Resolve on Send | A true/false value to set whether the conversation opened after an announcement is sent should be resolved. This does not affect conversations open before the announcement is sent. |
Assignment Target UUID | Enter (map) the UUID of the agent that should be assigned any conversations created (and opened) as a result of the announcement. |
Reply Window Value | Enter (map) time in seconds after which any message sent in by the contact should be considered a reply to the announcement. |
Reply Assignment Target UUID | Select or map the UUID of the agent that should be assigned any conversations opened as a result of a contact replying to the announcement. |
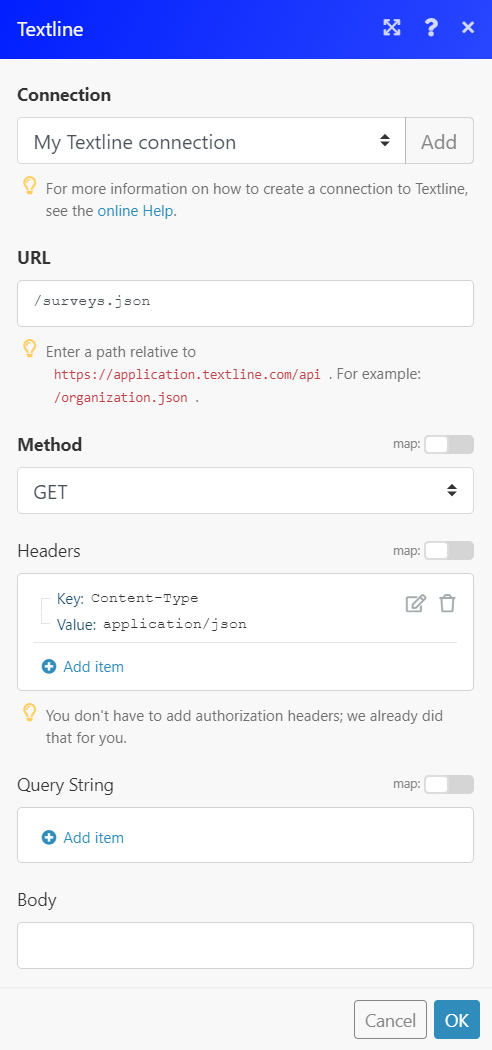
Make an API Call
Performs an arbitrary authorized API call.
Connection | |
URL | Enter a path relative to NoteFor the list of available endpoints, refer to the Textline API Documentation. |
Method | Select the HTTP method you want to use: GET to retrieve information for an entry. POST to create a new entry. PUT to update/replace an existing entry. PATCH to make a partial entry update. DELETE to delete an entry. |
Headers | Enter the desired request headers. You don't have to add authorization headers; we already did that for you. |
Query String | Enter the request query string. |
Body | Enter the body content for your API call. |
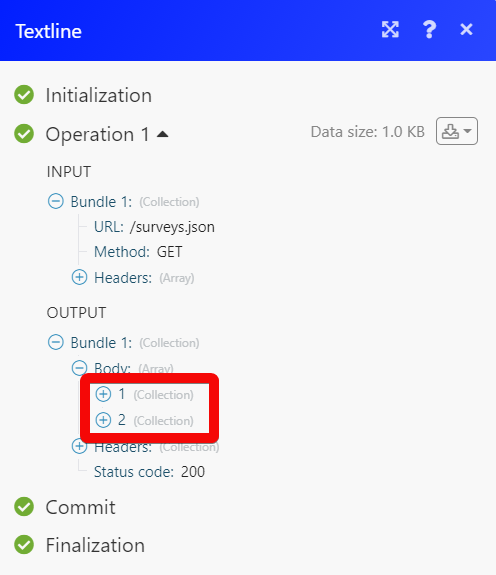
Example of Use - List Surveys
The following API call returns all the surveys from your Textline account:
URL: /surveys.json
Method: GET
Matches of the search can be found in the module's Output under Bundle > Body > data. In our example, 2 surveys were returned:
1. Open any Watch module, establish a connection and copy the URL address to your clipboard. Click OK and save the trigger.
2. Log in to your Textline account.
3. Click Settings > Tools & Integrations > Developer API > New Webhook.
4. Enter the following details:
Type: Select the type of event you want to watch
URL: Enter (map) the URL address copied in step 1
Method: Select the HTTPS request method.
5. Click Save.
The webhook is successfully set up. Go back to Make and run the scenario module to receive triggers when the specified event occurs.