Transloadit
The Transloadit modules allow you to monitor and manage jobs, tasks, and import&export files in your Transloadit account.
Prerequisites
A Transloadit account
In order to use Transloadit with Make, it is necessary to have a Transloadit account. If you do not have one, you can create a Transloadit account at transloadit.com.
Note
The module dialog fields that are displayed in bold (in the Make scenario, not in this documentation article) are mandatory!
Connecting Transloadit to Make
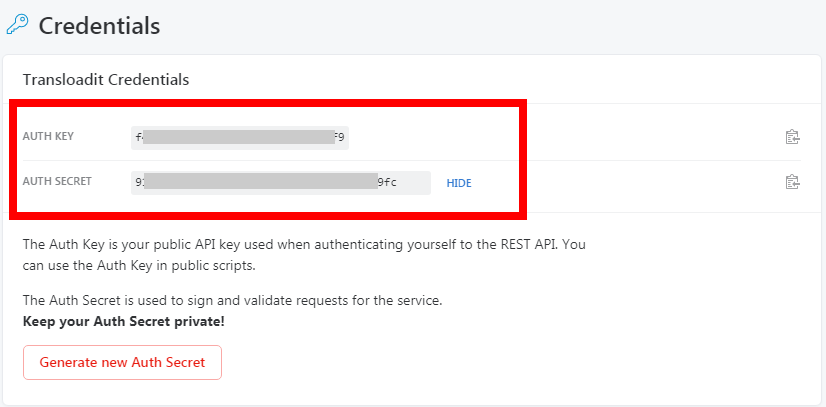
To connect your Transloadit account to Make you need to obtain the Auth Secret and Auth Key from your Transloadit account and insert it in the Create a connection dialog in the Make module.
Log in to your Transloadit account and click Credentials

Copy the Auth Key and Auth Secret to a safe place.
Go to Make and open the Transloadit module's Create a connection dialog.
In the Connection name field, enter a name for the connection.
In the Secret and Key fields, enter the details copied in step 2 respective fields and click Continue.
The connection has been established.
Assemblies
See the Setting Up the Transloadit Webhooks to add webhooks in your Transloadit account.
Triggers when a new assembly is finished.
Webhook Name | Enter a name for the webhook. |
Connection |
Triggers when an assembly with at least one result is finished.
Webhook Name | Enter a name for the webhook. |
Connection |
Triggers when an assembly with at least one result is finished.
Connection | |
Limit | Set the maximum number of assemblies Make should return during one scenario execution cycle. |
Lists assemblies.
Connection | |
Limit | Set the maximum number of assemblies Make should return during one scenario execution cycle. |
The types of assemblies | Select the type of assemblies you are searching for:
|
From Date | Enter the date to search the assemblies created on or after the specified date. |
To Date | Enter the date to search the assemblies created on or before the specified date. |
Keywords | Enter the keywords to search the assemblies that match the query. |
Gets an assembly.
Connection | |
The method of obtaining the status of the assembly | Select the option to choose the assembly whose details you want to retrieve:
|
Assembly ID | Select the Assembly ID whose details you want to retrieve. |
Assembly SSL URL | Enter the assembly SSL URL address which the machine details that controls the assembly whose details you want to retrieve.When you create an assembly, you will see the field with the name Assembly SSL URL in the details. 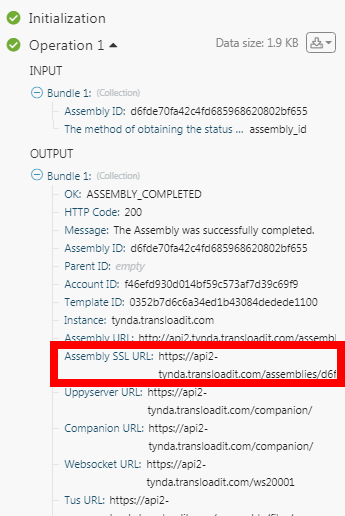 |
Creates an assembly.
Connection | |
The method of presenting the instructions of the assembly | Select the option to create the assembly:
|
Template ID | Select the Template ID to create the assembly. |
Steps | Enter the steps or assembly instructions to process the files. |
Notify URL | Enter the notification URL address. Transloadit can send a pingback to your server when the assembly is completed. The notification URL address sends the assembly status in JSON string inside a transloadit field in a multipart POST request to the URL supplied here. |
Fields | Add the custom fields and their value which can be used as Assembly Variables.For example, to dynamically have resized images based on an end-user provided width, use {
"user_width": 800
} |
Updates an assembly.
Connection | |
Assembly URL | Enter the assembly URL address whose details you want to update. |
The method of presenting the instructions of the assembly | Select the option to create the assembly:
|
Template ID | Select the Template ID which contains the assembly instructions. |
Steps | Enter the steps or assembly instructions to process the files. |
Notify URL | Enter the notification URL address. Transloadit can send a pingback to your server when the assembly is completed. The notification URL address sends the assembly status in JSON string inside a Transloadit field in a multipart POST request to the URL supplied here. |
Fields | Add the custom fields and their value which can be used as Assembly Variables.For example, to dynamically have resized images based on an end-user provided width, use {
"user_width": 800
} |
Reparse Template | Select the reparsing template to update:
|
Cancels an assembly (and upload if that is still in progress).
Assembly SSL URL | Enter the assembly SSL URL address which the machine details that controls the assembly you want to cancel.When you create an assembly, you will see the field with the name Assembly SSL URL in the details. |
Other
See the Setting Up the Transloadit Webhooks to add webhooks in your Transloadit account.
Triggers when an image face detection is complete.
Webhook Name | Enter a name for the webhook. |
Connection |
See the Setting Up the Transloadit Webhooks to add webhooks in your Transloadit account.
Triggers when an iPad video optimization is completed.
Webhook Name | Enter a name for the webhook. |
Connection |
See the Setting Up the Transloadit Webhooks to add webhooks in your Transloadit account.
Triggers when an iPad video optimization is complete.
Webhook Name | Enter a name for the webhook. |
Connection |
Detects access in the image.
Connection | |
Import Robot | Select the option to import the files. For example, |
Import Credentials | Enter the template credentials.You must create your associated Template Credentials in your Transloadit account and use the name of your Template Credentials here. They will contain the values for your FTP host, user, and password. We recommend always using Template Credentials while some use cases demand dynamic credentials for which using Template Credentials with their static nature is too unwieldy. If you have this requirement, use the following parameters instead: |
Import Paths | Enter the path on your FTP server for searching the files.The files are imported recursively from all sub-directories and sub-sub-directories (and so on) from this path. |
Port | Enter the port to use for the FTP connection. For example, 21. |
Passive Mode | Select whether if you want to use passive mode for the FTP connection. |
Ignore Errors | Add the error you want to ignore. For example, |
Export Robot | Select the option to export the files. For example, |
Crop | Select whether the detected faces should be extracted. If you chose No, then the Robot returns the input image, but with the coordinates of all detected faces attached to file.meta.faces in the result JSON. If you chose Yes, the Robot will output all detected faces as images. |
Faces | Select the option to detect faces. In addition to the specified values, you can specify any integer number. The faces are sorted by their top-left corner and the integer determines the index of the returned face. Be aware the values are zero-indexed, meaning that faces: 0 will return the first face. If no face for a given index exists, no output is produced. |
Minimum Confidence | Enter the minimum confidence that a detected face must have. The value must be a number out of 100. Only faces that have a higher confidence value than this threshold will be included in the result. |
Notify URL | Enter the notification URL address. Transloadit can send a pingback to your server when the assembly is completed. The notification URL address sends the assembly status in JSON string inside a Transloadit field in a multipart POST request to the URL supplied here. |
Fields | Add the custom fields and their value which can be used as Assembly Variables. For example, to dynamically have resized images based on an end-user provided width, use {
"user_width": 800
} |
Converts a video to WebM.
Connection | |
Import Robot | Select the option to import the files. For example, |
Import Credentials | Enter the template credentials.You must create your associated Template Credentials in your Transloadit account and use the name of your Template Credentials here. They will contain the values for your FTP host, user, and password. We recommend always using Template Credentials while some use cases demand dynamic credentials for which using Template Credentials with their static nature is too unwieldy. If you have this requirement, use the following parameters instead: |
Import Paths | Add the import paths. The path in your bucket to the specific file or directory. If the path points to a file, only this file will be imported. For example, js/my_javascript_file.js If it points to a directory, then all files from this directory will be imported. For example, js/. For Transloadit to recognize you want to import all files from a directory, make sure your path ends with a / slash. Directories are not imported recursively. If you want to import all files from the root directory, use / as the value here. In this case, ensure all your objects belong to a path. If you have objects in the root of your bucket that isn't prefixed with /, you'll receive a 404 BACKBLAZE_IMPORT_NOT_FOUND error. You can also use an array of path strings here to import multiple paths in the same Robot Step. |
Recursive | Select whether you want to enable importing files from subfolders of the given path. Use the pagination parameters |
Ignore Errors | Add the errors you want to ignore. For example, |
Export Robot | Select the option to export the files. For example, |
Preset | Select the option for a video according to pre-configured settings. If you specify your own FFmpeg parameters using the Robot's and/or do not want Transloadit to set any encoding setting, starting ffmpeg_stack: |
Width | Enter the width of the input video in pixels. |
Height | Enter the height of the input video in pixels. |
Resize Strategy | Select the resize strategy:
|
Background | Enter the background color you want in the resulting video in the |
Zoom | Select whether you want to zoom the videos. If selected No, smaller videos will not be stretched to the desired width and height. |
Crop X1 | Enter the coordinate for the upper left corner along the abscissa axis of the rectangle to be cropped. |
Y1 | Enter the coordinate for the upper left corner along the ordinate axis of the rectangle to be cropped. |
X2 | Enter the coordinate for the lower right corner along the abscissa axis of the rectangle to be cropped. |
Y2 | Enter the coordinate for the lower right corner along the ordinate axis of the rectangle to be cropped. |
Rotate | Enter the number in degrees for the video to be rotated by the specified degree integer. Currently, only multiples of 90 are supported.Transloadit automatically corrects the orientation of many videos when the orientation is provided by the camera.This option is only useful for videos requiring rotation because it was not detected by the camera. |
Hint | Select whether you want to enable hinting for mp4 files, for RTP/RTSP streaming. |
Turbo | Select whether you want to speed up the encoding, especially for large non-adaptive workloads. |
FFmpeg Stack | Selects the FFmpeg stack version to use for encoding. |
FFmpeg | Add the parameter object to be passed to FFmpeg.For available options, see the FFmpeg documentation. If a preset is used, the options specified are merged on top of the ones from the preset. The FFmpeg r parameter (framerate) has a default value of 25 and a maximum value of 60. If you set r to null, you clear the default of 25 and can preserve the original video's framerate. |
Watermark URL | Enter the URL address for the watermark image that will be overlaid above this image. Choose the image in PNG format. |
Watermark Position | Select the watermark position. For example, center, bottom, bottom-right. |
Watermark X Offset | Enter the number of pixels for X-offset at which the watermark will be placed in relation to the position it has due to the |
Watermark Y Offset | Enter the number of pixels for y-offset at which the watermark will be placed in relation to the position it has due to Values can be both positive and negative and yield different results depending on the Positive values move the watermark closer to the image's center point, whereas negative values move the watermark further away from the image's center point. |
Watermark Size | Enter the size of the watermark as a percentage. For example, |
Watermark Resize Strategy | Select the option for watermark resizing:
For example, our target video size is 800×800 pixels and our watermark image is 400×300 pixels. Let's also assume, the watermark_size parameter is set to If you select the Fit option with our watermark, the width is the longer side, and 25% of the video size would be 200px. Hence, the watermark would be resized to 200×150 pixels. If the watermark_size was set to If you select the Stretch, since our video is 800×800 pixels, for a watermark size of 25% the watermark would be resized to 200×200 pixels. Its height would appear stretched as it would be resized to 200×150 pixels keeping the aspect ratio in mind. If you select the Area option, the value from watermark_size is used for the percentage area size. |
Watermark Start Time | Enter the delay in seconds from the start of the video for the watermark to appear. By default, the watermark is immediately shown. |
Watermark Duration | Enter the duration in seconds for the watermark to be shown. Can be used together with watermark_start_time to create nice effects. The default value is -1.0, which means that the watermark is shown for the entire duration of the video. |
Watermark Opacity | Enter the opacity of the watermark. Valid values are between 0 (invisible) and 1.0 (full visibility). Enter a value between 0 and 1. |
Notify URL | Enter the notification URL address. Transloadit can send a pingback to your server when the assembly is completed. The notification URL address sends the assembly status in JSON string inside a Transloadit field in a multipart POST request to the URL supplied here. |
Fields | Add the custom fields and their value which can be used as Assembly Variables. For example, to dynamically have resized images based on an end-user provided width, use {
"user_width": 800
} |
Optimizes a video for iPad.
Connection | |
Import Robot | Select the option to import the files and enter the details. For example, |
Import Credentials | Enter the template credentials.You must create your associated Template Credentials in your Transloadit account and use the name of your Template Credentials here. They will contain the values for your FTP host, user, and password. We recommend always using Template Credentials while some use cases demand dynamic credentials for which using Template Credentials with their static nature is too unwieldy. If you have this requirement, use the following parameters instead: |
Import Paths | Add the import paths. The path in your bucket to the specific file or directory.If the path points to a file, only this file will be imported.For example, js/my_javascript_file.js If it points to a directory, then all files from this directory will be imported. For example, js/. For Transloadit to recognize you want to import all files from a directory, make sure your path ends with a / slash. Directories are not imported recursively. If you want to import all files from the root directory, use / as the value here.In this case, ensure all your objects belong to a path.If you have objects in the root of your bucket that isn't prefixed with /, you'll receive a 404 BACKBLAZE_IMPORT_NOT_FOUND error. You can also use an array of path strings here to import multiple paths in the same Robot Step. |
Recursive | Select whether you want to enable importing files from subfolders and subfolders, etc. of the given path.Use the pagination parameters |
Ignore Errors | Add the errors you want to ignore. For example, |
Export Robot | Select the option to export the files and enter the details. For example, |
Preset | Select the option for a video according to pre-configured settings. If you specify your own FFmpeg parameters using the Robot's and/or do not want Transloadit to set any encoding setting, starting ffmpeg_stack: |
Width | Enter the width of the input video in pixels. |
Height | Enter the height of the input video in pixels. |
Resize Strategy | Select the resize strategy:
|
Background | Enter the background color you want in the resulting video in the |
Zoom | Select whether you want to zoom the videos. If selected No, smaller videos will not be stretched to the desired width and height. |
Crop X1 | Enter the coordinate for the upper left corner along the abscissa axis of the rectangle to be cropped. |
Y1 | Enter the coordinate for the upper left corner along the ordinate axis of the rectangle to be cropped. |
X2 | Enter the coordinate for the lower right corner along the abscissa axis of the rectangle to be cropped. |
Y2 | Enter the coordinate for the lower right corner along the ordinate axis of the rectangle to be cropped. |
Rotate | Enter the number in degrees for the video to be rotated by the specified degree integer. Currently, only multiples of 90 are supported.Transloadit automatically corrects the orientation of many videos when the orientation is provided by the camera.This option is only useful for videos requiring rotation because it was not detected by the camera. |
Hint | Select whether you want to enable hinting for mp4 files, for RTP/RTSP streaming. |
Turbo | Select whether you want to speed up the encoding, especially for large non-adaptive workloads. |
FFmpeg Stack | Selects the FFmpeg stack version to use for encoding. |
FFmpeg | Add the parameter object to be passed to FFmpeg.For available options, see the FFmpeg documentation. If a preset is used, the options specified are merged on top of the ones from the preset. The FFmpeg r parameter (framerate) has a default value of 25 and a maximum value of 60. If you set r to null, you clear the default of 25 and can preserve the original video's framerate. |
Watermark URL | Enter the URL address for the watermark image that will be overlaid above this image. Choose the image in PNG format. |
Watermark Position | Select the watermark position. For example, center, bottom, bottom-right. |
Watermark X Offset | Enter the number of pixels for X-offset at which the watermark will be placed in relation to the position it has due to |
Watermark Y Offset | Enter the number of pixels for y-offset at which the watermark will be placed in relation to the position it has due to Values can be both positive and negative and yield different results depending on the Positive values move the watermark closer to the image's center point, whereas negative values move the watermark further away from the image's center point. |
Watermark Size | Enter the size of the watermark as a percentage. For example, |
Watermark Resize Strategy | Select the option for watermark resizing:
For example, our target video size is 800×800 pixels and our watermark image is 400×300 pixels. Let's assume, the watermark_size parameter is set to If you select Fit option with our watermark, the width is the longer side, and 25% of the video size would be 200px. Hence, the watermark would be resized to 200×150 pixels. If the watermark_size was set to If you select Stretch, since our video is 800×800 pixels, for a watermark size of 25% the watermark would be resized to 200×200 pixels. Its height would appear stretched as it would be resized to 200×150 pixels keeping the aspect ratio in mind. If you select the Area option, the value from watermark_size is used for the percentage area size. |
Watermark Start Time | Enter the delay in seconds from the start of the video for the watermark to appear. By default, the watermark is immediately shown. |
Watermark Duration | Enter the duration in seconds for the watermark to be shown. Can be used together with watermark_start_time to create nice effects. The default value is -1.0, which means that the watermark is shown for the entire duration of the video. |
Watermark Opacity | Enter the opacity of the watermark. Valid values are between 0 (invisible) and 1.0 (full visibility). Enter a value between 0 and 1. |
Notify URL | Enter the notification URL address. Transloadit can send a pingback to your server when the assembly is completed. The notification URL address sends the assembly status in JSON string inside a Transloadit field in a multipart POST request to the URL supplied here. |
Fields | Add the custom fields and their value which can be used as Assembly Variables. For example, to dynamically have resized images based on an end-user provided width, use {
"user_width": 800
} |
Performs an arbitrary authorized API call.
Connection | |
URL | Enter a path relative to NoteFor the list of available endpoints, refer to the Transloadit API Documentation. |
Method | Select the HTTP method you want to use: GET to retrieve information for an entry. POST to create a new entry. PUT to update/replace an existing entry. PATCH to make a partial entry update. DELETE to delete an entry. |
Headers | Enter the desired request headers. You don't have to add authorization headers; we already did that for you. |
Query String | Enter the request query string. |
Body | Enter the body content for your API call. |
Setting Up the Transloadit Webhooks
Open any Watch module, establish a connection, click Save and copy the URL address to your clipboard. Click OK and save the trigger.
Log in to your Transloadit account.
Select the assembly for which you want to receive the triggers.
In the New Notify URL field, enter the URL address copied in step 1 and click Send Notification.
You have successfully added the webhooks.