HTTP
The HTTP app provides modules for communication based on the Hypertext Transfer Protocol (HTTP). HTTP is the fundamental component of data transfer for the World Wide Web. As the backbone of information exchange between web servers and clients, HTTP allows you to download web pages, access files, make API calls, and trigger webhooks.
Overview of the HTTP modules
Select a module of the HTTP app based on the authentication requirements of the resource you want to use. To use modules that require authentication, you have to create a connection first.
Make a request: universal module, best to use for resources that do not require authentication.
Make a basic auth request: for resources that require basic authentication.
Make an API key Auth request: for resources that require API key authentication.
Make an OAuth 2.0 request: for resources that require OAuth 2.0 authorization.
Make a client certificate auth request: for resources that require client-side certificate authentication.
Get a file: download a file from the URL.
Resolve a target URL: retrieve the target URL from a chain of HTTP redirects.
Retrieve headers: to get headers from the HTTP request module in separate bundles.
Note
The module dialog fields that are displayed in bold (in the Makescenario, not in this documentation article) are mandatory!
Make a request
The Make a request module allows you to create an HTTP request and send it to a server. The output bundle contains the HTTP response.
Evaluate all states as errors (except for 2xx and 3xx) | Use the response status to detect errors. Otherwise, the module reports only Make related errors (like mapping errors or missing required values). | ||||||
URL | Enter the request URL. | ||||||
Serialize URL | Encodes the API call URL with the URL encoding (encoding special characters for example). | ||||||
Method | Select the HTTP method you want to use:
| ||||||
Headers | Enter request headers. For example, the response content type. CautionThe HTTP app requests do not have the Accept header. If the HTTP request returns an unexpected response, try adding the 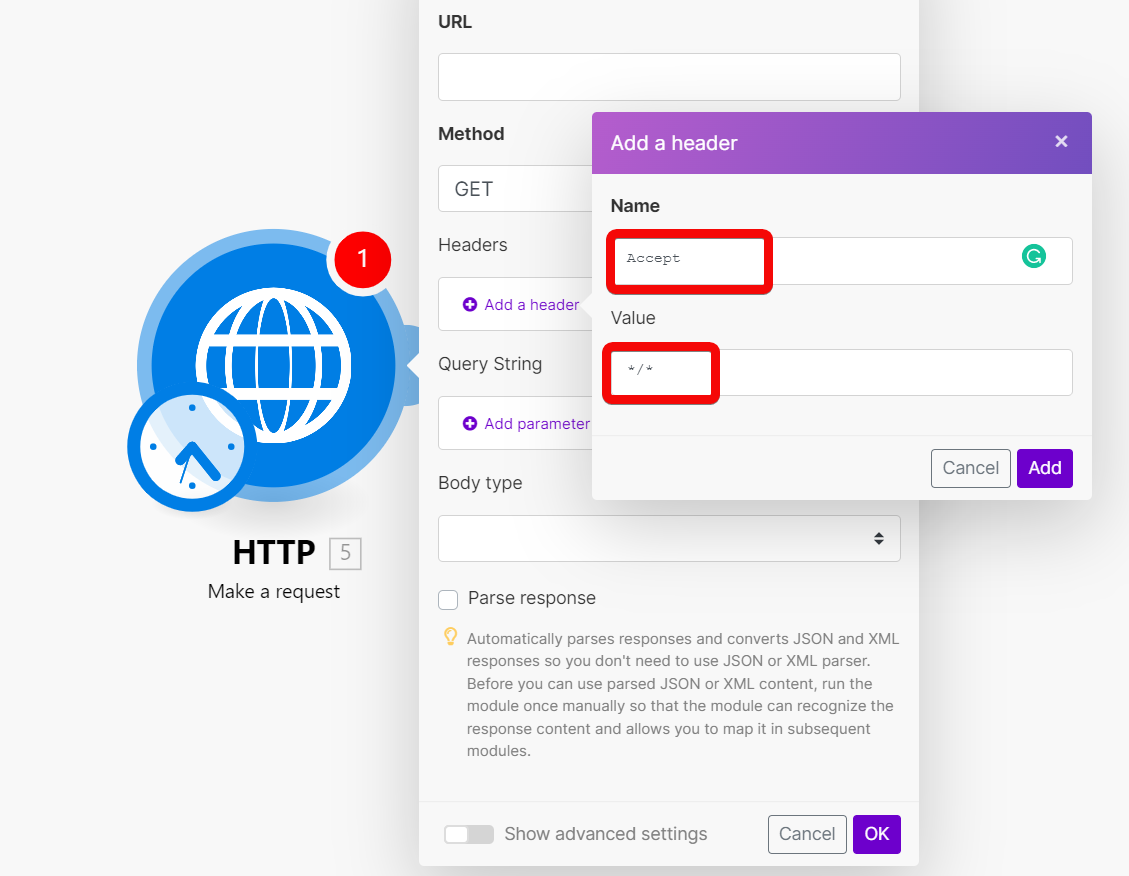 | ||||||
Query String | Enter the query key-value pairs. | ||||||
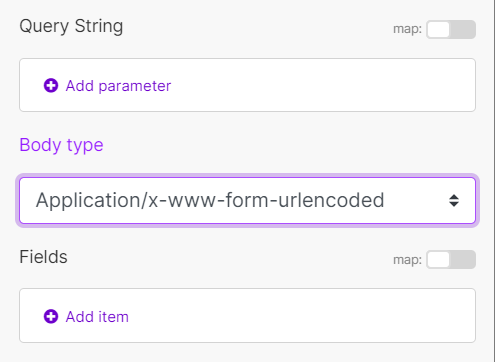
Body type | HTTP
| ||||||
Parse response | Enable to parse HTTP responses into bundles. With this option, you don't need to add the Parse JSON or Parse XML modules. Otherwise, the HTTP module returns the raw response data. Before you can use parsed JSON or XML content, run the module once manually so that the module can recognize the response content and allow you to map it in subsequent modules. 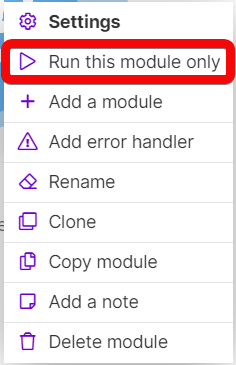 | ||||||
User name | Enter the user name to send the request with the basic auth. | ||||||
Password | Enter the password to send the request with the basic auth. | ||||||
Timeout | Specify the request timeout in seconds (1-300). Default: 40 seconds. | ||||||
Share cookies with other HTTP modules | Enable to share cookies from the server with all HTTP modules in your scenario. | ||||||
Self-signed certificate | Upload your certificate if you want to use TLS using your self-signed certificate. | ||||||
Reject connections that use unverified (self-signed) certificates | Enable to reject connections that use unverified TLS certificates. | ||||||
Follow redirect | Enable to follow URL redirects that return 3xx response statuses. | ||||||
Follow all redirect | Enable to follow URL redirects regardless of response statuses. | ||||||
Disable serialization of multiple same query string keys as arrays | Make handles multiple values for the same URL query string parameter key as arrays (e.g., | ||||||
Request compressed content | Enable to request compression of the response data. Adds the | ||||||
Use Mutual TLS | Select if you want to use mutual TLS (mTLS) for the HTTP request to ensure both the client and server authenticate each other using certificates. |

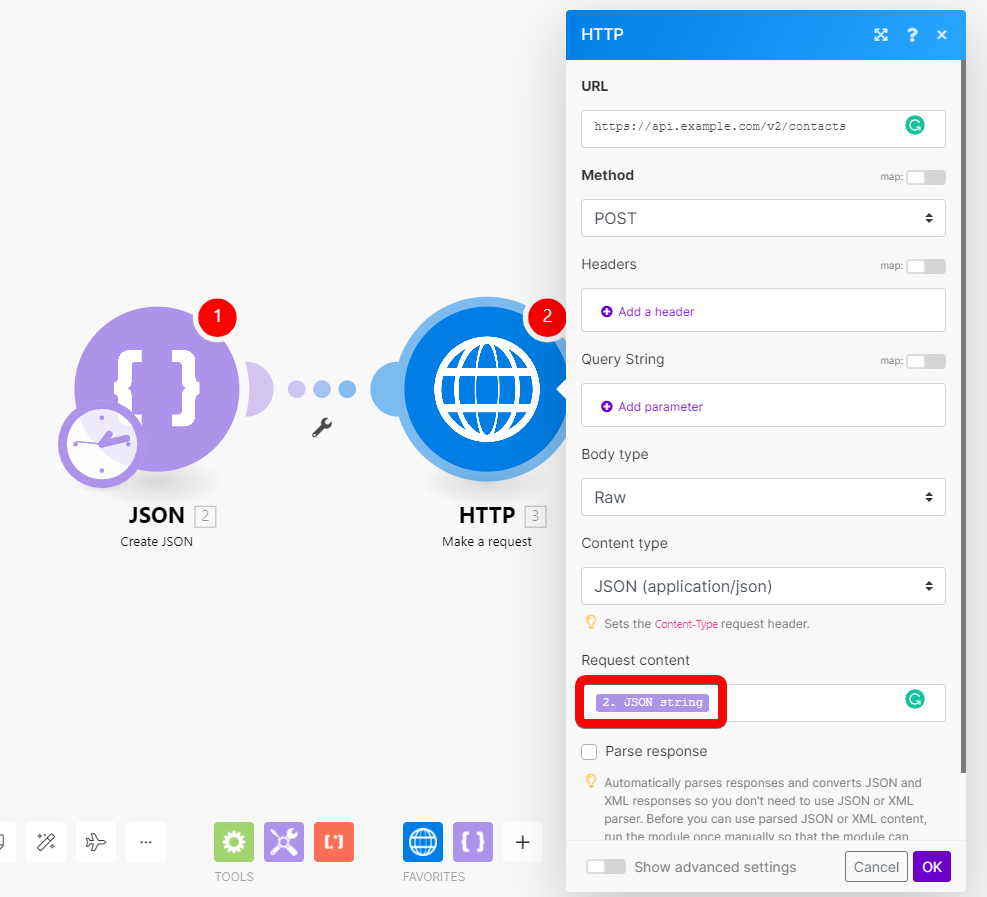
Example HTTP request with the Make a request module
Check the following screenshot to see how to set up the Make a request module to send a POST request with the body in the JSON data format:
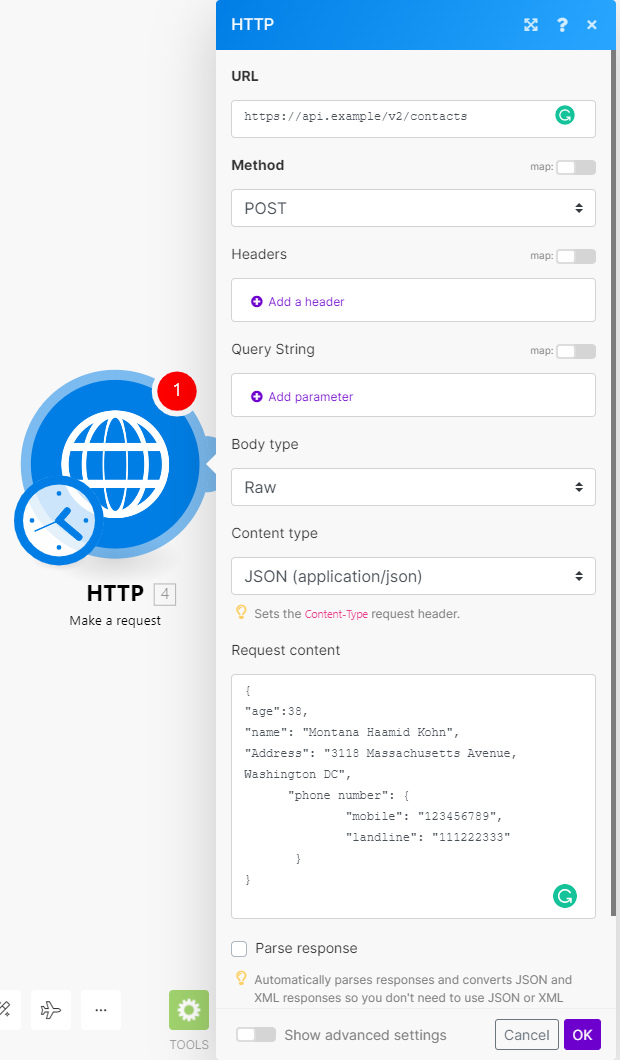
To make sure your JSON is valid, use a JSON validator (for example: https://jsonlint.com/) or use a Create JSON module to create the JSON.
Caution
Be careful when combining JSON data with mapping variables or function directly in the Request content field. Mixing JSON with mapping can lead to an invalid JSON structure.
Make a Basic Auth request
The Make a Basic Auth request module allows you to send an HTTP request with the basic authentication. The output bundle contains the HTTP response.
Credentials | Click Add to add your credentials (user name and password) for basic authentication. | ||||||
Evaluate all states as errors (except for 2xx and 3xx) | Use the response status to detect errors. Otherwise, the module reports only Make related errors (like mapping errors or missing required values). | ||||||
URL | Enter the request URL. | ||||||
Serialize URL | Encodes the API call URL with the URL encoding (encoding special characters for example). | ||||||
Method | Select the HTTP method you want to use:
| ||||||
Headers | Enter request headers. For example, the response content type. CautionThe HTTP app requests do not have the Accept header. If the HTTP request returns an unexpected response, try adding the | ||||||
Query String | Enter the query key-value pairs. | ||||||
Body type | HTTP
| ||||||
Parse response | Enable to parse HTTP responses into bundles. With this option, you don't need to add the Parse JSON or Parse XML modules. Otherwise, the HTTP module returns the raw response data. Before you can use parsed JSON or XML content, run the module once manually so that the module can recognize the response content and allow you to map it in subsequent modules. | ||||||
Timeout | Specify the request timeout in seconds (1-300). Default: 40 seconds. | ||||||
Share cookies with other HTTP modules | Enable to share cookies from the server with all HTTP modules in your scenario. | ||||||
Self-signed certificate | Upload your certificate if you want to use TLS using your self-signed certificate. | ||||||
Reject connections that use unverified (self-signed) certificates | Enable to reject connections that use unverified TLS certificates. | ||||||
Follow redirect | Enable to follow URL redirects that return 3xx response statuses. | ||||||
Follow all redirect | Enable to follow URL redirects regardless of response statuses. | ||||||
Disable serialization of multiple same query string keys as arrays | Make handles multiple values for the same URL query string parameter key as arrays (e.g., | ||||||
Request compressed content | Enable to request compression of the response data. Adds the | ||||||
Use Mutual TLS | Select if you want to use mutual TLS (mTLS) for the HTTP request to ensure both the client and server authenticate each other using certificates. |
Make an API key Auth request
The Make an API key Auth request module allows you to send API calls to apps that require API key authorization. The module also supports "Bearer" authorization.
The output bundle contains the HTTP response.
Create an API key connection for the Make an API key Auth request module
Check out the following example if you want to set up a connection for the Make an API key Auth request module:
In the Make an API key Auth request module settings, click the Add button. The Add a new keychain window pops up.
Fill in:
Name: The label for your API key connection.
Key: The API key to authorize the HTTP calls. If the API uses "Bearer" or "Token" authorization, add the word before the API key.
Example:
Bearer 1234-5678-abcd-efghNote
You can use the eye icon at the edge of the box to reveal the API key and the text you add to it. If you do, make sure that you are the only one viewing the content.
API key placement: Select if you want the authorization in the request header or query string.
API key parameter name: The name of the parameter that contains the API key.
Click Create to create the connection.
You created an API key connection. You can now use the connection in the Make an API key Auth request module.
Evaluate all states as errors (except for 2xx and 3xx) | Use the response status to detect errors. Otherwise, the module reports only Make related errors (like mapping errors or missing required values). | ||||||
URL | Enter the request URL. | ||||||
Serialize URL | Encodes the API call URL with the URL encoding (encoding special characters for example). | ||||||
Method | Select the HTTP method you want to use:
| ||||||
Headers | Enter request headers. For example, the response content type. CautionThe HTTP app requests do not have the Accept header. If the HTTP request returns an unexpected response, try adding the | ||||||
Query String | Enter the query key-value pairs. | ||||||
Body type | HTTP
| ||||||
Parse response | Enable to parse HTTP responses into bundles. With this option, you don't need to add the Parse JSON or Parse XML modules. Otherwise, the HTTP module returns the raw response data. Before you can use parsed JSON or XML content, run the module once manually so that the module can recognize the response content and allow you to map it in subsequent modules. | ||||||
Timeout | Specify the request timeout in seconds (1-300). Default: 40 seconds. | ||||||
Share cookies with other HTTP modules | Enable to share cookies from the server with all HTTP modules in your scenario. | ||||||
Self-signed certificate | Upload your certificate if you want to use TLS using your self-signed certificate. | ||||||
Reject connections that use unverified (self-signed) certificates | Enable to reject connections that use unverified TLS certificates. | ||||||
Follow redirect | Enable to follow URL redirects that return 3xx response statuses. | ||||||
Follow all redirect | Enable to follow URL redirects regardless of response statuses. | ||||||
Disable serialization of multiple same query string keys as arrays | Make handles multiple values for the same URL query string parameter key as arrays (e.g., | ||||||
Request compressed content | Enable to request compression of the response data. Adds the | ||||||
Use Mutual TLS | Select if you want to use mutual TLS (mTLS) for the HTTP request to ensure both the client and server authenticate each other using certificates. |
Make an OAuth 2.0 request
In order to make HTTP(S) requests that require an OAuth 2.0 authorization, you need to create an OAuth connection first.
Create an OAuth 2.0 Connection
To configure the app inMake, you need to create OAuth 2.0 credentials in the app developer portal or settings and enter them in the HTTP module in scenarios.
Note
Make supports two flows:
Authorization code: enter an Authorize URL and Token URL from the app API documentation.
Implicit: enter the Authorize URL from the app API documentation.
Prerequisites
An app account
Access to a developer portal or settings
A Redirect URL (sometimes called a Callback URL).
Obtaining credentials in the app
Create an OAuth client in the app that you want to connect with Make. To do this, enter the developer portal or settings.
Specify a Redirect URL:
https://www.integromat.com/oauth/cb/oauth2Obtain the Client ID and Client Secret. Sometimes the app calls them App Key and App Secret.
Save the Client ID and Client Secret in a safe place. You will need them when building a scenario in Make.
Find the Authorize URL and Token URL in the app API documentation. These are the addresses through which Make communicates with the app.
Establishing the connection in Make
Once you have your credentials from the app, you can enter them in the app's configuration in Make
Go to a Make scenario.
Add the HTTP - Make an OAuth 2.0 request module.
Click Create a connection.
Optional: In the Connection name field, enter a name for the connection.
In Flow type, select the flow.
In Scopes, add API scopes. Refer to the app API documentation to get scopes.
In Client ID and Client Secret enter the credentials you saved previously.
Click Save to create an OAuth 2.0 connection.
You have created an OAuth 2.0 connection. Now you can use the connection in the Make an OAuth 2.0 request module.
Check the advanced settings for creating a connection:
Scope separator | Select the separator for the list of scopes you entered above. Check the app API documentation for the format of the list of scopes. If the separator is not set correctly, Make will be unable to create the connection, and you will receive an invalid scope error. |
Authorize parameters | Enter additional authorization request parameters as a key-value pair:
|
Access token parameters | Enter additional access token request parameters as key-value pairs. Standard parameters:
|
Refresh token parameters | Enter the additional refresh token request parameters as key-value pairs. Standard parameters:
|
Custom Headers | Specify any custom headers to send in the request. |
Token placement | Select whether to send the token in the |
Header token name | Enter the name of the authorization token in the header. Default: |
Query string parameter name | Enter the name of the authorization token in the query string. Default: |
Module settings
Evaluate all states as errors (except for 2xx and 3xx) | Use the response status to detect errors. Otherwise, the module reports only Make related errors (like mapping errors or missing required values). | ||||||
URL | Enter the request URL. | ||||||
Serialize URL | Encodes the API call URL with the URL encoding (encoding special characters for example). | ||||||
Method | Select the HTTP method you want to use:
| ||||||
Headers | Enter request headers. For example, the response content type. CautionThe HTTP app requests do not have the Accept header. If the HTTP request returns an unexpected response, try adding the | ||||||
Query String | Enter the query key-value pairs. | ||||||
Body type | HTTP
| ||||||
Parse response | Enable to parse HTTP responses into bundles. With this option, you don't need to add the Parse JSON or Parse XML modules. Otherwise, the HTTP module returns the raw response data. Before you can use parsed JSON or XML content, run the module once manually so that the module can recognize the response content and allow you to map it in subsequent modules. | ||||||
Timeout | Specify the request timeout in seconds (1-300). Default: 40 seconds. | ||||||
Share cookies with other HTTP modules | Enable to share cookies from the server with all HTTP modules in your scenario. | ||||||
Self-signed certificate | Upload your certificate if you want to use TLS using your self-signed certificate. | ||||||
Reject connections that use unverified (self-signed) certificates | Enable to reject connections that use unverified TLS certificates. | ||||||
Follow redirect | Enable to follow URL redirects that return 3xx response statuses. | ||||||
Follow all redirect | Enable to follow URL redirects regardless of response statuses. | ||||||
Disable serialization of multiple same query string keys as arrays | Make handles multiple values for the same URL query string parameter key as arrays (e.g., | ||||||
Request compressed content | Enable to request compression of the response data. Adds the | ||||||
Use Mutual TLS | Select if you want to use mutual TLS (mTLS) for the HTTP request to ensure both the client and server authenticate each other using certificates. |
Make a client certificate authentication request
Sends an HTTP(S) request to apps that require a client certificate authorization.
Evaluate all states as errors (except for 2xx and 3xx) | Use the response status to detect errors. Otherwise, the module reports only Make related errors (like mapping errors or missing required values). | ||||||
URL | Enter the request URL. | ||||||
Serialize URL | Encodes the API call URL with the URL encoding (encoding special characters for example). | ||||||
Method | Select the HTTP method you want to use:
| ||||||
Headers | Enter request headers. For example, the response content type. CautionThe HTTP app requests do not have the Accept header. If the HTTP request returns an unexpected response, try adding the | ||||||
Query String | Enter the query key-value pairs. | ||||||
Body type | HTTP
| ||||||
Parse response | Enable to parse HTTP responses into bundles. With this option, you don't need to add the Parse JSON or Parse XML modules. Otherwise, the HTTP module returns the raw response data. Before you can use parsed JSON or XML content, run the module once manually so that the module can recognize the response content and allow you to map it in subsequent modules. | ||||||
Timeout | Specify the request timeout in seconds (1-300). Default: 40 seconds. | ||||||
Share cookies with other HTTP modules | Enable to share cookies from the server with all HTTP modules in your scenario. | ||||||
Self-signed certificate | Upload your certificate if you want to use TLS using your self-signed certificate. | ||||||
Reject connections that use unverified (self-signed) certificates | Enable to reject connections that use unverified TLS certificates. | ||||||
Follow redirect | Enable to follow URL redirects that return 3xx response statuses. | ||||||
Follow all redirect | Enable to follow URL redirects regardless of response statuses. | ||||||
Disable serialization of multiple same query string keys as arrays | Make handles multiple values for the same URL query string parameter key as arrays (e.g., | ||||||
Request compressed content | Enable to request compression of the response data. Adds the | ||||||
Use Mutual TLS | Select if you want to use mutual TLS (mTLS) for the HTTP request to ensure both the client and server authenticate each other using certificates. |
Get a file
Downloads a file from a URL.
URL | Enter the URL of the file you want to download. You can use the file (map the file data) in other modules in the scenario. |
Resolve a target URL
Enter the URL you want to resolve. The output bundle contains the link to which the original URL redirects in the location response header.
This module helps you to get a direct URL to a resource instead of a redirect URL. For example, links for sharing files in storage apps like Dropbox redirect you before you reach the target file. The module navigates through the redirect chain and returns the target URL.
URL | Enter the URL you want to resolve. |
Method | Select the method you want to use. |
Retrieve Headers
Returns each header (name and value) from the specified HTTP module in a separate bundle.
Source Module | Select the module you want to retrieve headers from. |
How to generate JSON Web Tokens (JWT)
If you need to connect to an API or send messages that requires JWT authentication, you can create a JWT via the HTTP module using the HS256 or HS512 algorithms. Make allows creating a JWT with the help of custom or built-in functions.
Generating a JWT via a custom function
You can create a HS256 or HS512 JWT with the help of Make custom functions.
Note
Custom functions are available to the Enterprise plan users only.
Follow the steps to create a JWT:
Go to Functions and create a custom function using the following body:
function readableJWTencode(payload, secret, header = '{"alg":"HS256","typ":"JWT"}') {
    let formattedHeader = iml.replace(iml.replace(iml.replace(iml.base64(header), "=", ""), "+", "-"), "/", "_")
    let formattedPayload = iml.replace(iml.replace(iml.replace(iml.base64(payload), "=", ""), "+", "-"), "/", "_")
    let signature = iml.sha256(formattedHeader + "." + formattedPayload, "base64", secret)
    let formattedSignature = iml.replace(iml.replace(iml.replace(signature, "=", ""), "+", "-"), "/", "_")
    let jwt = formattedHeader + "." + formattedPayload + "." + formattedSignature
    return jwt
}
Note
Replace HS256 with HS512 and sha256 with sha512 in the custom function above to create a HS512 JWT.
The example custom function has the jwtEncode name embedded onto the function body. If you want to use another name, change it in the body too.
Start your scenario with the Set multiple variables module and add three items:
Item 1:
In Variable name, enter
header.In Variable value, enter the following function:
{"alg":"HS256","typ":"JWT"}Note
Replace HS256 with HS512 to create a HS512 JWT.
Item 2:
In Variable name, enter
payload.In Variable value, enter the following function:
{"var1":1,"var2":"text"}
Item 3:
In Variable name, enter
secret.In Variable value, enter your 256-bit or 512-bit secret.
Add another Set multiple variables module to generate the JWT.
Optional: In Variable name, enter the name for the token.
In Variable value, enter the following function:
{{jwtEncode(11.payload; 11.secret)}}Note
Make sure to take into account the module number in the code. In the example above, the header, payload and secret are in the 11th module in the scenario. It may vary from one scenario to another.
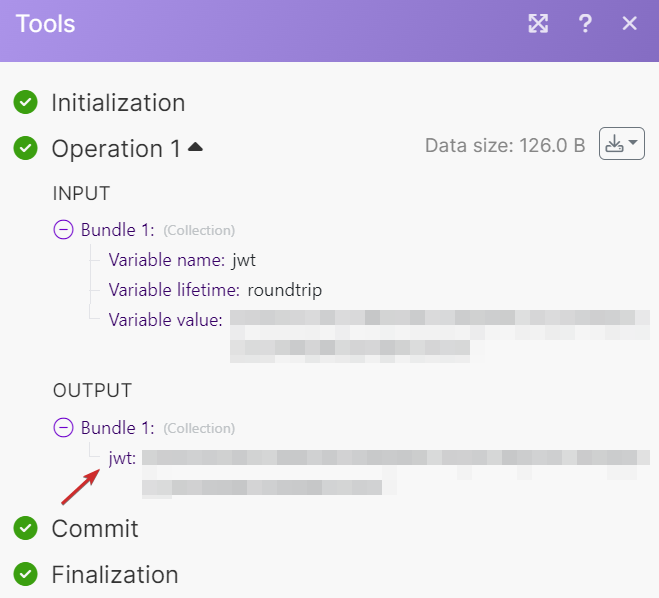
If you run the scenario, you will receive the HS256 or HS512 JWT in the second module's output.
 |
You can connect to an API or send messages that requires JWT authentication.
Generating a JWT via built-in functions
To generate a JWT with the help of built-in functions, do the following in your scenario:
Start your scenario with the Set multiple variables module and add three items:
Item 1:
In Variable name, enter
header.In Variable value, enter the following function:
{{replace(replace(replace(base64("{""alg"":""HS256"",""typ"":""JWT""}"); "="; emptystring); "+"; "-"); "/"; "_")}}Note
Replace HS256 with HS512 to create a HS512 JWT.
Item 2:
In Variable name, enter
payload.In Variable value, enter the following function:
{{replace(replace(replace(base64("{""var1"":1,""var2"":""text""}"); "="; emptystring); "+"; "-"); "/"; "_")}}
Item 3:
In Variable name, enter
secret.In Variable value, enter your 256-bit or 512-bit secret.
Add another Set multiple variables module to generate the HS256 or HS512 JWT.
Optional: In Variable name, enter the name for the token.
In Variable value, enter the following function:
{{5.header}}.{{5.payload}}.{{replace(replace(replace(sha256(5.header + "." + 5.payload; "base64"; 5.secret); "="; emptystring); "+"; "-"); "/"; "_")}}Note
Use the
sha512function to create a HS512 JWT.Make sure to take into account the module number in the code. In the example above, the header, payload and secret are in the 5th module in the scenario. It may vary from one scenario to another.
If you run the scenario, you will receive the HS256 or HS512 JWT in the second module's output.
|
You can connect to an API or send messages that requires JWT authentication.