NetSuite
With NetSuite modules in Make, you can watch, search, create or update, retrieve, and delete standard and custom records.
Note
To use the NetSuite app in Make, you must have the Make Enterprise plan. All Enterprise apps are currently labeled as premium tier 3 in Make.
To use the NetSuite modules, you must have a NetSuite account. You can create an account at NetSuite.com. The account must have admin or system administration permissions..
The following steps are required before creating the connection in Make:
Connect NetSuite to Make
To establish the connection, you must:
Enable token-based authentication
To enable token-based authentication and SOAP/REST webservice:
Log in to your NetSuite account as an admin.
Click Setup > Company > Enable Features.
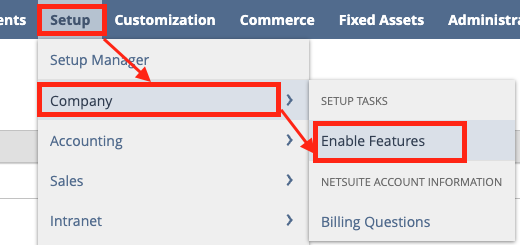
Click SuiteCloud and select the following options:
Section
Options
SuiteScript
CLIENT SUITESCRIPT; SERVER SUITESCRIPT
SuiteTalk (Web Services)
SOAP WEB SERVICES
REST WEB SERVICES
Manage Authentication
SUITESIGNON; TOKEN-BASED AUTHENTICATION
Click Save.
Create Consumer Key and Consumer Secret Credentials
You must create a new integration in NetSuite to generate a consumer key and consumer secret values.
Navigate to Setup > Integration > Manage Integrations > New.
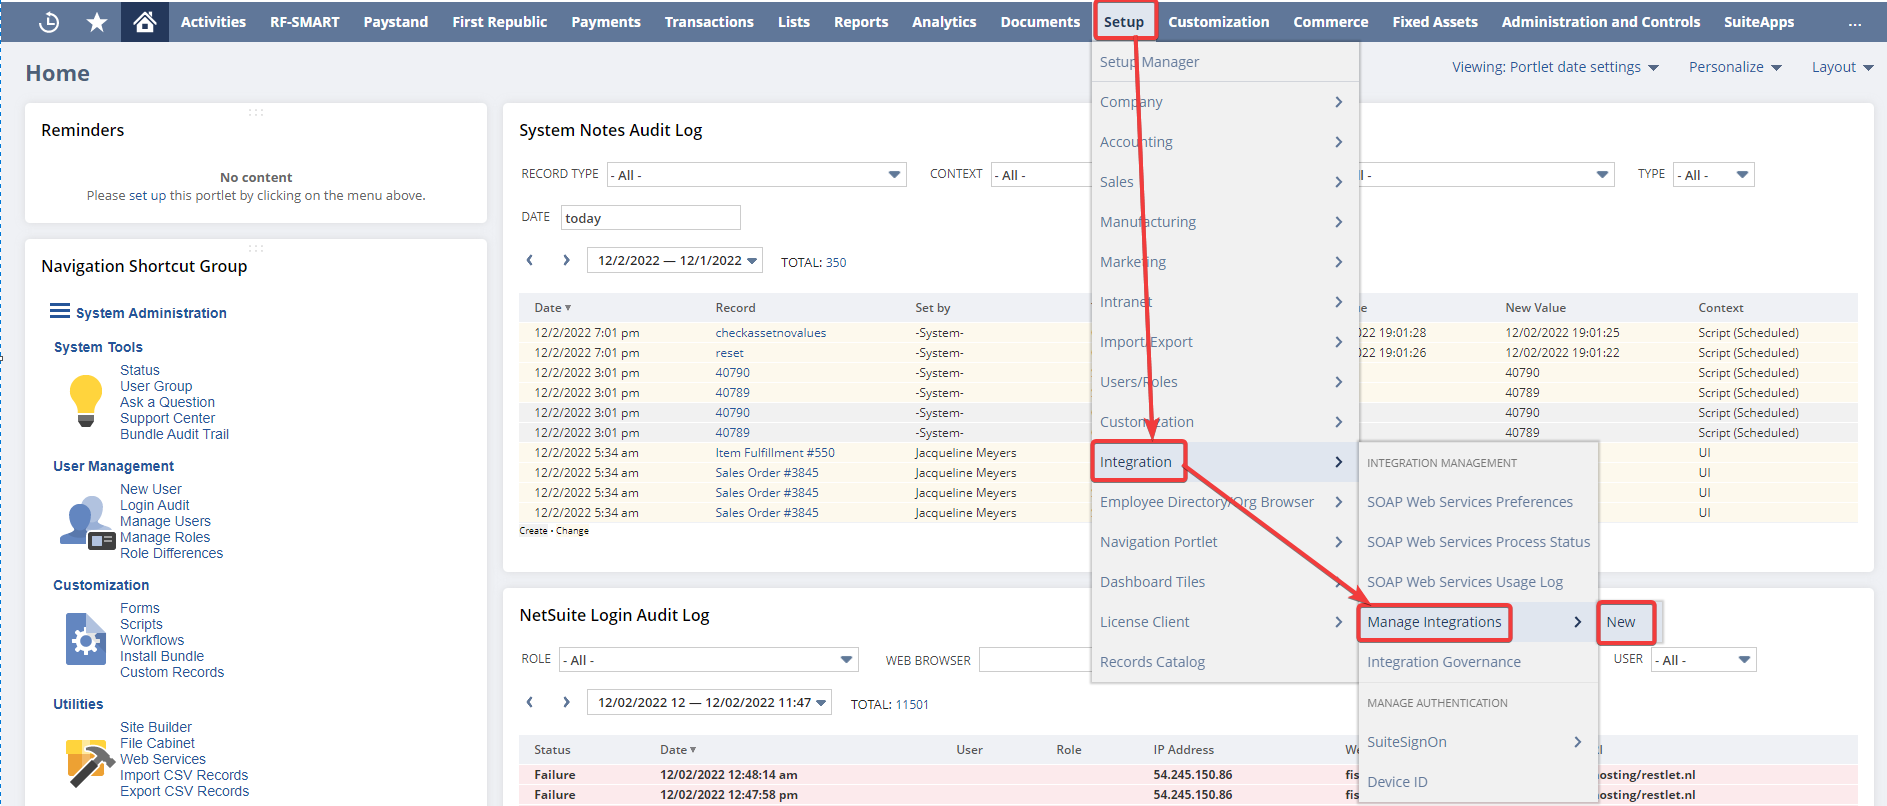
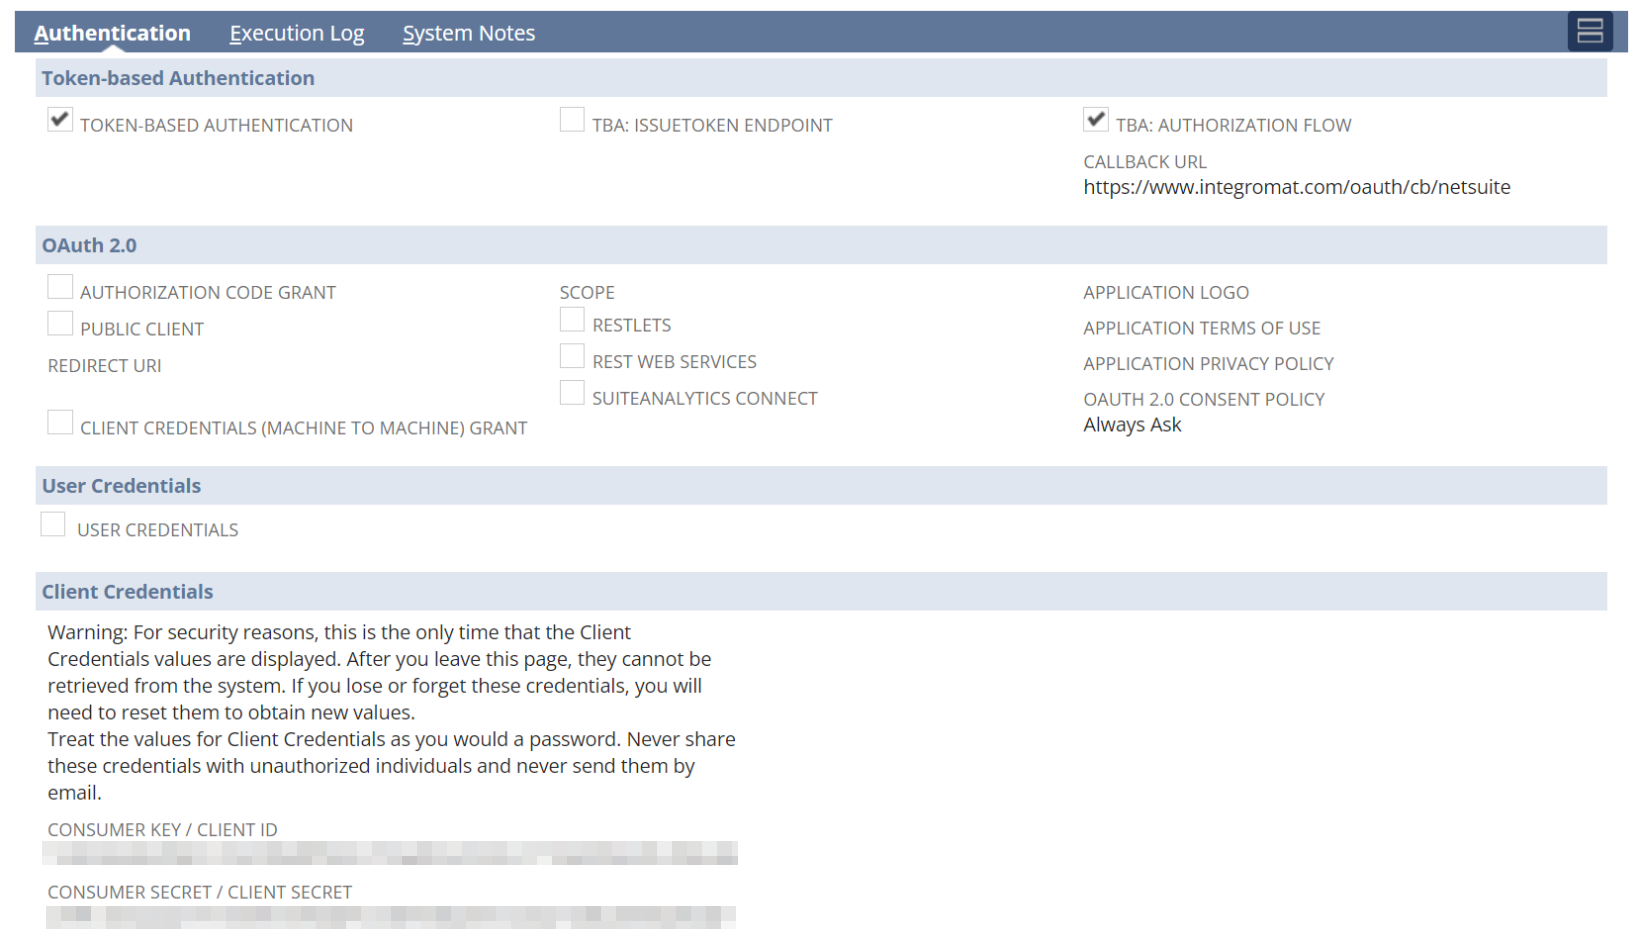
Enter a Name for the integration, select Enabled in the State field, select Token-based Authentication and TBA: authorization flow, and paste the following in the Callback URL field
https://www.integromat.com/oauth/cb/netsuite.Click Save.
Copy the Consumer Key and Consumer Secret and save them in a safe place.
You now have the consumer credentials to connect to Make.
Create and Assign Roles
An admin must create roles and assign them to the users or employees to access the integration details.
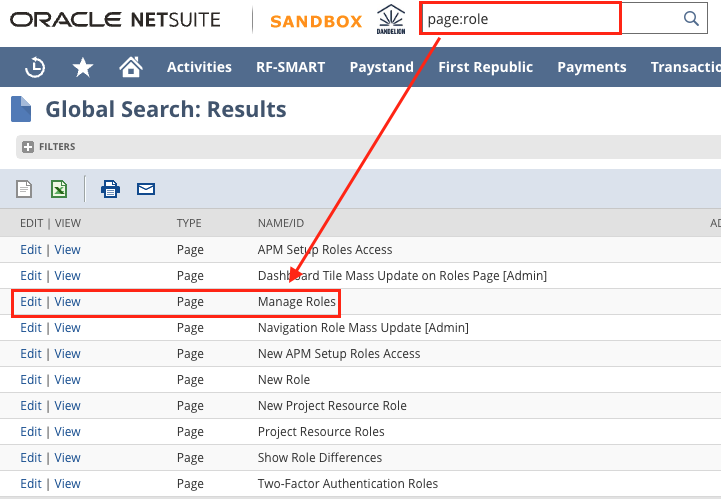
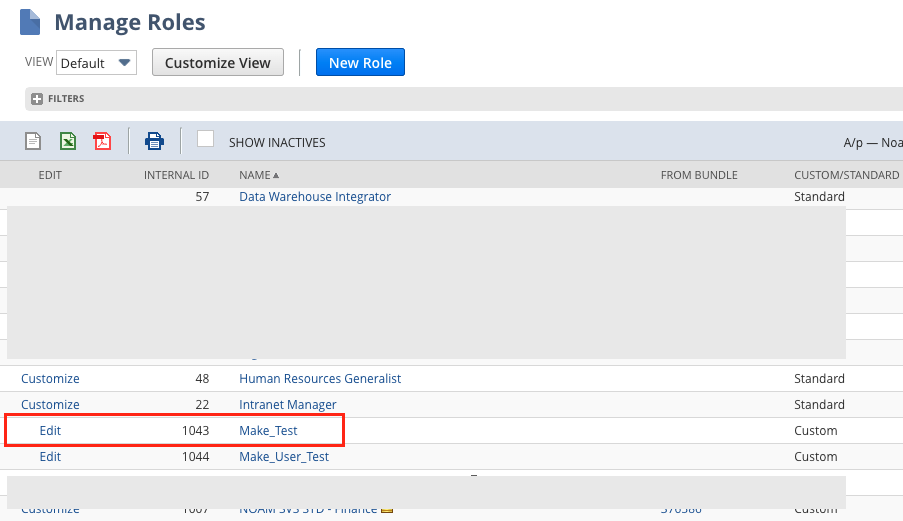
To access the roles page, search for Page:roles.
Click Edit next to Manage Roles.
Click New Role.
Enter the details as provided in the table and click Save. This creates a new role.
Name
Enter a name for the role.
Subsidiary Restrictions
Select All.
Permissions
In the Setup tab, add the following mandatory permissions:
Custom Body Fields - full access
Custom Entity Fields - full access
Custom Fields - full access
Custom Item Fields - full access
Custom Lists - full access
Custom Record Types - full access
Custom Segment - full access
Note: Before granting access to Custom Segments, enable the feature. To do it, go to Settings > Company > Enable Features. On the SuiteCloud subtab, select Custom Segments, and then click Save.
Log in using Access Tokens - full access
Records Catalog - view access
REST Web Services - full access
Set Up Company - view access
SOAP Web Services - full access
User Access Tokens - full access
In the Lists tab, add the following mandatory permissions:
Custom Record Entries - full access
Item Collection - full access
Items - full access
In the Reports tab, add the following mandatory permissions:
SuiteAnalytics Workbook - edit access
In the Transactions tab, add the following mandatory permissions:
Find Transactions - full access
Other required permissions for your desired transaction type.
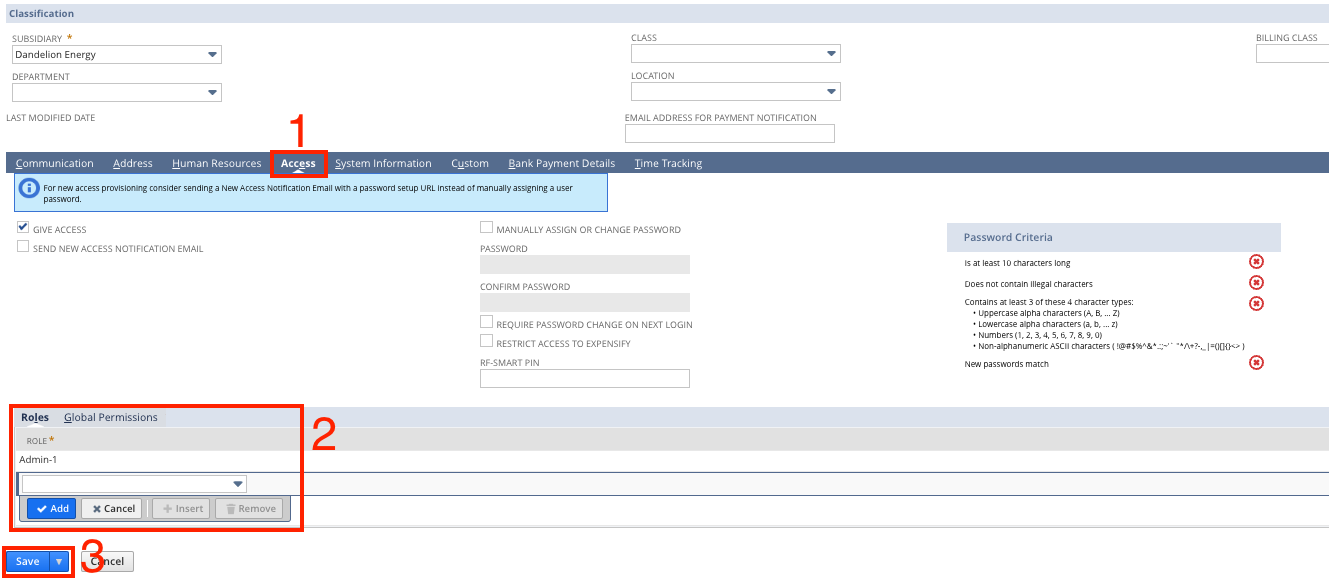
Search for Page:Employees to assign the role to a user.
To assign the role to existing employees: Click Edit next to Employees and select the employee to assign the role to.
To assign the role to a new employee: Click Edit next to New Employees to create a new employee. Add the employee details.
Click Access > Roles, add the new role you have created, and click Save.
You have successfully created and assigned the roles to access the integration details.
Establish the connection with NetSuite in Make
All users can create a connection, while only admin can obtain the Consumer Key and Secret values and assign roles.
Log in to your Make account, add a NetSuite module to your scenario, and click Create a connection.
Optional: In the Connection name field, enter a name for the connection.
In the Consumer Key and Consumer Secret fields, enter the credentials that you generated in NetSuite.
Click Save.
If prompted, authenticate your account and confirm access.
You have successfully established the connection. You can now edit your scenario and add more NetSuite modules. If your connection requires reauthorization at any point, follow the connection renewal steps here.
NetSuite connections and token-based authentication
Connections between NetSuite and Make use token-based authentication with tokens that do not expire.
NetSuite Production connections: If your connection breaks or expires, check your NetSuite account to ensure your token has not been revoked. For more information, you can check the Integration Record in NetSuite by navigating to Setup > Integrations > Manage Integrations or the Login Audit Trail by navigating to Setup > Users/Roles > View Login Audit Trail.
NetSuite Sandbox connections: NetSuite will regularly rollback sandbox environments to their original state. When this happens, your connection in Make may be broken.
Note
Make does not refresh the connection with NetSuite. Make sure, your token and secret are valid. If the token and secret are not valid, check if NetSuite Web UI revoked the token.
If you use NetSuite Sandbox, keep in mind, that the Sandbox may be rolled back to its original state. It breaks the connection. Learn more about checking if the token is valid.
Standard Record
You can watch, search, create or update, retrieve, and delete records using the following modules.
Note
Some entity fields describing a record type are displayed with their internal API names instead of their NetSuite labels. For example, in Account record types where the entity field is called Parent, the internal ID label refers to Subaccount of. For more information, refer to NetSuite SOAP API documentation.
Triggers when a record is created or updated.
Connection | |
Search Record Type | Select or map the record type of the records you want to watch. |
Trigger by | Select the type of field you want the module to be triggered by. |
Record Field | Select the exact date field to be triggered by. |
Custom Field | Select the exact date custom field to be triggered by. |
Entity Custom Fields | Select the custom fields to be listed for mapping. If you want to list all the fields then you can leave this empty. |
Limit | Set the maximum number of records Make will return during one execution cycle. The default value is 2. |
Triggers when a record in a saved search is created.
Connection | |
Search Record Type | Select or map the record type of the records you want to watch. |
Saved Search | Select the saved search that must include Internal ID. |
Trigger by | Select the type of field you want the module to be triggered by. |
Record Field | Select the date field to trigger the search for newly created records. |
Custom Field | Select the date type custom field to be triggered by. |
Search Filter | Specify the filter conditions and operators. To search for sales transaction types, see the information below this table regarding how to set up the Search Filter. |
Enable Custom Field Filter | Select whether to enable the custom field filter for additional filtering options. |
Custom Field Filter | Specify the custom fields to add additional filters to trigger your search for newly created records. |
Limit | Set the maximum number of records Make will return during one execution cycle. The default value is 2. |
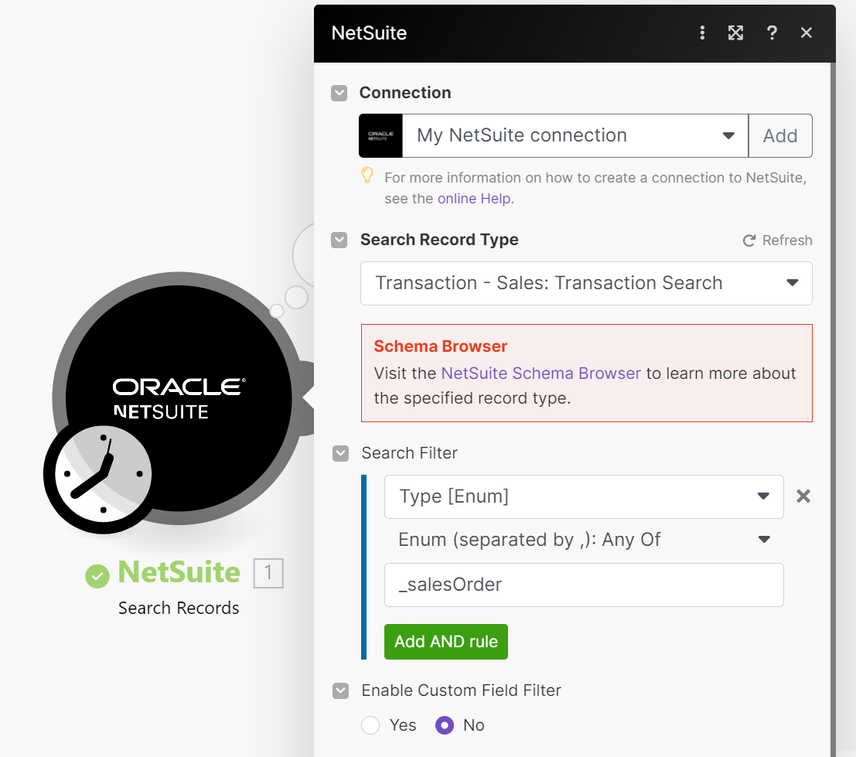
To search for sales transaction types (such as invoices, deposits, etc.), you must use a search filter for the transaction type's Enum value.\
Follow these steps to create the filter:
In Search Record Type, select Transaction Search.
Under Search Filter, select Type [Enum].
Select the Enum (separated by,) operator.
In the field below, enter the Enum value from the table below, depending on the transaction type.
Transaction type | Enum value |
|---|---|
Assembly Build | _assemblyBuild |
Assembly Unbuild | _assemblyUnbuild |
Bin Transfer | _binTransfer |
Bin Worksheet | _binWorksheet |
Cash Refund | _cashRefund |
Cash Sale | _cashSale |
Check | _check |
Credit Memo | _creditMemo |
Custom Purchase | _customPurchase |
Custom Sale | _customSale |
Customer Deposit | _customerDeposit |
Customer Payment | _customerPayment |
Customer Refund | _customerRefund |
Deposit | _deposit |
Deposit Application | _depositApplication |
Estimate | _estimate |
Expense Report | _expenseReport |
Inventory Adjustment | _inventoryAdjustment |
Inventory Cost Revaluation | _inventoryCostRevaluation |
Inventory Transfer | _inventoryTransfer |
Invoice | _invoice |
Item Fulfillment | _itemFulfillment |
Item Receipt | _itemReceipt |
Journal Entry | _journal |
Opportunity | _opportunity |
Paycheck Journal | _paycheckJournal |
Purchase Order | _purchaseOrder |
Return Authorization | _returnAuthorization |
Sales Order | _salesOrder |
Transfer Order | _transferOrder |
Vendor Bill | _vendorBill |
Vendor Credit | _vendorCredit |
Vendor Payment | _vendorPayment |
Vendor Return Authorization | _vendorReturnAuthorization |
Work Order | _workOrder |
Work Order Close | _workOrderClose |
Work Order Completion | _workOrderCompletion |
Work Order Issue | _workOrderIssue |
Retrieves a list of records filtered by a query.
Connection | |
Search Record Type | Select the record type and add filters to search the record. |
Search Filter | Specify the filter conditions and operators. To search for sales transaction types, see the information below this table regarding how to set up the Search Filter. |
Limit | Set the maximum number of records Make will return during one execution cycle. The default value is 10. |
Entity Custom Fields | Select the fields to be listed for mapping or leave the field blank to list records for all the available entity custom fields. |
To search for sales transaction types (such as invoices, deposits, etc.), you must use a search filter for the transaction type's Enum value.
Follow these steps to create the filter:
In Search Record Type, select Transaction Search.
Under Search Filter, select Type [Enum].
Select the Enum (separated by,) operator.
In the field below, enter the Enum value from the table below, depending on the transaction type.
Transaction type | Enum value |
|---|---|
Assembly Build | _assemblyBuild |
Assembly Unbuild | _assemblyUnbuild |
Bin Transfer | _binTransfer |
Bin Worksheet | _binWorksheet |
Cash Refund | _cashRefund |
Cash Sale | _cashSale |
Check | _check |
Credit Memo | _creditMemo |
Custom Purchase | _customPurchase |
Custom Sale | _customSale |
Customer Deposit | _customerDeposit |
Customer Payment | _customerPayment |
Customer Refund | _customerRefund |
Deposit | _deposit |
Deposit Application | _depositApplication |
Estimate | _estimate |
Expense Report | _expenseReport |
Inventory Adjustment | _inventoryAdjustment |
Inventory Cost Revaluation | _inventoryCostRevaluation |
Inventory Transfer | _inventoryTransfer |
Invoice | _invoice |
Item Fulfillment | _itemFulfillment |
Item Receipt | _itemReceipt |
Journal Entry | _journal |
Opportunity | _opportunity |
Paycheck Journal | _paycheckJournal |
Purchase Order | _purchaseOrder |
Return Authorization | _returnAuthorization |
Sales Order | _salesOrder |
Transfer Order | _transferOrder |
Vendor Bill | _vendorBill |
Vendor Credit | _vendorCredit |
Vendor Payment | _vendorPayment |
Vendor Return Authorization | _vendorReturnAuthorization |
Work Order | _workOrder |
Work Order Close | _workOrderClose |
Work Order Completion | _workOrderCompletion |
Work Order Issue | _workOrderIssue |
In the picture below, you see the example of filtering by the Sales Order type of transactions.
 |
Retrieves a list of records filtered by a saved search.
Connection | |
Search Record Type | Select the record type and add filters to search the record. |
Saved Search | Select the saved search that you want to use for filtering records. |
Search Filter | Specify the filter conditions and operators. To search for sales transaction types, see the information below this table regarding how to set up the Search Filter. |
Enable Custom Field Filter | Select whether to enable the custom field filter for additional filtering options. |
Limit | Set the maximum number of records Make will return during one execution cycle. The default value is 10. |
To search for sales transaction types (such as invoices, deposits, etc.), you must use a search filter for the transaction type's Enum value.
Follow these steps to create the filter:
In Search Record Type, select Transaction Search.
Under Search Filter, select Type [Enum].
Select the Enum (separated by,) operator.
In the field below, enter the Enum value from the table below, depending on the transaction type.
Transaction type | Enum value |
|---|---|
Assembly Build | _assemblyBuild |
Assembly Unbuild | _assemblyUnbuild |
Bin Transfer | _binTransfer |
Bin Worksheet | _binWorksheet |
Cash Refund | _cashRefund |
Cash Sale | _cashSale |
Check | _check |
Credit Memo | _creditMemo |
Custom Purchase | _customPurchase |
Custom Sale | _customSale |
Customer Deposit | _customerDeposit |
Customer Payment | _customerPayment |
Customer Refund | _customerRefund |
Deposit | _deposit |
Deposit Application | _depositApplication |
Estimate | _estimate |
Expense Report | _expenseReport |
Inventory Adjustment | _inventoryAdjustment |
Inventory Cost Revaluation | _inventoryCostRevaluation |
Inventory Transfer | _inventoryTransfer |
Invoice | _invoice |
Item Fulfillment | _itemFulfillment |
Item Receipt | _itemReceipt |
Journal Entry | _journal |
Opportunity | _opportunity |
Paycheck Journal | _paycheckJournal |
Purchase Order | _purchaseOrder |
Return Authorization | _returnAuthorization |
Sales Order | _salesOrder |
Transfer Order | _transferOrder |
Vendor Bill | _vendorBill |
Vendor Credit | _vendorCredit |
Vendor Payment | _vendorPayment |
Vendor Return Authorization | _vendorReturnAuthorization |
Work Order | _workOrder |
Work Order Close | _workOrderClose |
Work Order Completion | _workOrderCompletion |
Work Order Issue | _workOrderIssue |
Creates or updates an existing record by its ID.
Connection | |
Action | Select the action you want to perform. For example, |
Record Type | Select the record type and enter the details of the record you want to create. |
Entity Custom Fields | Select the custom fields you want to add to this record. Once you select the custom field, an option to enter or map a value will be provided. |
Retrieves the details of an existing record by its ID.
Connection | |
Record Type | Select or map the record type of the details you want to retrieve. |
Internal ID | Enter the Internal ID of the record whose details you want to retrieve. Ensure that in the Preference section, you have selected the Show Internal ID checkbox to display the Internal ID column in the records page. 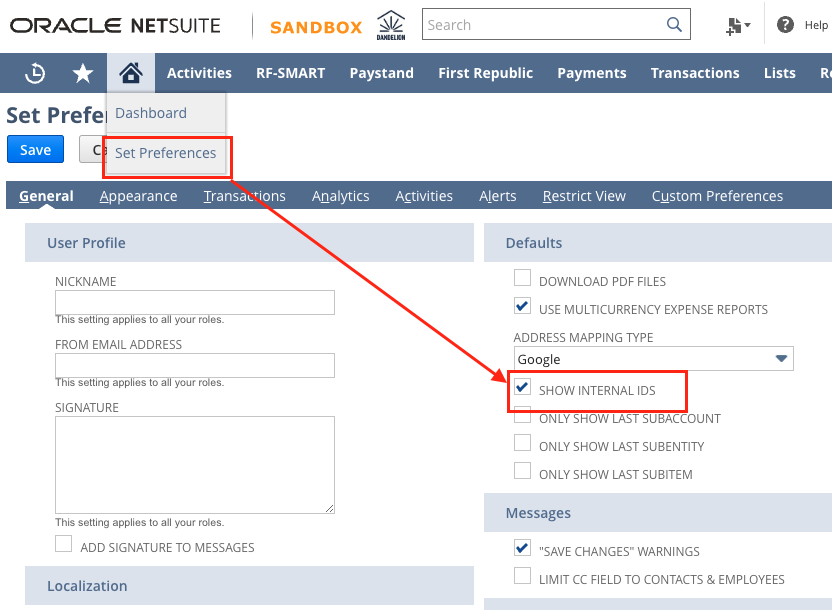 |
External ID | Enter the External ID of the record whose details you want to retrieve. |
Entity Custom Fields | Select the fields to be listed for mapping or leave this field blank to list all available entity custom fields. |
Removes a record by its type and ID.
Connection | |
Record Type | Select or map the record type of the record you want to delete. |
Internal ID | Enter the Internal ID of the record you want to delete. Ensure that in the Preference section, you have selected the Show Internal ID checkbox to display the Internal ID column in the records page. |
External ID | Enter the External ID of the record you want to delete. |
Reason Code ID | Enter the Reason Code ID applicable to the record you want to delete. You can find the ID at NetSuite Setup > Accounting > Accounting Lists and filter by Transaction Deletion Reason to get the reason ID. |
Reason Memo | Enter a memo with the reason to delete the record. |
Custom Record
You can search, create, retrieve, update, and delete custom records using the following modules.
Retrieves a list of custom records filtered by a query.
Connection | |
Custom Record Type | Select the custom record type and add filters to search for the custom records. |
Limit | Set the maximum number of records Make will work with during one execution cycle. It must be a number between 1 and 3200. The default value is 10. |
Offset | Enter the number of results to be skipped, it must be divisible by the page limit 100. Use this field with a repeater module only if you want to get more than 3200 results. |
Creates a new custom record.
Connection | |
Custom Record Type | Select the custom record type and enter details for the record you want to create. |
Retrieves the details of the custom record by its ID.
Connection | |
Custom Record Type | Select the custom record type of the details you want to retrieve. |
ID | Enter either the internal or external ID of the custom record you want to retrieve details for. If using an external ID, add the prefix To use internal IDs, ensure that in the Preference section you have selected the Show Internal ID checkbox to display the Internal ID column in the records page. |
Updates a custom record by its ID.
Connection | |
Custom Record Type | Select the custom record type of the record you want to update and enter the details you want to update. |
ID | Enter either the internal or external ID of the custom record you want to update. If using an external ID, add the prefix To use internal IDs, ensure that in the Preference section you have selected the Show Internal ID checkbox to display the Internal ID column in the records page. |
Deletes a custom record by its ID.
Connection | |
Custom Record Type | Select the custom record type of the record you want to delete. |
ID | Enter either the internal or external ID of the custom record you want to delete. If using an external ID, add the prefix To use internal IDs, ensure that in the Preference section you have selected the Show Internal ID checkbox to display the Internal ID column in the records page. |
Files and Folders
You can upload, download, attach, detach files and create folders using the following modules.
Uploads a file by an external URL or binary data.
Connection | |
Upload By | Select or map the upload type:
|
Folder | Either Interal ID or External ID must be provided. If both are provided, the Internal ID is used. |
File Type | Select the type of file you want to upload. |
Description | Enter a description for the file. |
Is Online | Select if the file is accessible externally. |
Is Private | Select if the file is visible only by you. |
Download an existing file by its Internal ID or External ID.
Connection | |
Internal ID | Enter the Internal ID of the file you want to download. |
External ID | Enter the External ID of the file you want to download. |
Attaches a file to a record by its ID and the record ID.
Connection | |
File | Either Internal ID or External ID must be provided. If both are provided, the Internal ID is used. |
Record Type | Select the type of record to which you want to attach a file. |
Internal ID | Enter the Internal ID of the file you want to attach. |
External ID | Enter the External ID of the file you want to attach. |
Detaches a file from a record by its ID and the record ID.
Connection | |
File | Either Internal ID or External ID must be provided. If both are provided, the Internal ID is used. |
Record Type | Select the type of record from which you want to detach a file. |
Internal ID | Enter the Internal ID of the record you want to detach. |
External ID | Enter the External ID of the record you want to detach. |
Creates or updates a folder by its Internal ID or External ID.
Connection | |
Action | Select the action you want to take:
|
Description | Enter a description for the folder. |
Folder Type | Select the type of folder. |
Parent | Provide the Internal ID or External ID of the parent folder. If both are provided, the Internal ID is used. |
Is Online | Select if you want this folder accessible externally. |
Is Private | Select if you want the folder to be visible only by you. |
Is Inactive | Select if you want to inactivate this folder. |
Other
Performs an arbitrary authorized API call.
Connection | |
Action | Select or map an action for the call. For example, |
Body | Enter the body content for your API call. For example, |
Header | Enter the desired request headers. You don't have to add authorization headers; we've already added those for you. |
SOAP Version | Enter a valid SOAP version to apply for the call. For example, |
Predefined namespaces for making a SOAP API request:
Namespace | Target |
|---|---|
platformCore | /xsd/platform/v2022_1_0/core.xsd |
platformCoreTyp | /xsd/platform/v2022_1_0/coreTypes.xsd |
platformMsgs | /xsd/platform/v2022_1_0/messages.xsd |
platformCommon | /xsd/platform/v2022_1_0/common.xsd |
platformCommonTyp | /xsd/platform/v2022_1_0/commonTypes.xsd |
actSched | /xsd/activities/v2022_1_0/scheduling.xsd |
actSchedTyp | /xsd/activities/v2022_1_0/schedulingTypes.xsd |
demandPlanning | /xsd/transactions/v2022_1_0/demandPlanning.xsd |
demandPlanningTyp | /xsd/transactions/v2022_1_0/demandPlanningTypes.xsd |
docfileCab | /xsd/documents/v2022_1_0/fileCabinet.xsd |
docfileCabTyp | /xsd/documents/v2022_1_0/fileCabinetTypes.xsd |
generalComm | /xsd/general/v2022_1_0/communication.xsd |
generalCommTyp | /xsd/general/v2022_1_0/communicationTypes.xsd |
listAcct | /xsd/lists/v2022_1_0/accounting.xsd |
listAcctTyp | /xsd/lists/v2022_1_0/accountingTypes.xsd |
listEmp | /xsd/lists/v2022_1_0/employees.xsd |
listEmpTyp | /xsd/lists/v2022_1_0/employeeTypes.xsd |
listMkt | /xsd/lists/v2022_1_0/marketing.xsd |
listMktTyp | /xsd/lists/v2022_1_0/marketingTypes.xsd |
listRel | /xsd/lists/v2022_1_0/relationships.xsd |
listRelTyp | /xsd/lists/v2022_1_0/relationshipTypes.xsd |
listScm | /xsd/lists/v2022_1_0/supplyChain.xsd |
listScmTyp | /xsd/lists/v2022_1_0/supplyChainTypes.xsd |
listSupport | /xsd/lists/v2022_1_0/support.xsd |
listSupportTyp | /xsd/lists/v2022_1_0/supportTypes.xsd |
listSite | /xsd/lists/v2022_1_0/website.xsd |
listSiteTyp | /xsd/lists/v2022_1_0/websiteTypes.xsd |
setupCustom | /xsd/setup/v2022_1_0/customization.xsd |
setupCustomTyp | /xsd/setup/v2022_1_0/customizationTypes.xsd |
tranBank | /xsd/transactions/v2022_1_0/bank.xsd |
tranBankTyp | /xsd/transactions/v2022_1_0/bankTypes.xsd |
tranCust | /xsd/transactions/v2022_1_0/customers.xsd |
tranCustTyp | /xsd/transactions/v2022_1_0/customerTypes.xsd |
tranInvt | /xsd/transactions/v2022_1_0/inventory.xsd |
tranInvtTyp | /xsd/transactions/v2022_1_0/inventoryTypes.xsd |
tranEmp | /xsd/transactions/v2022_1_0/employees.xsd |
tranEmpTyp | /xsd/transactions/v2022_1_0/employeeTypes.xsd |
tranFin | /xsd/transactions/v2022_1_0/financial.xsd |
tranFinTyp | /xsd/transactions/v2022_1_0/financialTypes.xsd |
tranGeneral | /xsd/transactions/v2022_1_0/general.xsd |
tranPurch | /xsd/transactions/v2022_1_0/purchases.xsd |
tranPurchTyp | /xsd/transactions/v2022_1_0/purchaseTypes.xsd |
tranSales | /xsd/transactions/v2022_1_0/sales.xsd |
tranSalesTyp | /xsd/transactions/v2022_1_0/saleTypes.xsd |
For more information, see the NetSuite SOAP API Documentation.
Example of Use - Get Records from Saved Search on Custom Record
The following API call returns records from save search on custom record:
Action: Search
Body: <platformMsgs:search><platformMsgs:searchRecord xsi:type="setupCustom:CustomRecordSearchAdvanced" savedSearchId="1"/></platformMsgs:search>
Note
The opening and closing tags should contain the action name. In the example, the action is Search. The tags contain platformMsgs:search.
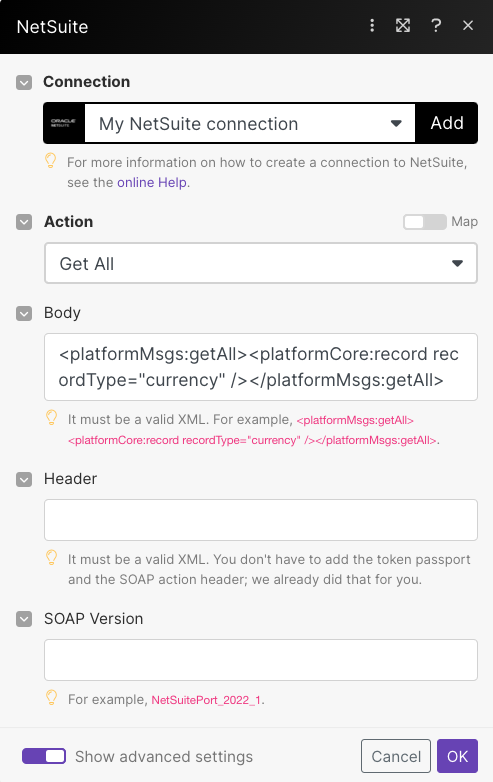
Example of Use - Get All Messages
The following API call returns all the messages from your NetSuite account:
Action: Get All
Body: <platformMsgs:getAll><platformCore:record recordType="currency" /></platformMsgs:getAll
 |
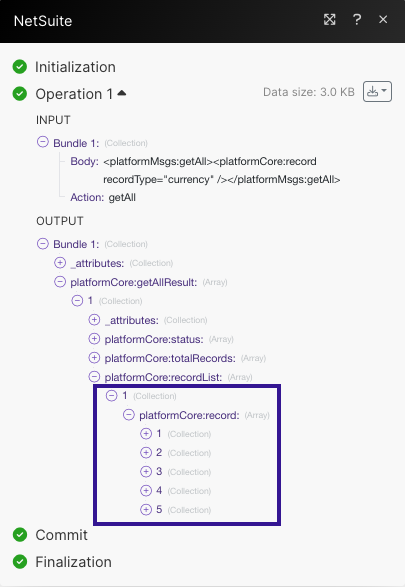
Matches of the search can be found in the module's Output under Bundle. In our example, 5 messages were returned:
 |
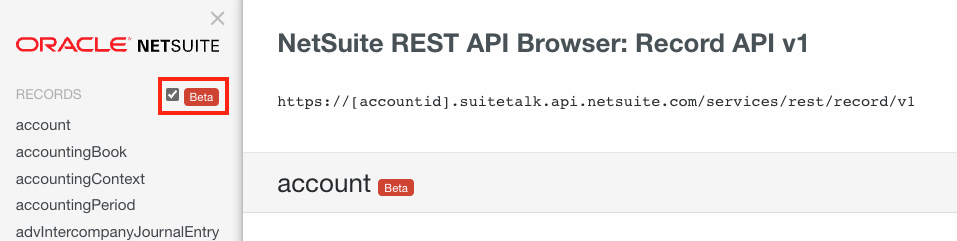
Performs an arbitrary authorized REST API call.
Note
The Beta endpoints are available only if you are enrolled and have joined the Oracle NetSuite Beta programs.
Connection | |
URL | Enter a path relative to |
Method | Select the HTTP method you want to use:
|
Headers | You don't have to add authorization headers and content type as they are already added for you. |
Query String | Enter the request query string. |
Body | Enter the body content for your API call. It must be a valid JSON string. |
For more information, see the NetSuite REST API documentation.
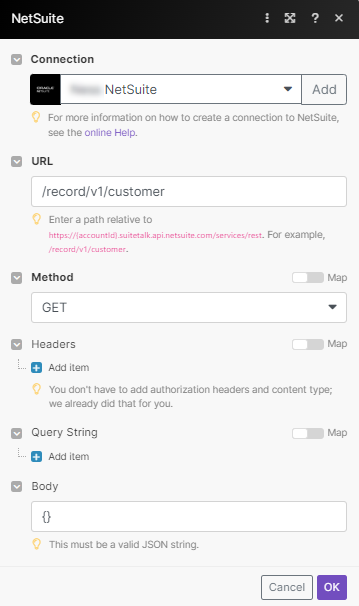
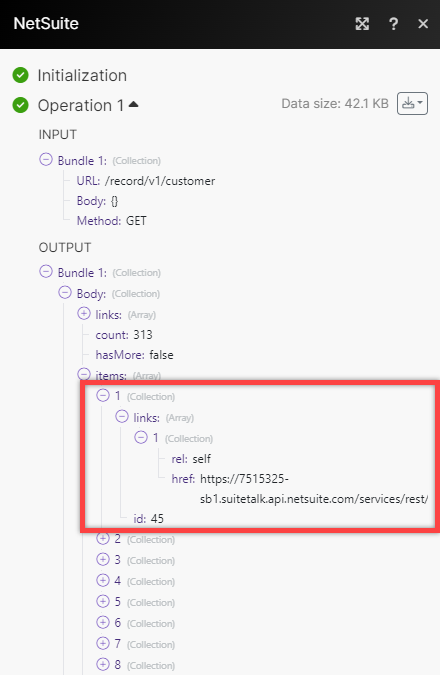
Example of Use - Get All Customers
The following API call returns all customers from your NetSuite account:
URL: /record/v1/customer
Method: GET
 |
Search results can be found in the module's Output under Bundle. In our example, 313 customers were returned.
 |
Performs an arbitrary authorized RESTlet API call.
Note
Before using a module, upload your script file to your File Cabinet and create a script record and a script deployment record for it in your NetSuite account. Read more here.
Connection | |
Script ID | Enter the script record’s ID. |
Deploy ID | Enter the deployment record’s ID |
Method | Select the HTTP method you want to use:
|
Header | You don't have to add authorization headers and content type as they are already added for you. |
Query String | Enter the request query string. |
Body | Enter the body content for your API call. It must be a valid JSON string. |
Executes a SuiteQL query.
Connection | |
Query | For more information on building a query, visit the NetSuite documentation. |
Limit | The maximum number of results to be worked with during one execution cycle. The number must be between 1 and 3200. |
Offset | The number of results to be skipped, it must be divisible by the page limit 100. Use this field with a repeater module only if you want to get more than 3200 results. |
For more information, see the NetSuite SuiteQL documentation.
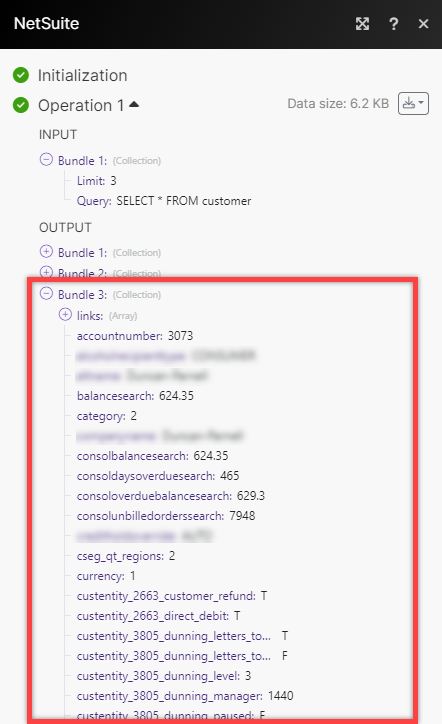
Example of Use - Customer Information
The following SuiteQL Query returns information for three customers from your NetSuite account.
Query: SELECT * FROM customer
Limit: 3
 |
Results can be found in the module's Output under Bundle. In our example, 3 customers and their information were returned.
 |